
The Mini 3 is an excellent drone for beginners for two reasons
- The weight is below the threshold of 250 grams, which puts it under more relaxed regulations in many countries
- It has tridirectional sensors with an efficient system for the detection and avoidance of obstacles, crucial for the safety of inexperienced pilots
Other articles you might find interesting
- The most common mistakes to avoid with the Mini 3 and Mini 3 Pro
- Return to Home, more details on this important functionality in my dedicated article
- Fly over water with the Mini 3 Pro
If you prefer to watch this as a video, you will find my YouTube version at the end of this article
Set up for the First Flight
Obstacle sensors
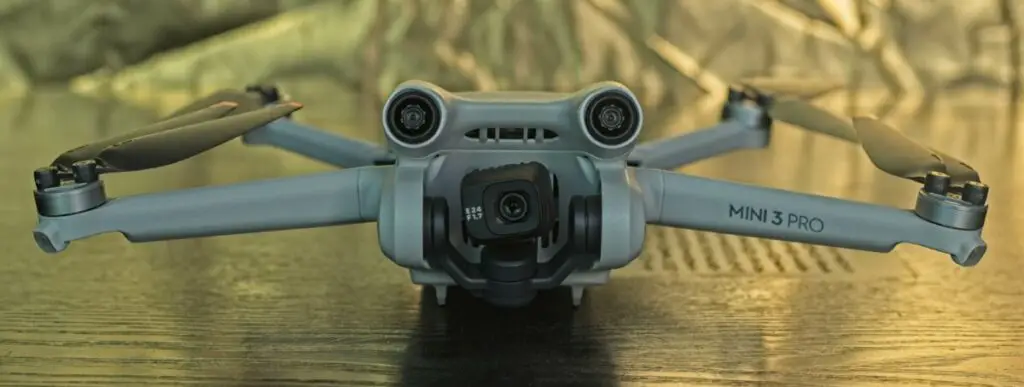
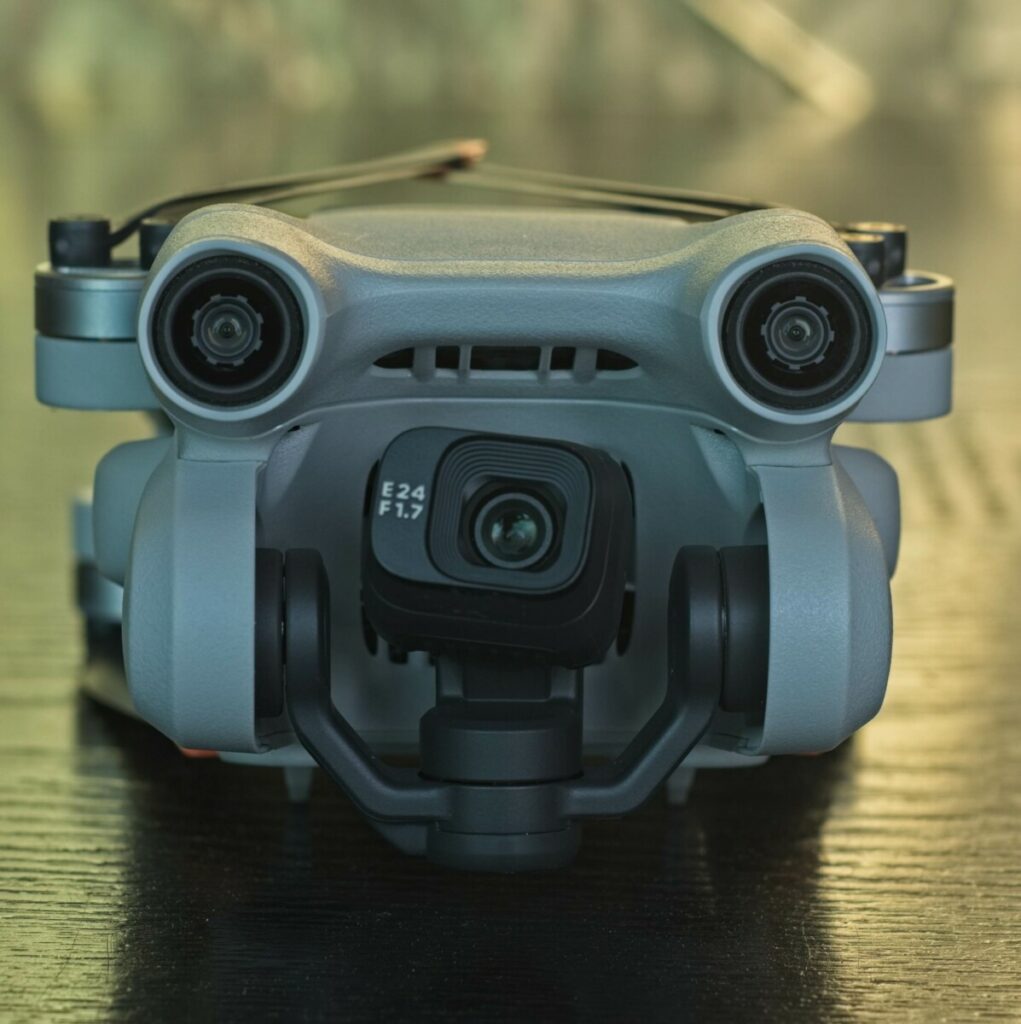
The first thing we notice is the protruding pair of front obstacle sensors above the camera
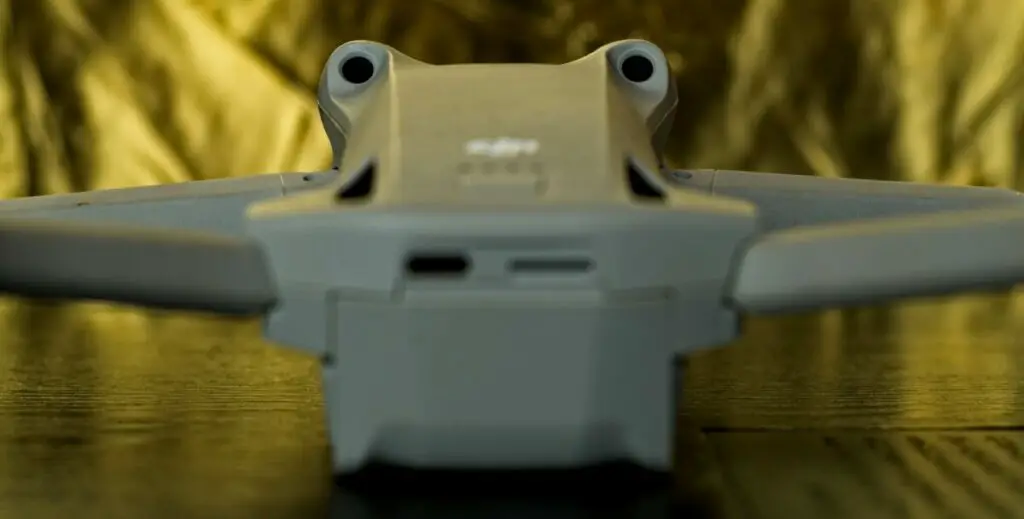
In the same enclosure, two sensors look backward and the fuselage is shaped in a way that allows them to see through. There is also a pair of sensors facing downwards
There are no lateral sensors, but the broad angle of the front and back sensors protects the drone when moving diagonally forward or backward. A lot of care is needed when flying sideways or circling, as the sensors cannot detect obstacles placed at 90 degrees
The same goes for obstacles above the drone. I will analyze the behavior of the drone when encountering obstacles in the chapter about Settings. For more details, please check my in-depth article about the obstacle avoidance system of the Mini 3 Pro
Gimbal, Wings, Propellers
The camera has a stabilized 3-axis gimbal like any other drone of the current DJI line, but it is the only one that can rotate 90 degrees for vertical videos and photos. It has also an extended upward tilt, allowing it to reach the top of the sky
Before flying the wings must be opened. The pair at the front has to be pushed downward, while the ones at the back rotate laterally. It is possible to start either from the front pair or from the back one
The propellers are much bigger than the ones of the Mini 2. Some spare ones are supplied together with a small screwdriver. One pair of props show a small line near the screw, make sure you replace them with the corresponding one
Battery
At the back, there is the enclosure for the battery. To take it out open the front arms first, then push the two buttons at the sides towards the inside and gently pull the battery backward
With Mini 3 Pro there are two different choices for battery
- The regular battery supplied with the drone is labeled Ultralight 249 grams
- An Intelligent Flight Battery Plus has an announced life of a whopping 47 minutes, versus 34 for the regular battery, but it is heavier and it is not available for sale in old Europe
Above the battery, there is a USB-C input for charging the drone, or for direct connection with a computer for downloading photos and videos stored in the internal memory
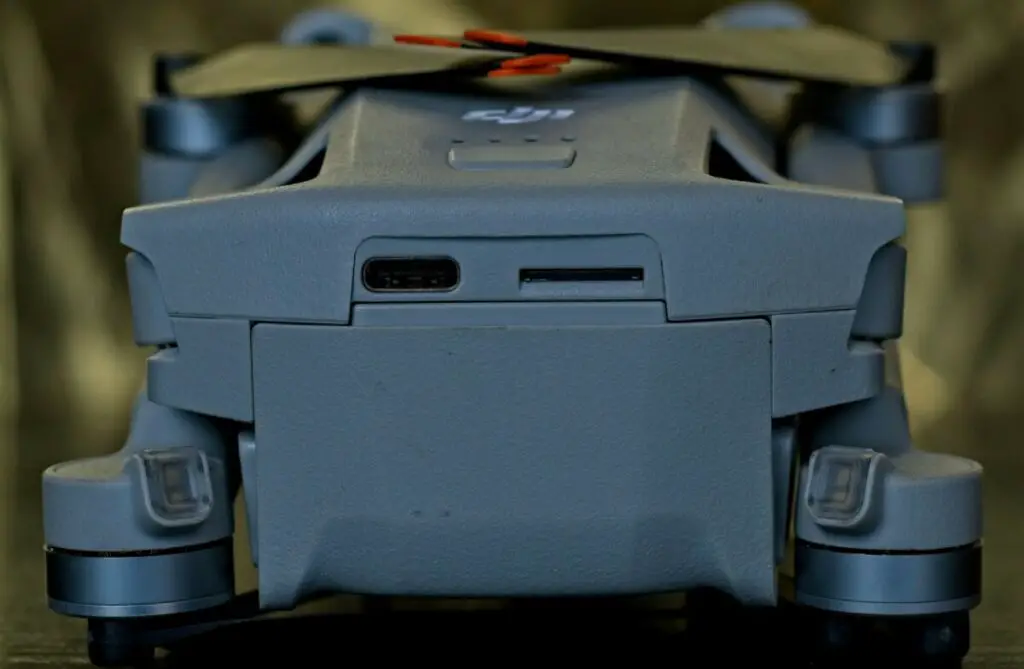
Next to it, there is a slot for a memory disk. The internal storage of the Mini 3 is extremely small at 1.3 Gb, so using a memory card is mandatory
At the top, there is a switch to turn on the drone. If we press it once, the level of the battery will be shown by four LEDs
To turn the drone on press once and immediately after press and hold, after a few seconds, the young boy will say hello. The same goes for turning the drone off: press once and then press and hold
As with all other models, it is possible to purchase a fly more combo with two extra batteries, extra propellers, a shoulder bag, and a battery charging hub for three batteries that will be charged sequentially
Remote Controllers
1 – RC Controller
The Mini 3 Pro can be purchased with the RC controller, with the traditional RC N1, or even without any controller, which is handy for owners of other DJI models
The RC controller has a built-in screen and doesn’t need mobile devices and cables
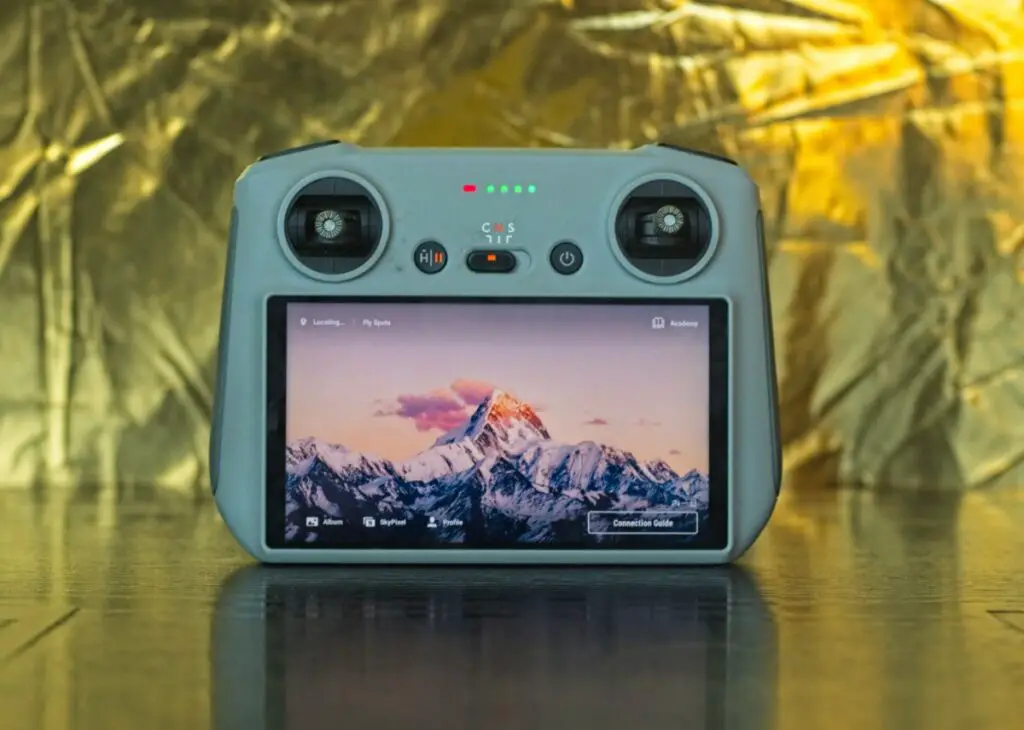
I find that the screen has more luminosity compared to most tablets and it makes it very easy to record the screen. It is rated at 700 Nits of luminosity
More info about the RC controller in this dedicated article
2 – The RC N1 Controller
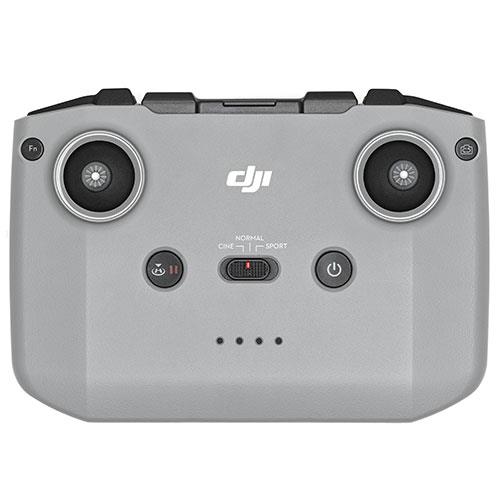
A cheaper alternative is to purchase the Mini 3 with the traditional RC-1N controller
It doesn’t have a built-in screen, so we need to use a smartphone or a tablet to be placed on a clamp and attach the corresponding cable that is stored inside the clamp
DJI Fly app must be installed by going to the Apple store for iPhones or tablets, or to the DJI downloads website for Android devices
There is only one function button on the left and only one scrolling wheel at the top to tilt the gimbal up or down
3 – Without a Controller
For the first time, there is also the possibility to purchase the drone without any controller at a cheaper price, this is aimed at people who already own another DJI model with a controller
How to Use DJI Fly App
General Settings
When using the Mini 3 Pro for the first time, an internet connection is needed to update the firmware and activate the aircraft
When turning on the controller, after a few seconds we are presented with this screen. After turning on the drone, this other screen appears and we can press on the icon GoFly. We are now on the main page of DJI Fly app
To the left, in the middle, there is a button for taking off. Tap on it to access the auto take-off button
By pressing and holding on the circle take off, the drone will take off and hover at a height of about one meter
On the top left, there is an arrow icon that will take us back to the previous screen
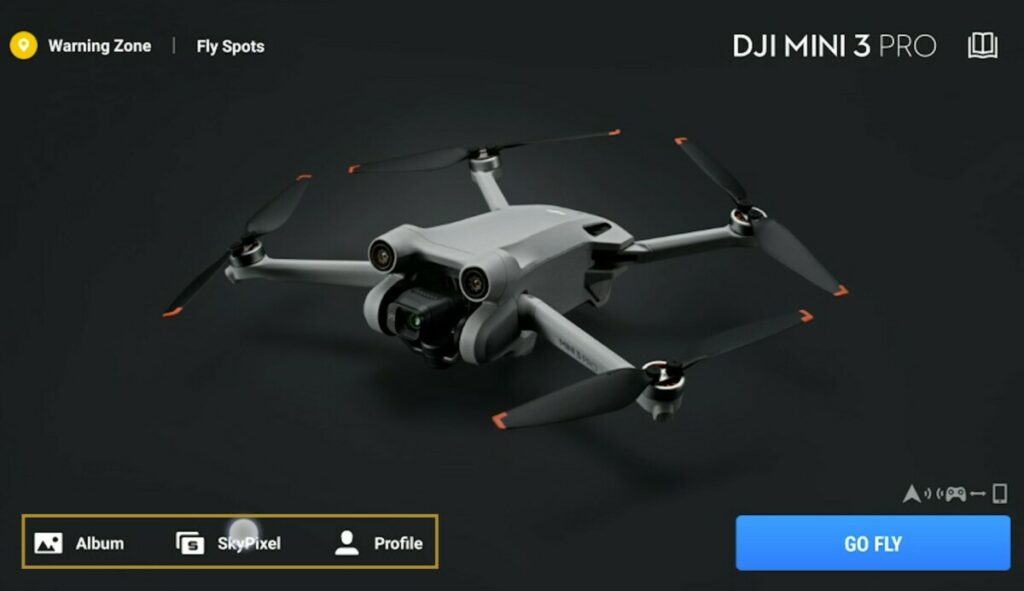
Tap on the Album icon on the lower left to access all the photos and videos contained in the storage of the drone
The next icon is for DJI’s social media SkyPixel
Then we have an icon for our profile, containing the Flight data center with the log of all the flights made with the drone
On the top right-hand corner, there is an icon to access some tutorials made by DJI
Let’s go back to the main page by pressing on GoFly. On the top left, an indicator shows which of the three flying modes is currently active, Cine, Normal, or Sport. They are selected using the switch in the middle of the controller
A display shows the altitude zone, or some warning if it is not possible to take off for technical reasons or because of a restricted zone, or for a weak GPS signal. By clicking on it extra details are shown
To the right, some icons show the percentage of battery left and the estimated remaining flight time. Click on the circle icon for a detailed view of the time left until Return to Home and a forced landing
The next icon shows the strength of the signal between the drone and the remote controller. White bars indicate an excellent signal, yellow bars appear when the signal has dropped somehow, while red bars show a very poor signal, just before disconnection
The following icon indicates that the obstacle avoidance sensors are active when it is white, it turns to red when they are switched off, for example when flying in Sport mode
The next icon indicates the number of satellites connected as well as the strength of the GPS signal
Video/Photo Menu
Further down in the right part of the screen, an icon toggles between Video and Photo modes
When selecting Photo, a vertical menu to the left shows the different modes available: Single, 48MP, AEB, Burst, and Timed shots. More info in my article about photography with the Mini 3 Pro
The next choice is video, with two options:
- Normal is the one used on most occasions
- Slow motion is available at the lower resolution of 1080p
Further down there are several automated shooting modes:
In the middle on the right-hand side, there is a large round shutter, red when we shoot video and white when we are in Photo mode
Tapping on it to take a photo or start recording a video, according to the mode selected
To the left of the shutter, the button at the top toggles the camera from the traditional horizontal position to vertical to shoot videos and photos in portrait
The Mini 3 Pro is the first DJI model of the current line to feature the portrait format, an important option for users active on social media. The vertical format has since been included in the Mini 4 Pro and Air 3
Zoom with the Mini 3 Pro
The button below is for zooming from the normal ratio to two times in 4k resolution
The zoom is optical, so there is a loss of resolution when zooming in. It can be used without harm when delivering video at 1080p, but if the final output is in 4k, the quality will be affected
By holding a finger on the icon and dragging we can progressively zoom from 1 to 2 times. For smoother results, it is possible to use the right wheel of the RC controller
With the RC N1 controller, the progressive zoom is activated by turning the scroll wheel while holding the fn button
In 1080p resolution, it is possible to zoom up to four times, but with a very noticeable loss of resolution, so this function is mainly for exploration
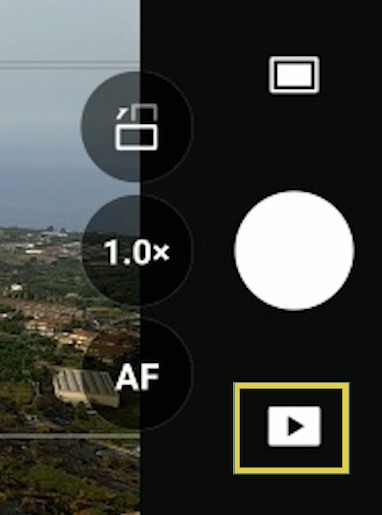
The play button underneath shows all photos and videos contained on the memory disk or internal storage of the drone
Exposure Settings
On the bottom right, a button to toggle between Auto and Manual modes
I recommend shooting in Manual mode, at least for video
In Auto mode, the software will choose the exposure, the only interaction is the EV value to make the image brighter or darker
All details about How to expose video and photos with the Mini 3 and 3 Pro in this article
Resolution and White Balance
The next button to the left is for the resolution and the frame rate
4k is the one widely used, but 2.7k and 1080p are also available

At 4k we can choose frame rates of 24, 25, 30, 48, 50, and 60 frames per second. In frame rates up to 30 fps, a sort of HQ mode is applied
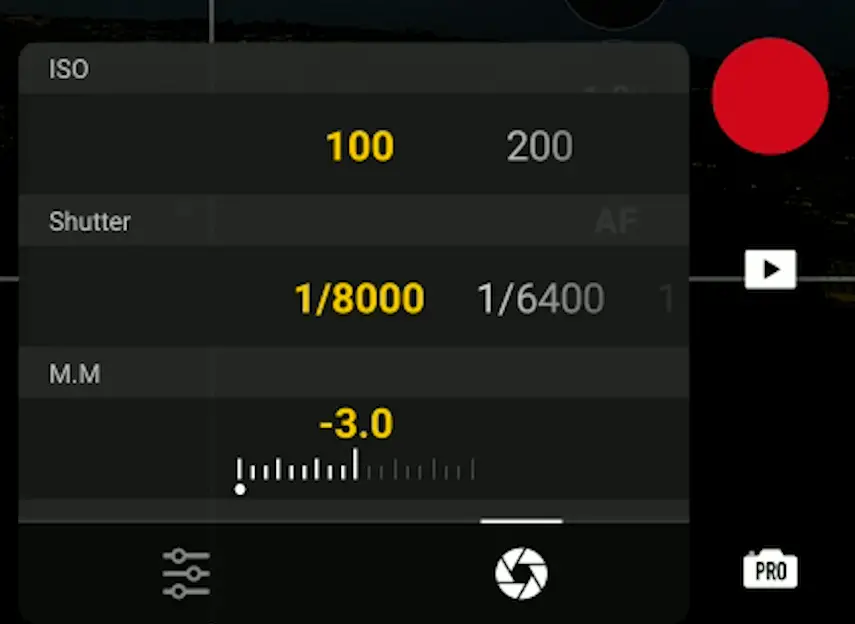
In Pro Mode, we access all the exposure settings from a single window and this is an excellent feature of DJI Fly app. After tapping on the settings area this window appears to modify independently the ISO and Shutter speed values
The icon on the bottom left toggles to another window for all other video parameters: White Balance, Resolution and Frame Rate, Storage Location from the SD card to the internal memory, Codec, and Video Format
The next button to the left, Storage, indicates how much recording time we have left in the memory card according to the mode we are in
I have done specific articles about the Settings for video and the Settings for photos for the Mini 3 Pro
Position of the Drone
On the left, there is an indicator of the distance of the drone from the home point and above an indicator of the horizontal speed. Further to the left the elevation of the drone as well as the vertical speed
On the bottom left corner, this icon opens a radar view of the position of the drone relative to the home point and to the North
By tapping on the bottom right a map of the area again with the position of the drone, the home point, and the controller. By tapping on it a full-screen display of the map to visualize the itinerary traveled by the drone and the orientation of the gimbal. The bottom left corner toggles back to the original icon
I have done an in-depth article about the Map, Radar Map and Attitude mode in the Mini 3 and 3 Pro
Settings Menu
In DJI Fly app, the three dots in the top right corner give access to the general Settings divided into five tabs:
- Safety
- Control
- Camera
- Transmission
- About
I will only show you the useful ones in the different menus. Some of them are hardly ever used and will only confuse beginners
Safety Tab
In the Safety tab, Obstacle Avoidance Action specifies the behavior of the aircraft when detecting obstacles
There are three options:
- Bypass: the aircraft will find the quickest way around obstacles
- Brake: the aircraft will stop just before them
- Off: the obstacle sensor system is disabled
There is an option Disable Sideways Flight just below, in most it must be turned off. If selected the aircraft will not be able to move sideways; This is useful only in rare specific situations
The option Display Radar Map, when enabled, shows on the screen an orange or red line when an obstacle is detected in front, behind, or below the aircraft, together with the distance of the obstacle from the drone
The obstacle avoidance system is a main feature of the Mini 3 Pro, here you find my in-depth analysis
The next series of options, Flight protection, is also important to prevent accidents. The Maximum Flight Altitude is set here
There is a limit set by local regulations, in most cases between 100 and 150 meters
The same goes for Maximum Distance, which is the horizontal distance from the operator. In most countries, the aircraft should be in Visual Line of Sight, at about 300 to 400 meters
Then the Return To Home Altitude: When RTH is triggered, the aircraft will raise to the altitude specified here, fly back towards the home point, and then descend for landing
It is important to set this value at a higher altitude than any obstacle in the surroundings, but not too high, as it will take longer to ascend and redescend, and often in the case of return to home the remaining battery life is short
Further down we have the option to Update the Home Point. This is the point from where the distances are computed and also where the drone will come back when RTH is triggered
It is, therefore, useful to update if your position changes during the flight, for example, when driving, hiking, cycling, or on a boat
Then there is Calibration for the Compass and the IMU. They are to be performed only when asked by the app, or in case of unusual behavior by the drone
After clicking on the button calibrate, some easy-to-follow instructions will be shown on the screen
The next useful option is Find My Drone. The position of the drone and the remote controller will be displayed on a map and it is also possible to have the drone flashing and beeping if some battery is left
Here is my article on how to find a lost drone with more info about Find My Drone
Advanced Safety Settings specify the behavior of the drone in case of loss of signal. There are three options:
- Descend is to be avoided, as the drone could land in water, bushes, or someone’s property
- Return To Home is fine on most occasions, but can be dangerous if we have obstacles above, as an example if we are flying below a canopy of trees
- Hover is often the best option: the drone will remain in the same spot and we can decide what to do according to each situation
Control Tab
In the control tab, we can choose the units to be displayed in meters, kilometers, or imperial
The Subject Scanning option is to be used when tracking. When it is turned on, the camera will recognize people, bicycles, and cars as possible targets and will put a plus sign over them. To select a target simply tap on the plus sign, this is particularly useful with targets in motion
The gimbal is by default set to Follow Mode, in which case the aircraft will maintain the horizon line while flying. In FPV Mode to have the drone behaves like a small plane, leaning to a side while it changes direction
In Advanced Gimbal Settings, we can specify the values of pitch and the yaw rotation speed and smoothness for each flying mode: Cine, Normal, and Sport
Pitch speed is the sensitivity of the gimbal’s upward and downward tilt when turning the wheel, a relatively slow value is preferable for cinematic moves, while a low smoothness value causes an abrupt stop when releasing the wheel, therefore a relatively high value is to be preferred
Yaw rotation is the sideway movement of the drone around its axis when we move the left stick of the controller to the left or to the right. It is again better to set the speed to a low value and the smoothness to a relatively high one
The Gimbal Calibration has to be performed in case of unusual behavior. Simply place the drone on a level base and click on the Auto button
Further down in the Button Customisation, it is possible to assign specific tasks to each of the two buttons on the back of the remote controller, to the two dials on top of the controller, and even to the combination of each of the two buttons with the right dial. I would leave the configuration to the default one to start with
Camera Tab
At the top there are some choices affecting video: the Format is not really important, MP4 is generally used with Windows computers, Mov with Apple
The choice of Color is more important: Normal is a mode already pre-graded and more or less ready to use as it comes out of the camera, while D Cinelike is a flat profile that needs serious post-processing, but is more suitable for high dynamic range situations.
Further down a choice for Coding Format: H 264 is one that has been around for a long time and works with all different software packages. H265 is the codec of the future, as it is more efficient, it can save the same amount of data saving a lot of file size, but the downside is that it is heavier in computer resources and it is not yet recognized by many video editors
In the general section, we can leave the Anti Flicker to Auto mode
The Histogram is the most important tool for exposing. It can be dragged anywhere on the screen
To expose video and photos in manual mode, some space must be left between the last bar to the right and the right edge of the histogram, to avoid burning the highlights, which cannot be recovered
Peaking level is a tool used when focusing in manual mode, as it shows the area in focus in red. But with drones, we rarely use manual focus, so it can be disregarded by beginners
Overexposure Warning is an alternative way to check exposure, as striped bars will appear in the overexposed areas. I find it confusing and never use it
The option Gridlines is for one or more overlays on the screen to help composition. I like to have the rule of thirds on
Further down there is a choice for White Balance between Auto and Manual. I strongly recommend using Manual, at least for video, as Auto causes horrible shifts of color when the luminosity changes
For manual White Balance in sunny conditions, the correct value is around 5500 Kelvins
In Storage, the choice is between an SD card (which is recommended) or internal storage. The available space is displayed and there is a button to format them
Beginners should not worry about the Transmission tag and leave it in Dual Band Auto
In the tab About we can check if we have the latest versions of the firmware