
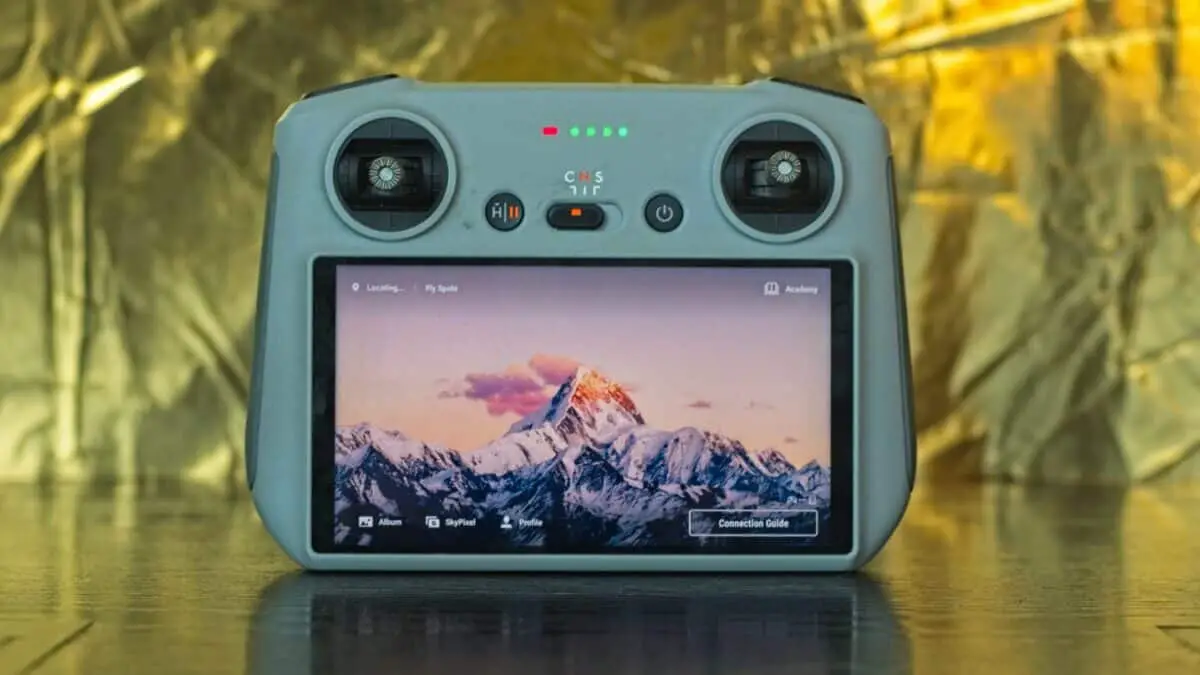
Unlike the traditional RC N1, The RC controller for the Mini 3 Pro has a built-in screen and doesn’t need a smartphone or tablet. This is a crucial advantage, just one device to charge and carry. It is well-designed and fits perfectly in the hands, all the controls are easy to reach
When buying a Mini 3 or Mini 3 Pro there is a choice between the traditional RC N1, or the new RC with a built-in screen
It is also possible to buy the drone without any controller, which is handy for users who already own other models. The RC controller is also available for standalone purchase, as a later upgrade
Related articles about the Mini 3 Pro you may find interesting:
- Beginner guide to the Mini 3 Pro
- Camera Settings for Video
- Camera Settings for Photography
- How to find a lost drone
- How to transfer files to computer, phone, or tablet
- Return To Home tutorial
If you prefer to watch it as a video, you will find my YouTube version at the end
Specs
| Display Size | 5.5″ |
| Resolution | 1080p at 60 fps |
| Brightness Value | 700 nits |
| Weight | 390 grams |
| Charging Time | 4 hours |
Features
The RC controller doesn’t need any other remote device, and no cables to connect
Simply turn on the controller, which boots up in less than 30 seconds, switch on the aircraft, and is ready to go in less than a minute. Also, we don’t have to worry about notifications disrupting the flight
The weight is practically the same as the RC N1 (387 grams), but with the traditional controller, we must add the weight and the space in the bag taken by a smartphone or a tablet
After removing the sticks, the new RC controller fits perfectly in the Mini 3 bags and is an excellent solution for hiking and traveling
The brightness value is 700 Nits
With the RC N1, I always use a tablet and I find the RC controller much brighter with much better visibility in sunny conditions
Some premium smartphones have a slightly higher Nits value, but they tend to dim in sunny conditions to avoid overheating, while the RC controller maintains the same luminosity in any conditions
The RC controller contains a compass to register the correct position. Occasionally it needs to be calibrated. All the details needed are in my specific article
When it was released, the RC controller was available only with the DJI Mini 3 Pro
After a firmware release, it is now compatible with the Mavic 3 and the Air 2s
A Guided Tour
Front
On the front, there are two removable sticks
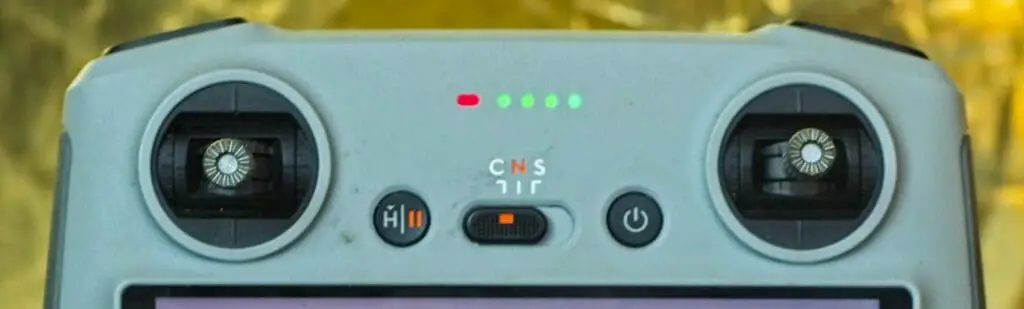
On the top, some LEDs. the four green ones to the right indicate the battery level, the one to the left is initially red, but it turns green when the connection with the drone is established
The button to the left starts a Return To Home if we press and hold. With a quick press, the drone pauses immediately in flight and exits any automated move like Master Shots, Quickshots, or Hyperlapses, which is useful for preventing accidents
In the middle, there is a selector for the speed modes:
- Cine
- Normal
- Sport
To the right the main switch. by pressing it once the 4 LEDs show the battery level; a short press followed by a long one to power the controller; the same to switch it off
Top
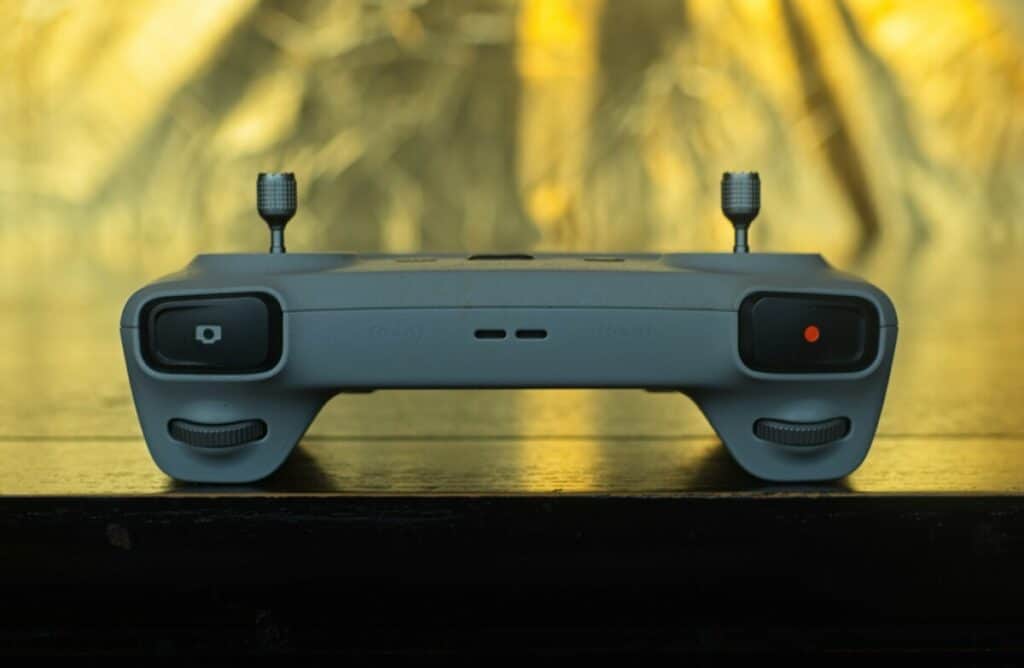
On the upper side, there are two buttons
- The one to the left to record video
- The one to the right is the photo shutter. By pressing it halfway it will focus on the middle of the screen if we are in autofocus mode
Below the two buttons, there are two wheels:
- The one on the left tilts the gimbal up or down
- The one to the right by default controls the zoom, but it can be customized, as we will see later
This second dial is not present in the RC N1 controller and produces a much smoother zoom compared to simply dragging a finger on the screen
Back
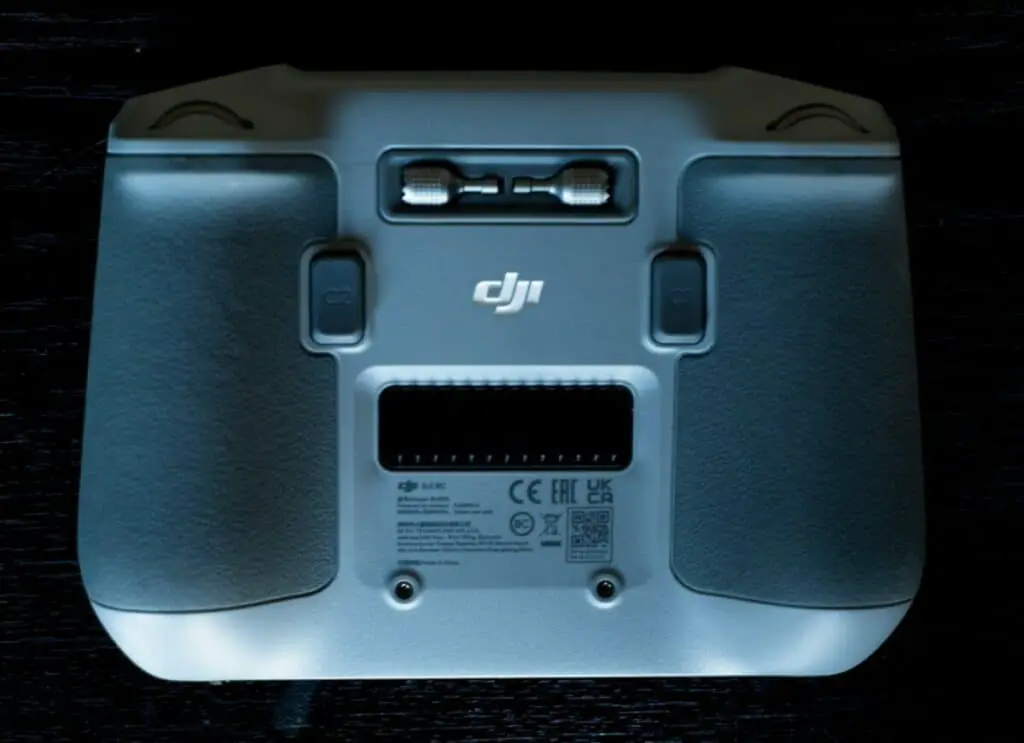
On the back the are two cavities to store the two control sticks and two buttons that can be customized in the Control tab of the settings, by opening Button Customisation
By default the button to the left is set to toggle the tilt of the vertical orientation of the gimbal from top down to facing forward
The other button to switch between portrait and landscape orientation, but there are several other options
It is possible to modify the action of the right dial, the one normally assigned to the zoom
It is also possible to customize the action of the right dial combined with each of the two buttons
You will find instructions on how to customize the buttons for photography here, and for video here
Bottom
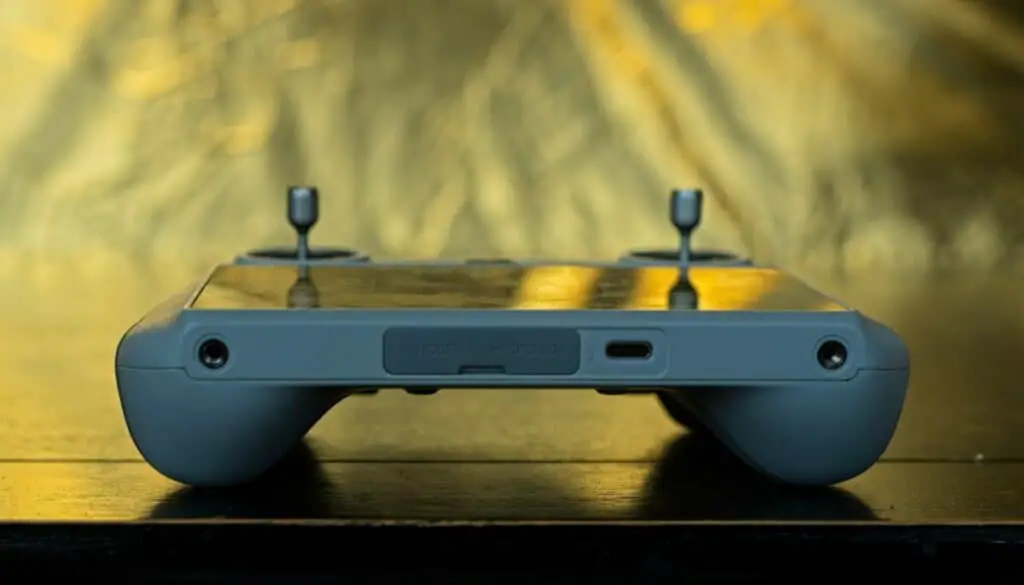
On the bottom to the right, there is a USB-C port to charge the remote control from the main or with a data bank, even while it is operating
In the middle, through a small flap door, we access another USB C port that can be used for attaching a USB microphone or a hard drive, it can also charge another device like a smartphone.
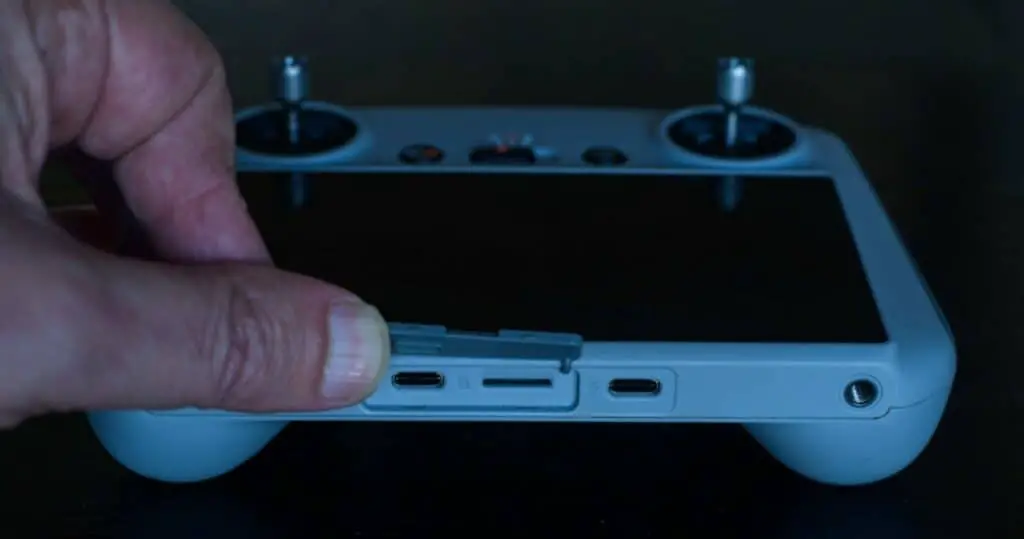
The microphone can be used to add voice or sound to a screen recording, but not on video recorded with the drone. The sound will come from the area around the controller, not from the drone
The controller has 8GB of storage, but they are mostly used for the system, only a couple of Gb are available for storage
This is where the other slot comes into play: we can insert a micro SD card to store screen recordings, snapshots, and if needed the cached low-res video files and photos
How to Use it
By swiping down once at the top of the screen we can visualize:
- The local time
- The status of the SD card
- The battery level,
- Icons representing other devices connected, like a microphone or a headphone
By swiping down twice we access the main screen for functionalities and settings of the controller
To the left, we can explore the content of the mini SD card, if we have one connected
By swiping to the right we return to the previous screen, if we swipe up we exit the settings and return to DJI Fly app
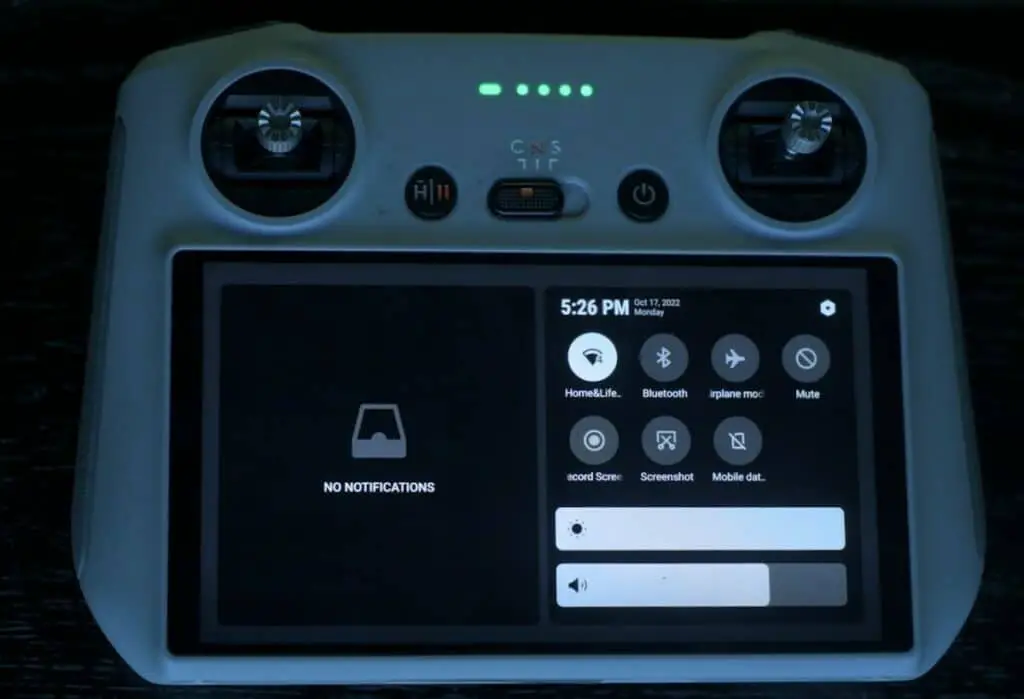
On the right half of the screen on the top right, we access a menu of settings through the gear icon, where we can choose an internet connection. It is needed in case of firmware updates or for accessing the maps
When the aircraft takes off the internet connection of the remote controller is switched off
To access the maps in location there are two possibilities:
- To get an internet connection with your smartphone or tablet, if you have set up a hot spot
- To browse the maps of the location we intend to go at different zoom levels to store them in memory
On the right part of the screen, there are 7 icons:
- To connect to the internet if a network is available
- Press and hold the next one to pair a Bluetooth device such as a headphone
- To choose Airplane mode
- To mute most of the messages we receive during the flight
- To record the screen. I use it all the time and find it very useful. An icon will appear showing the recording time and a button to stop recording, we can move it out of the way by simply dragging it
- To take a screenshot. After having composed the shot, simply tap on the icon. Screen recordings and snapshots will be shown on the notifications on the left part of the screen
- Mobile data
More features are available on the landing page of DJ Fly app by tapping on the Profile icon:
- Flight Data Center
- Find my drone
- Firmware updates
More details about the use of the map and the radar are in my dedicated article
DJI RC Controller Signal Transmission

The antennas are internal, housed on the top of the controller, between the shutters for video and photo. It might be feared that not having external antennas, like all other controllers, could reduce signal strength
I have tested the range with both the RC N1 and the new RC controller and I have not found major differences in signal strength, even though I do have transmission issues with my unit with both controllers, in areas with strong interferences
More detail about Signal transmission with the Mini 3 Pro in this article
DJI RC Controller Limitations
One limitation of the RC controller is that it cannot access third-party apps, unlike the much more expensive RC Pro. At the moment it only works with DJI Fly app
This is something to bear in mind for users that absolutely need Waypoint, which may become at some point available through other apps like Litchi, as is the case for other models of the DJI prosumer line
Final Verdict
Do I recommend purchasing the RC controller, absolutely! I use it all the time, not only with the Mini 3 but with the Mavic 3 too. After a firmware update, it is now compatible with the Air 2S
When I use the Mini 2 and I have to go back to the old RC N1 it feels very cumbersome