
The most important video camera settings for video in the Mini 3 Pro are White Balance, Resolution, and Frame Rate, as well as the ones for exposure, ISO, and Shutter Speed. It is possible to choose between two different color profiles, Normal and D Cinelike
In this article, I will walk you through all the settings needed to achieve smooth, well-exposed, cinematic footage
If you are interested in the settings of the DJI Mini 3 Pro for photography, you will find them here
Other related articles about the Mini 4 Pro:
- Beginner’s Guide
- How to transfer files to a computer
- How to use Map, Radar, and Attitude Mode
- How to calibrate Compass, IMU, Gimbal and Controller
- Return to Home Tutorial
If you prefer to watch it as a video, you will find my YouTube version at the end of this article
General Video Settings
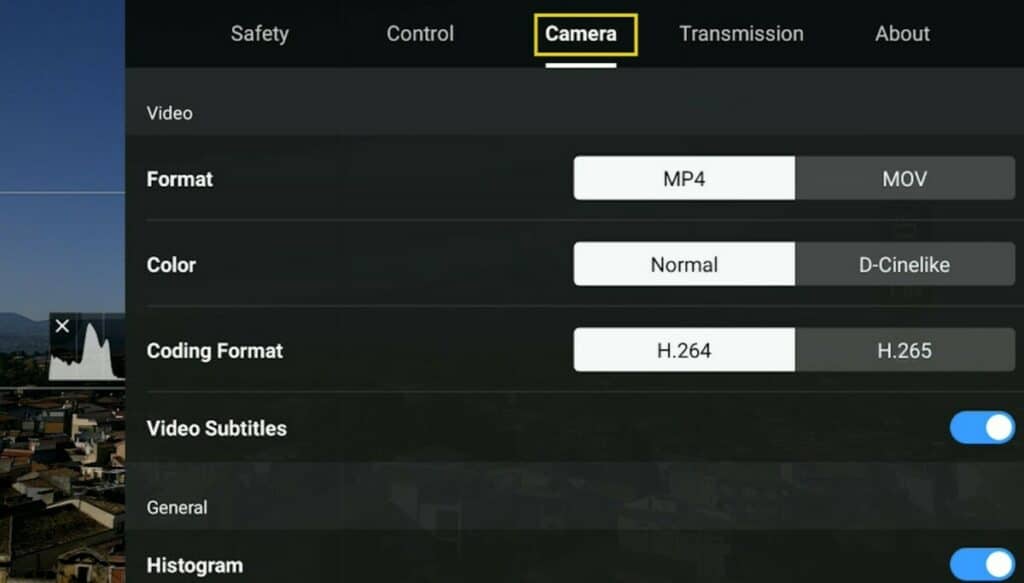
We access the Settings for video by tapping on the three dots on the top right of the screen and selecting the Camera tab
The menu is context-sensitive, in other words, it is different in video mode compared to photo mode
Settings Specific to Video
The first item, Format is not that important. When using a Windows device choose MP4, for an IOS-based device go for MOV, but it doesn’t make much difference
Then we choose the Coding Format. H264 has been around for many years and is still widely used. H265 is the format of the future, it has the advantage of producing smaller files without loss of quality, but it requires more computing power, also it is not yet recognized by some programs
The option Video Subtitles can be disregarded by most users. When it is selected a file containing all the EXIF for each video file is created. I always turn it on, as it allows me to use a program named VLC Media Player to check the camera settings for each clip
Anti-flicker reduces artifacts when filming under artificial light. In the USA (and some other countries) the frequency of the main electric supply is set at 60Hz, while in Europe it is at 50Hz. This setting can be left on Auto

Tools for Exposure
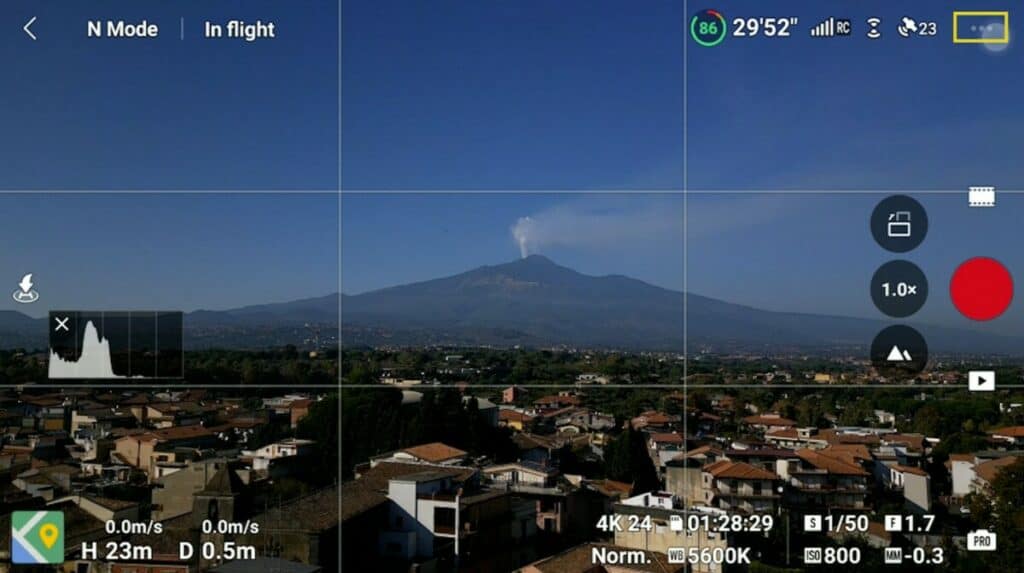
The Histogram is the only tool I use for exposing, therefore I have it on all the time. I always check that no bars touch the right edge of the histogram to prevent burning the highlights.
Bars touching the left edge show that part of the shadows will be very dark. It is acceptable up to a certain point, as they can be recovered while editing, but avoid having plenty of bars bunched against the left edge
More details about the use of the histogram in my article How to expose video and photos with the Mini 3 and 3 Pro
Peaking levels highlight in red the areas in focus. I only use it when focusing manually on a subject close to the camera. On all other occasions, I keep it off as I find it distracting
Overexposure Warning when selected shows zebra lines on overexposed areas. I find it very distracting and never use it
Then we can overlay Gridlines. I generally use the one in the middle to apply the Rule of Thirds
When filming with drones, we often have the horizon line in the frame. Rather than having it in the middle, it is more interesting to divide the scene into thirds and have the horizon either on the top or on the bottom third
In other occasions, especially for top-down shots, we might want a symmetric framing, in which case the same overlay helps position the subject
Color Profiles
The Mini 3 Pro has two color profiles for video:
- Normal is an 8-bit profile preprocessed internally, ready to use immediately after filming. It is the one for users who need to post their footage immediately on social media or for others who don’t rely on computer editing
- D Cinelike is a 10-bit relatively flat profile meant for serious computer post-processing using LUTs
A 10-bit profile can display 1.7bl colors, vs 16.7 ml for 8-bit. This translates into a better rendition of shades of colors and fewer artifacts
This article explains in-depth the differences between the two color profiles: Normal and D Cinelike
More details about VIdeo quality with the Mini 3 and 3 Pro in my specific article
Advanced Gimbal Settings
In the Control tab of the Video Settings we find Advanced Gimbal Settings
In Advanced Gimbal Settings it is possible to modify the sensitivity of the left stick and the left wheel of the controller
By default, they are way too sensitive, and this leads to abrupt transitions
We can set Pitch Speed, Pitch Smoothness, Yaw Rotation Speed and Yaw Rotation Smoothness
To combine smooth and slow pans with other moves, it is suggested to modify the advanced gimbal settings

Pitch Rotation Speed controls how fast the gimbal turns up or down when using the left wheel of the controller; I like to set it at a very low value
Pitch Smoothness controls how quickly the gimbal comes to a halt when we release the wheel. I prefer a value slightly above the midpoint
Yaw is the horizontal rotation of the gimbal. I prefer a low Yaw Rotation Speed and a Yaw Smoothness just above the midpoint
It is possible to modify the value independently for each of the three different speed modes: Cine, Normal, and Sport
To maintain the horizon straight, the gimbal occasionally needs calibrating, All the details needed for calibrations are in my specific article
Exposure Settings
In the DJI Mini 3 and 3 Pro the aperture is fixed at a very wide value of f 1.7, therefore there are only two settings for exposure:
- ISO
- Shutter Speed
The only model in the DJI prosumer line of drones with a variable aperture is the Mavic 3
Auto Exposure
Let’s start with the settings for Auto exposure, as shown by the icon on the bottom right
Beginners generally start shooting video in Auto Exposure, but there are important reasons why it is better to use manual mode for cinematic footage

In Auto Exposure, the only setting controlling exposure is the overall exposure value (EV). The Mini 3 tends to overexpose, so I prefer to lower the EV value by about 1 stop
It is often possible to recover the darkest areas in a slightly underexposed clip, but nothing can be done to reduce overexposure
Limitations of Auto Exposure
Using Auto exposure we surrender control of ISO and Shutter Speed
Ideally, we want to keep an ISO value as low as possible, although the Mini 3 Pro can manage values up to ISO 400 with hardly any degradation of the footage. In some cases, we need to use a specific value for Shutter Speed
When moving the camera towards or away from the sun the luminosity detected by the sensor changes, the same applies when we tilt the gimbal up from a downward view and vice versa, or when a cloud covers the sky
In case of changes of luminosity in Auto mode, we notice a sudden shift of brightness to compensate, this is very noticeable in the resulting footage and a clear sign of amateur footage
Manual Exposure
Using manual mode we expose for the highest luminosity that will be reached during the clip, to avoid burning the highlight
The exposure settings will remain the same thus avoiding shifts in luminosity. If we need to brighten the darkest part, we can do it smoothly and with more control in post-processing
Manual Exposure Settings
The icon at the bottom right toggles between auto and manual exposure modes
To access the manual exposure settings tap on the area around SS and ISO. In the window, we can set independently the ISO value and Shutter speed
The MM value at the bottom cannot be modified, it displays the luminosity resulting from the values chosen above compared to the optimal exposure computed by the software
I prefer to see a value of about minus 1 stop as the Mini 3 tends to overexpose

More details and examples are in my article about Exposure settings in the Mini 3 and 3 Pro
White Balance
In the exposure window, we can click on the icon on the bottom left to access other settings for video
At the top, we select the value for White Balance, expressed in Kelvins. It is possible to use Auto WB through the icon on the right, but it might lead to unwanted shifts of colors when the luminosity changes
Much better to use manual mode for a consistent value throughout each clip. The value normally used in sunny conditions is 5600k
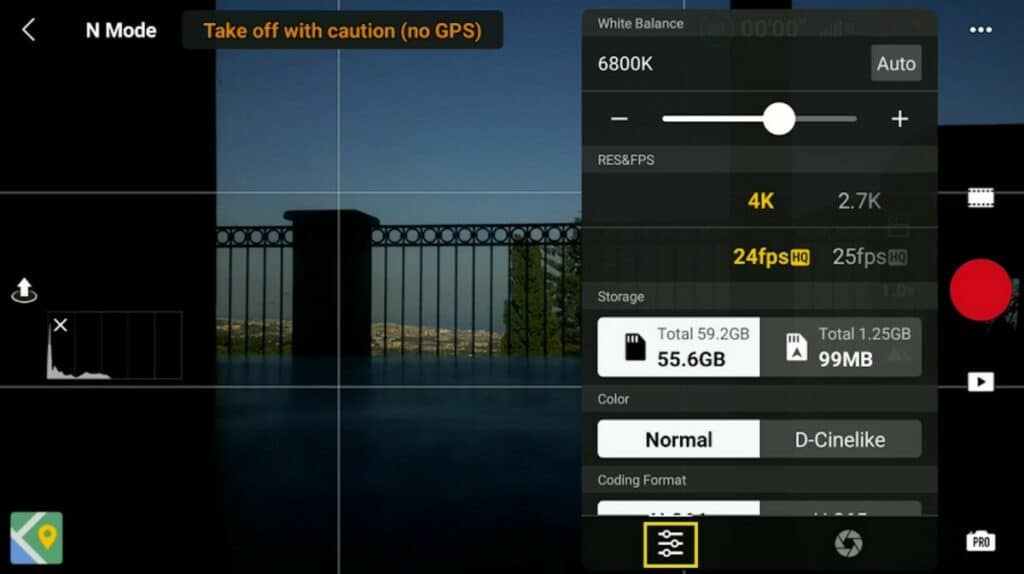
Resolution
By encoding 4k footage into 1080p we obtain a better quality compared to shooting in 2.7k or 1080p
The only reason for not using 4k is the size of the files, as the higher the resolution, the bigger the files

Frame Rate
Below the resolution, we have options for different frame rates
After having chosen the frame rate of the timeline for a project, 24 or 30 fps, it is important to shoot all the footage at the same frame rate as the one of the timeline
In the main video photo menu, we can choose slow motion for extreme results at 120 fps, but sadly it is available only at 1080p
More details on how to use frame rates for slow motion with the Mini 3 Pro are in this article
Below the area for resolution and framerate, we find info about the Storage Space available in the SD card and the internal memory of the aircraft