
The Mini 3 Pro is an excellent tool for hyperlapse, especially with the special battery with longer life. It is crucial to use ND filters to enter the control the shutter speed value and motion blur. The app generates a short movie, but the best results are obtained by processing the individual RAW files
Over the years, I have been shooting thousands of hyperlapses both with regular cameras and with drones. It is a very spectacular technique, but it requires some experience
To know more about this technique, I suggest watching my in-depth article Timelapse vs Hyperlapse tutorial which applies not only to drones but also to ground-based cameras and contains some very interesting examples
You can check the prices for the different configurations of the Mini 3 Pro through the button below (commission earned)
I have made several related articles that you might find interesting:
- Mini 3 Pro photography
- Drone time lapse and hyperlapse for beginners
- Camera Settings for photography with the Mini 3
- Long-exposure photography with the Mini 3 and 3 Pro
If you prefer to watch this as a video, You will find my YouTube version at the end
Hyperlapse with the Mini 3 Pro
Hyperlapses are all about movement. Drones are an ideal tool for hyper lapses as they can move in a very stable way in all directions, like a big slider in the sky
The DJI Mini 3 Pro is particularly suitable, thanks to its excellent camera, good stability in flight, and relatively long battery life of over 30 minutes
Settings
The DJI Mini 3 Pro has a dedicated Hyperlapse mode

We select it by clicking on the icon Photo/Video above the shutter and then on the vertical menu on the right choosing Hyperlapse
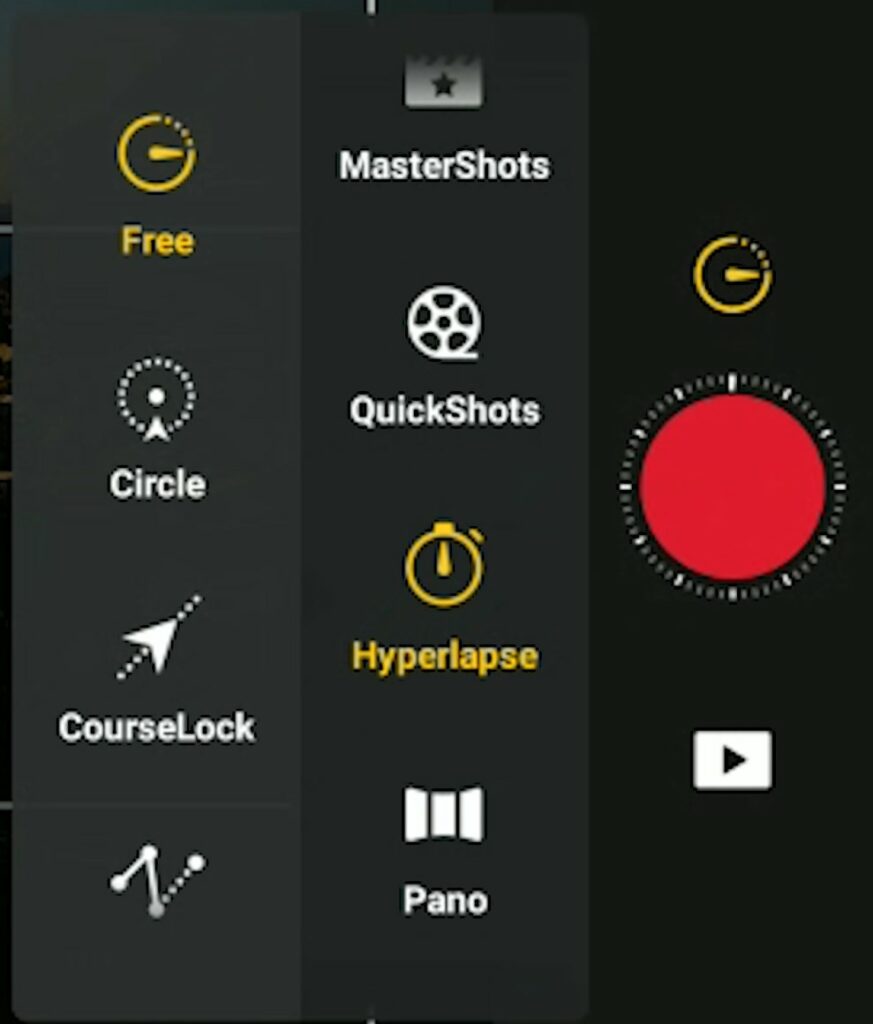
The vertical menu to the left displays the classic four modes: Free, Circle, Course Lock, and Waypoints
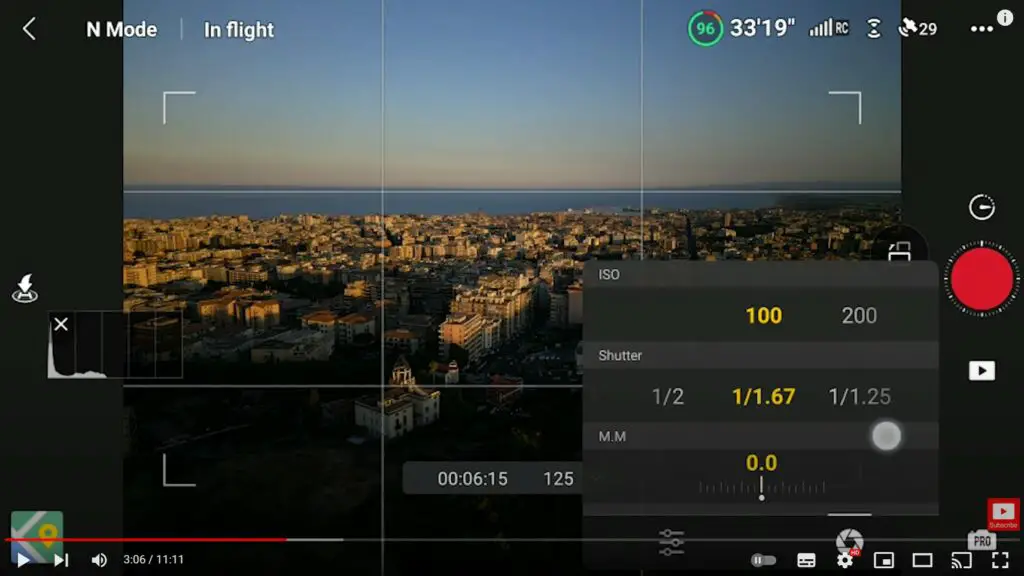
Exposure Settings
By clicking on the icon at the bottom right of the screen we access a window for setting the exposure values. Here we can enter the desired values for ISO and Shutter Speed
A small icon at the bottom left opens another window where we can set the white balance manually, which I strongly suggest to avoid shifts of color
We can choose the resolution of the hyperlapse automatically generated (4k and 1080p)
We can also choose to save each photo in RAW or JPEG format
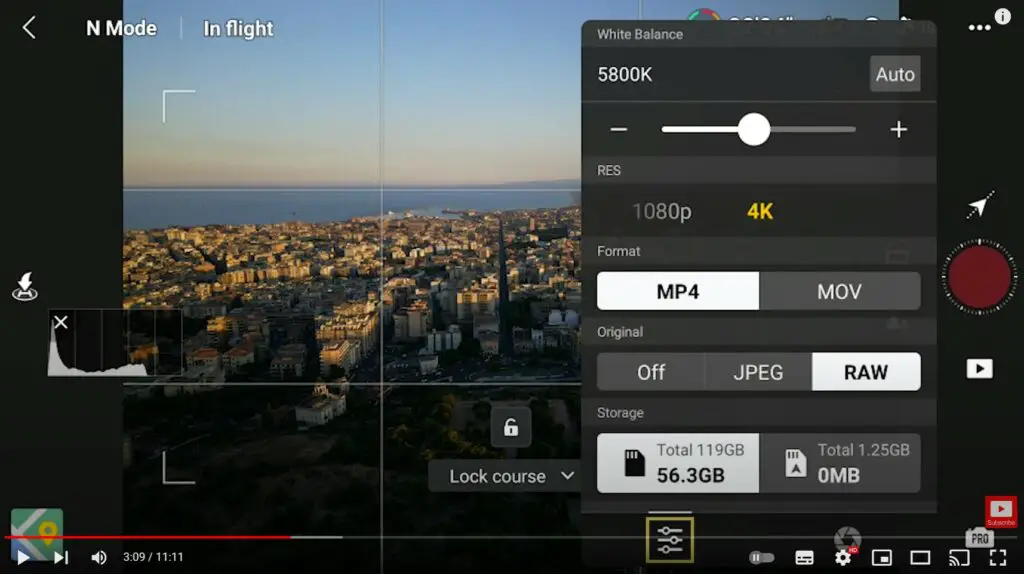
I suggest saving the individual photos in RAW format. By carefully post-processing the individual RAW files we can achieve a hyperlapse of higher quality compared to the short movie automatically generated
To edit all the images and merge them to HDR I have used Luminar Neo.
Here you find my article about this excellent program
You will find info about Luminar Neo together with a coupon for a 10% discount by entering the code “vicvideopic” using the button below
Time Settings
For a hyperlapse, we must select a shooting time compatible with the battery life
We must aim for the optimal amount of motion blur, as we will see later on
We choose the settings after having selected one of the four hyperlapse modes

A small window will appear in the lower part of the screen in the middle, we open it by tapping on the small arrow to the right
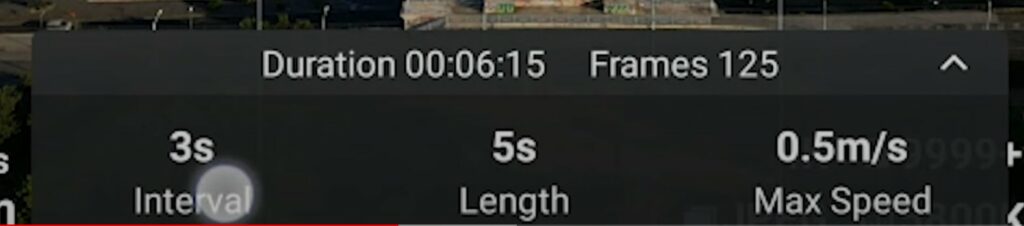
Here we can set the interval in seconds between each photo, the length of the final hyperlapse, and the maximum speed of the drone
The longer the interval between each photo, the faster will be the movement in the hyperlapse. The interval to choose with the Mini 3 Pro with the standard battery will be either 3 or 4 seconds
An interval of 3 seconds is a good choice when the movement in the scene comes from cars, boats, or people walking
When the movement comes mainly from clouds, an interval of 4 seconds is a better choice
In hyperlapses of sunrises or sunsets, longer intervals are preferable, but they can only be achieved when using the Intelligent Battery with a longer flying time
I like to set the length of the resulting movie at around 12 seconds. Assuming a frame rate of 24 frames per second, 300 photos will be needed (300 / 24 = 12.5)
In most cases, I prefer to have a relatively slow maximum flight speed
If the scene contains already some interesting movement I keep the speed near the minimum value to better concentrate on what is happening
Note that with the mode Waypoint, there is no choice for speed, as it will be automatically computed according to the distance traveled and the number of photos
Number of Photos
Hyperlapses are a series of photos shot at constant intervals and then assembled as a video sequence
With a Mini 3 Pro with the standard battery, the Interval Between Photos will start from one every 2 seconds up to one every 5 seconds
The higher the interval, the longer it will take to complete the shooting
In most cases, I like to shoot time lapses of 300 photos, which at 24 fps give me a short movie of 12.5 seconds (300/24=12.5)
| Interval Between Photos | No. of Photos | Shooting Time (sec) | Shooting Time (min) |
| 2 seconds | 300 | 600 seconds | 10 minutes |
| 3 seconds | 300 | 900 seconds | 15 minutes |
| 4 seconds | 300 | 1,200 seconds | 20 minutes |
| 5 seconds | 300 | 1,500 seconds | 25 minutes |
Length of a Hyperlapse
With a traditional camera, we can use longer intervals or go for longer time lapses, but with drones, we are limited by battery life
The longer interval we can use is one shot every 5 seconds, which requires 25 minutes of shooting, plus the time of setting up the shot and returning for landing
In most cases, drone hyperlapses I choose a a length of about 12 seconds. In case of a sunset or sunrise, a longer one would be desirable
This can be achieved with the Mini 3 Pro using the Intelligent Battery with an extended flight time of over 40 minutes which is highly recommended to users particularly interested in this technique, as it allows for longer short movies or higher intervals between photos
Motion Blur, the Crucial Factor for Hyperlapses
In real life moving elements don’t appear perfectly sharp to our eyes
The faster an object moves, the more blur the human eyes perceive around it
Think about a waterfall or the wheels of a fast-moving car
Motion blur is the single most important factor to consider when shooting hyper lapses, as the speed of moving objects is much faster than in real life. The correct amount of motion blur makes them appear as we would perceive them in real life
It is very easy to compute the exposure values needed for the optimal amount of motion blur by using the 180 degrees rule
It is a very old technique used in videography. In the case of timelapses and hyperlapses the rule consists of using the following shutter speed values according to the interval of photos:
| Interval Between Photos | Shutter Speed |
| 1 photo every 2 seconds | 1 second |
| 1 photo every 3 seconds | 1.5 seconds |
| 1 photo every 4 seconds | 2 seconds |
But a drone flying is not as stable as a camera on a sturdy tripod
I find that shutter speed values longer than one second may cause unwanted extra blur
Therefore, in windless conditions, I suggest using a shutter speed of 1 second for intervals of 3 seconds and above
More details about Motion blur, the crucial element of time lapses, in my dedicated article
On some rare occasions, it is possible to get some noise or flicker, I use the excellent denoiser Neat Video to get rid of them
You will find more info about Neat Video including the price through the button below
(commission earned)
Are ND Filters Needed for Hyperlapses?
As we have seen above, to get the correct amount of motion blur, we need to select specific values for shutter speed regardless of the amount of light in the scene
On most occasions, such long values will cause severe overexposure
When shooting hyperlapses we need ND filters to reduce the amount of light entering the sensor to dial in the correct shutter speed value to optimize motion blur
Due to the fixed aperture, the Mini 3 Pro has limited room for exposure adjustment, it is, therefore, crucial to have a set of ND filters and use the correct strength value for each specific light condition
Due to the very wide aperture of the Mini 3 Pro, higher ND values are needed compared to other drones
More info about the use of ND filters for hyperlapses here
Hyperlapse Modes
The Mini 3 Pro has four hyperlapse modes:
- Waypoints
- Free
- Circle
- Course Lock
Waypoints
Waypoints is the king of the hyperlapase modes, the one allowing practically all sorts of moves and the one I use on most occasions
To create a Waypoint mission, we open the window Set Waypoint, fly to the point where we want our hyperlapse to start, frame the shot, and tap the plus sign in the box on the left
The position of the drone, the altitude, and the direction of the camera will be stored in memory
Then we move to the next point of our hyperlapse, frame the shot, and set the second waypoints
The software will handle the smooth transition between the points
It is possible to set several points, but for videography, in most cases, I choose to use only two points, as the transitions between points are in my opinion a bit abrupt
Every Waypoint mission is automatically stored in the app and this is very powerful, as we can retrieve a mission to shoot the same hyperlapse at different times of the day, with different exposure values, in different light conditions, or in different seasons
More details about the outstanding Waypoint Hyperlapse mode in my specific article
Free Mode
Free mode is the only one that allows the use of the two sticks of the remote controller while shooting
But for timelapse where we intend to move in several directions, the mode Waypoint works much better with much smoother results
Therefore Free is to be used only with time lapses with a static point of view
Static time lapses are very interesting when the scene contains a good amount of movement
They are a good test for the stability of a drone while hovering and the Mini 3 behaves very well
The Mini 3 is not fitted with a cooling fan and relies on the air collected while flying. Hovering in a static position for a time lapse might cause overheating, especially in hot weather, therefore some caution is needed
Circle Mode
In Circle mode, the aircraft orbits around the chosen target
We select a target by drawing a box around it, then we choose the interval, length of the video, and speed. Finally, we select the direction, clockwise or counterclockwise
After hitting the shutter, the aircraft for a few seconds rotates in the chosen direction evaluating the scene before starting the hyperlapse
During the hyper-lapse, it is possible to use the left stick of the controller to modify the elevation
Course Lock Mode
Course lock works similarly to the Intelligent Flight Mode Spotlight: we can choose a target and the camera will maintain it in the same position on the frame regardless of the direction of flight, in other words, the camera Is disconnected from the direction of flight
If we don’t select a target, the drone will simply fly forward
In Course Lock mode it is not possible to use the two sticks of the controller to get closer or further away from the target, or to modify the elevation
I rarely use this mode, as much more precise results can be achieved by using the mode Waypoints
Auto-Generated Hyperlapse
The Mini 3 generates a short movie of the hyperlapse at 4K or 1080p resolution
In the current DJI line, the quality of these short movies has drastically improved and this is good news for users who need to quickly post their masterpieces on social media
Obviously using the individual files in JPEG or, even better in RAW, is the way to get the best results
Vertical Hyperlapse
After a recent firmware upgrade, the Mini 3 is the first DJI drone capable of shooting hyperlapses in vertical format
This is a huge feature for users involved in social media platforms. All we need is to tilt the camera to portrait format before entering Hyperlapse mode