
The quality of drone photos improves drastically by choosing the correct exposure values and the most suitable light conditions. Tools like Automatic Exposure Bracketing and 48 MP mode are useful in certain conditions. Several other tricks pave the way to extra creativity
Some tips apply to photography with any camera, others are more specific to images taken with drones
More details can be found in the following articles
- Mini 3 vs 3 Pro photo quality
- Mini 3 Pro exposure settings
- Mini 3 Pro camera settings for photography
- Mini 4 Pro photo quality
- Mini 4 Pro exposure settings
- Mini 4 Pro camera settings for photography
- Air 3 photo quality
- Air 3 camera settings for photography
- Air 3 telephoto lens
If you prefer to watch this as a video, you will find a link to my YouTube video at the end of this article
1 – Time of the Day
Probably the most important tip to get consistently good results in drone photography is to choose the best light conditions
I never shoot in the middle of a sunny day, as the shadows are very dark, the contrast too high and the results are always disappointing
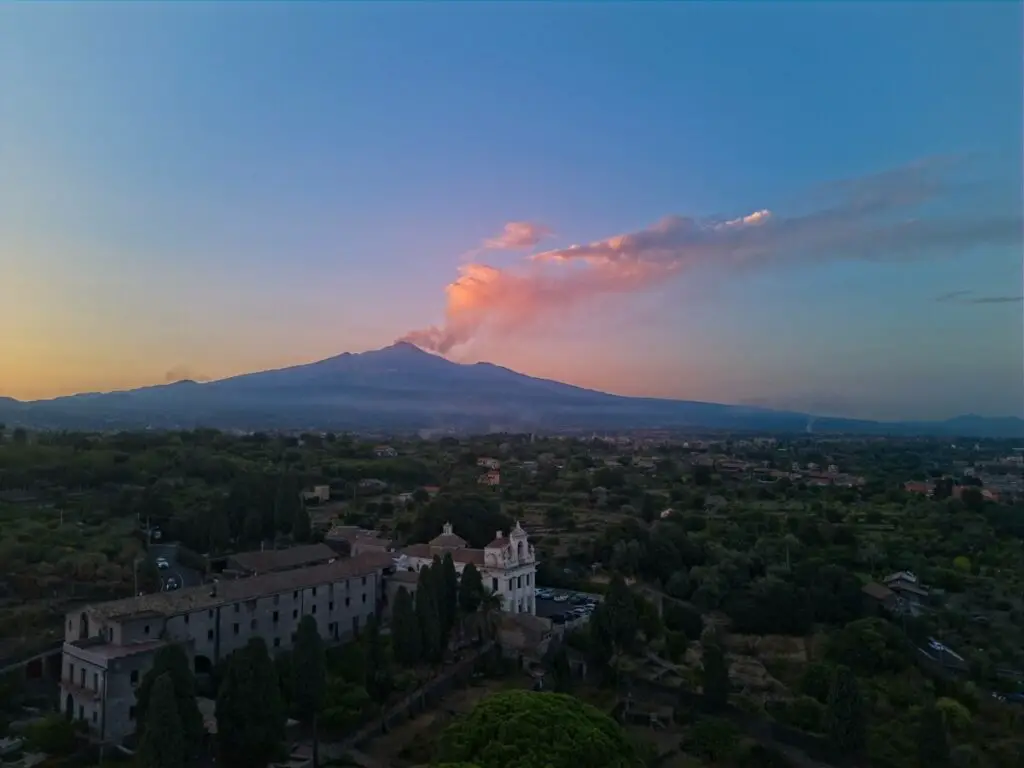
It is much better to choose the so-called golden hour: the first two hours after sunrise or the last two before sunset for much softer shadows and a warmer feel
Another excellent time of the day for drone photography is right after sunset when the street lights turn on and there is still some natural light
In these conditions, we have some control over the lighting of a scene, a bit like being in a photo studio, with the artificial lights acting as the main source and the twilight as a fade light to smoothen the shadows
I have done specific articles about Night photography with the Mini 3 and 3 Pro, and with the Mini 4 Pro
I only take photos in the central hours of the day when the sun is covered by clouds, as they act like a giant softbox, smoothening the shadows
In general, it is much better to have very little difference between the lights and the shadows, in other words, low contrast
It is then easy to increase the contrast to your taste in post-processing while reducing contrast is a much harder task
2 – Correct Exposure
To get quality images it is crucial to get the correct exposure
It is always better to err towards underexposing rather than overexposing, as it is possible to recover dark shadows up to a certain degree, while there is nothing to do with burnt highlights
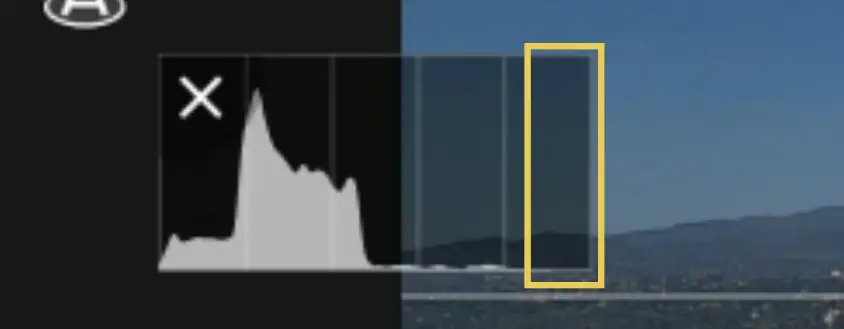
The only tool I use for exposing photos and footage is the histogram. I leave some space between the last bar to the right and the right edge to make sure that the highlights are preserved
When exposing manually, the MM value at the bottom of the exposure window displays the luminosity resulting from the exposure values
Since the Mini 3 and Pro have a slight tendency to overexpose, I prefer to have the value in negative territory, between -0.3 and -1
I always use manual exposure, as it is often useful to control individually the shutter speed and the ISO, the only two values available with most prosumer drones, as the aperture is fixed
By using a longer shutter speed of about 1” with the aid of ND filters, it is possible to get silky waves and clouds, add motion blur to moving subjects, or create some interesting special effects
You will find plenty of examples in my article about long-exposure photography
I also suggest using manual white balance to have consistent colors while editing
With most drones, I like to set the white balance value at around 5500 Kelvins, but the Mini 3 and 3 Pro tend toward a yellowish tone, so with these models, I prefer a lower value of about 5100 Kelvins
3 – Use Automatic Exposure Bracketing
The Mini 3 and 3 Pro have an AEB photo mode
When selected in the Photo menu, the camera will shoot 3 or 5 photos in rapid succession with an interval of two-thirds of a stop between them. I always use AEB mode with five shots when shooting photos for two reasons
- To make sure that I get one photo perfectly exposed, since I have five different exposure values for each of them, much like an insurance policy against wrong exposure
- To merge the five images to HDR with a photo editor to get better results under certain conditions, especially in situations of high dynamic range, like shooting in the direction of the sun. The software will take the darkest part of the image from the brightest photos and the brightest ones from the darkest image, thus reducing the dynamic range
More details about Automatic Exposure Bracketing with the Mini 3 and 3 Pro, AEB with the Mini 4 Pro
4 – 48MP Photo Mode
The DJI Mini 4 Pro, Air 3, Mini 3, Mini 3 Pro have a 48MP photo mode
The Bayer Quad sensor of these models has a real photo resolution of 12MP, but it can split each pixel into four smaller ones, thus achieving a sort of 48MP
Photos taken in this mode have a slight advantage in detail in easy light conditions. This is useful, especially for large prints and deep crops
Experienced users can also merge 48MP photos into a panorama for insane resolution
The downside of this mode is that the resulting pixels are much smaller and therefore collect a lower amount of light, resulting in less info in the shadows and lukewarm results in low-light situations
More detail in my article about the 48MP photo mode in the Mini 3 Pro, and with the Mini 4 Pro
5 – Use RAW Format
With the Mini 3 and 3 Pro, in photo mode, it is possible to save the images in JPEG or JPEG + RAW format
Photos saved in RAW format contain more information, especially in the shadows, and respond better to color grading and color correcting
JPEG photos have a good dose of processing applied, they are in a way pre-cooked, so they leave less latitude for post-processing
With the new generation of DJI prosumer drones, the quality of JPEG images is remarkable, they can be shared on social media without any editing, although they get even better with a slight increase in contrast and saturation
I always suggest saving in both formats. Even for users who don’t do any photo editing, it will be valuable to have a RAW copy of their images for future use
6 – Rule of Thirds
The same scene may look in many cases better, by applying some basic rules of composition
Also, by knowing the rules it is possible to break them
One of the best-known is the rule of thirds, used not only by photographers and videographers but also by master painters in the past
It consists of not placing the main subject in the middle of the images, but rather on a third, either horizontally or vertically, or both
In the Camera tab of Settings, all models have an overlay with a grid to apply this rule
In drone photography, the sky and the horizon are often in the frame. In general, it is more interesting to have the horizon in the upper or lower third rather than in the middle
The same often applies to the main element of a scene: rather than placing it in the middle, a position on one of the thirds can be more appealing
In the case of a moving subject, it is recommended to place it on the third which leaves more space in the direction of the movement
7 – Different Points of View
The same scene looks different from different angles. With drones, we can access unique points of view
I suggest taking several shots of a scene varying the altitude and the angle. Intelligent flight modes like Point of Interest or Spotlight are excellent tools for finding the best perspective for parallax
Try orbiting around the chosen subject or flying in a diagonal line at different heights and distances while taking plenty of photos
Then in front of the computer while sipping an exotic drink choose the ones that offer the best perspective and the most interesting angle
Beginners starting with drones tend to fly as high as possible, but very often the best shots are from a low altitude and closer to the subject
Bird’s eye view photos can only be made with drones and they often result in a completely different rendition of familiar scenes
This tiny island off the East Coast of Sicily is well known to locals, but when I showed top-down photos to friends living in the area, they could not guess what it was
A fumarole in Iceland seen from above looks like an abstract painting by Klimpt
A top-down view of a vineyard might be mistaken for a cashmere blanket
With the Mini 3 and 3 Pro it is possible to shoot videos and photos in a vertical format. It is a feature mostly used for footage, but certain still images fit very well in portrait photos
8 – Use Leading Lines and Geometrical Patterns
Photographers and painters often use lines and geometrical patterns to add interest and to lead the eyes in a specific direction
Drones can move the point of view to different heights, offering even more possibilities to use lines and other geometrical patterns
In post-processing, it is sometimes useful to rotate the shot to find the most interesting angle
9 – Inspect the Location
To make the most of a specific location it is important to know it well
Often when visiting an unknown place the first photo session is mostly for scouting purposes: we take as many photos as possible from different angles and different heights
When analyzing the images taken in front of a computer we often spot the ideal shots for photos to take going back to the same location
A useful tool to inspect an unknown location is Google Earth where it is possible to move around the place with a 3D view on the computer to analyze the scene
When preparing a photographic trip with a drone always inspect the official maps to find out if there are any restrictions due to regulations. Consult the maps of the aviation authority of that country or DJI Fly Safe maps