
The DJI Air 3 is a very versatile drone with a game-changing feature: the dual lens system. The settings for photography are found in the Camera and Control tabs of Settings, in the Exposure/White Balance window, and in the Photo/Video menu near the shutter
Some other related articles you may find interesting:
- DJI Air 3 Photography review
- Air 3 vs Mini 3 Pro photo quality
- Panorama photography with the DJI Air 3
- Air 3 video review
- Air 3 vs Mini 3 Pro video quality
- Air 3 Mastershot tutorial
- Telephoto lens of the Air 3
- Luminar Neo, the program I use for editing photos
- RC 2 remote controller
- Mini 4 Pro and Air 3 Return To Home
If you prefer to watch this as a video, you will find my YouTube version at the end
Where to Find the Settings
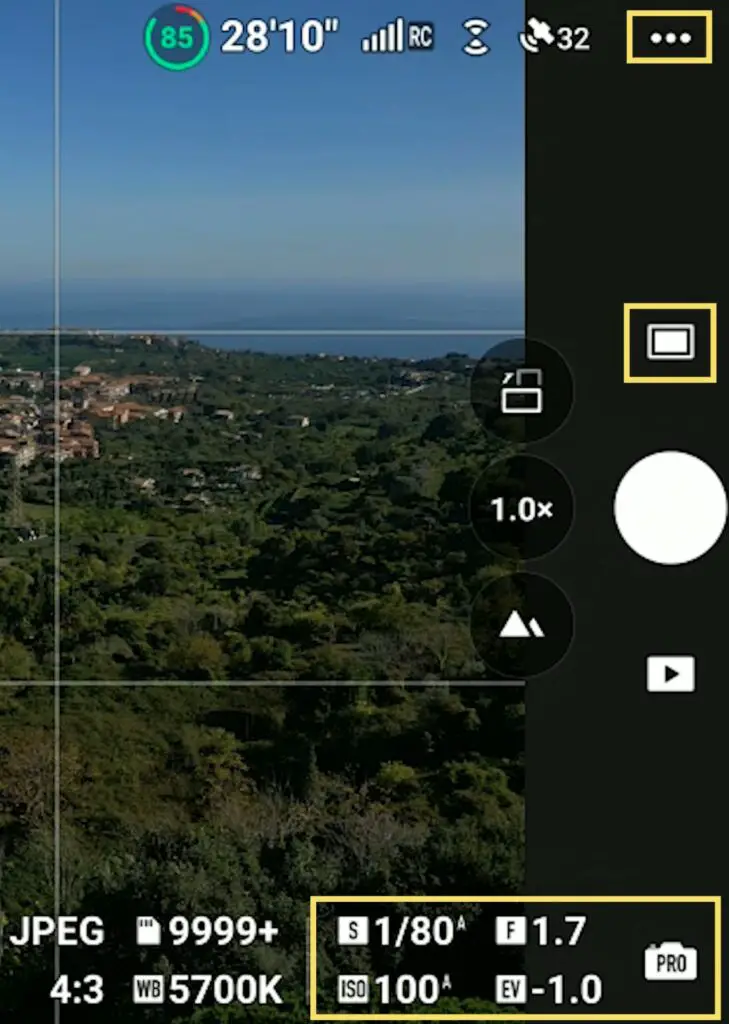
There are three locations where we can control the behavior of the Air 3 for still images:
- in Settings through the icon with three dots at the right of the screen
- in the Exposure Window at the bottom right
- in the main Photo/Video menu next to the shutter
In the Settings
Let’s start with the Settings. The menu is context-sensitive, in other words, the Settings are not the same in video or photo mode
Camera Tab of the Settings
After choosing Photo in the Photo/Video menu, we tap on the three dots on the top right to access Settings, and then go to the Camera tab. The menu now relates to Photo
File Format: RAW or JPEG?
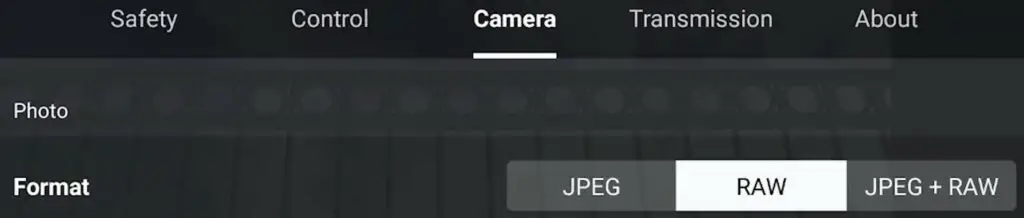
The first choice is the file format with options for RAW, JPEG, or both formats
I generally use only RAW files, but the JPEG ones in the Air 3 are excellent and this is good news for users who post their photos on social media without editing
Aspect Ratio
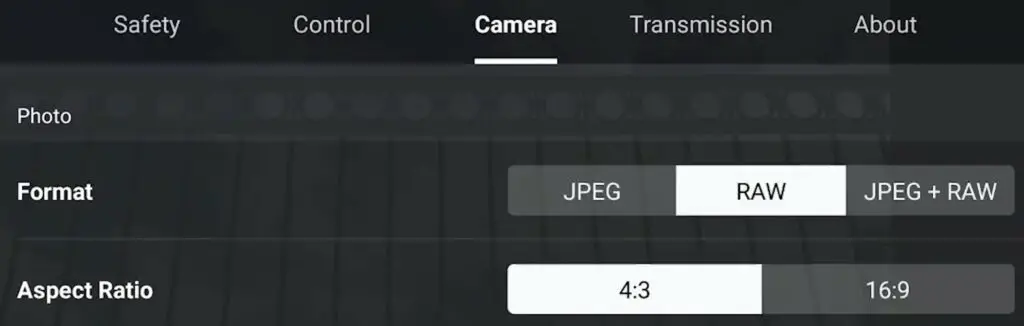
By selecting 4:3 we get the full resolution of the sensor, 4032×3024, slightly more than 12MP, if we choose 16:9 we get a version cropped to a height of 2268 which fits a traditional 4k landscape video format
I always use 4:3 as it gives more options for reframing or cropping to different formats
48 MP Mode
Then there is a choice for resolution between the true 12MP photo resolution of the camera and the so-called 48MP
The 1/1.3” sensor of the Air 3 is a Bayer Quad type of sensor, capable of splitting each pixel into four smaller ones, therefore creating a sort of 48 MP mode
However, the resulting pixels are much smaller with a limited capability of gathering light
In easy light conditions images taken in the 48 MP mode have just a touch of extra detail and give better results in large prints
But in high dynamic range or low light, the results are sometimes disappointing and this is not surprising, due to the reduced size of each pixel
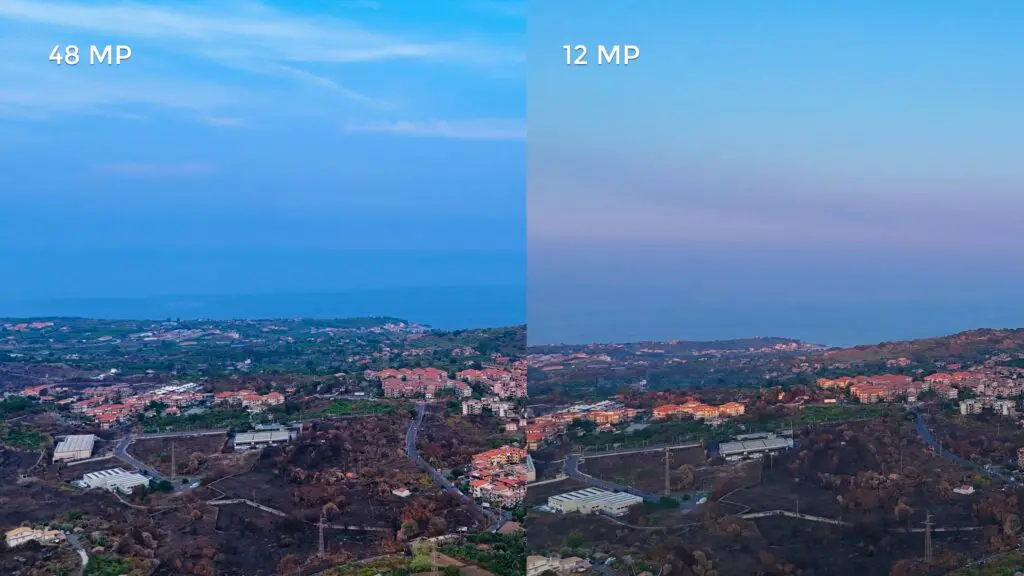
This mode has some benefits and it works much better in the Air 3 compared to the first firmware version of the Mini 3 Pro, but it has to be used only in certain light conditions and it is still a work in progress
To state that the Air 3 has a photo resolution of 48 MP is in my opinion misleading
Tools for Exposure and Focus
Then we have a switch to toggle the Histogram on and off. I have it always on, as it is the main tool I use for exposing
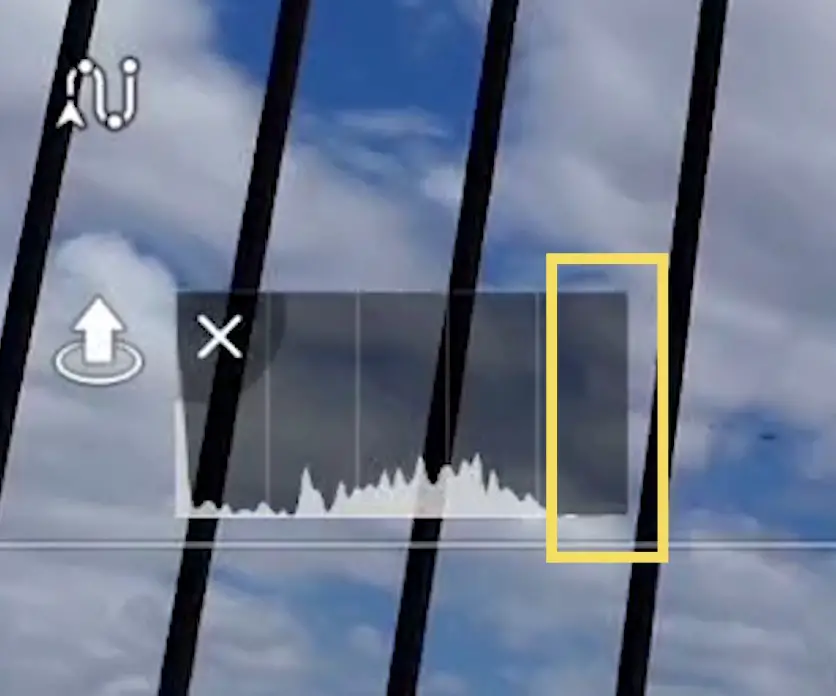
I make sure to leave some space between the last bar to the right and the right edge to prevent overexposure
Peaking level is a tool for focusing. It outlines in red the elements in focus, but only when using manual focus
It comes with three strength levels. I only use it when focusing manually on a subject close to the camera. On all other occasions, I leave it off, as I find it distracting
The next option, Overexposure warning, is another tool for exposure. It overlays white stripes on the overexposed areas. I never use it, as I find it distracting
Gridline for the Rule of Thirds
Then we can overlay Gridlines. I like the one in the middle to apply the rule of thirds
In drone photography, we often have the horizon line in the frame. Rather than having it in the middle, it is more interesting to divide the scene into thirds and have it either on the higher or on the lower third
On other occasions, especially for top-down shots, we might want a symmetric framing, in which case the same overlay helps position the subject
The function Style for sharpness and Noise Reduction that is found on the Mini 3 Pro is not available at the moment for still images on the Air 3
White Balance
Further down the White Balance can be set to Auto or Manual. I suggest always using Manual
With the Air 3, I choose a setting around 5700 Kelvins in daylight
Finally, we can select the Storage Location, either an SD Card or the internal 8GB memory, and we can format them
Control Tab
At the top, we can choose the Unit: Metric in meters, Metric in KM, and Imperial
In Gimbal Mode we have a choice between Follow and FPV modes. It is a feature meant mostly for video, and we generally keep it on Follow mode, but if we switch to FPV, the aircraft will lean sideways while turning, like a real plane
This gives us the chance to create some unusual photos
Further down we have Gimbal Calibration. We can calibrate it automatically when prompted by the app, but we can also access Manual if we have the horizon slightly slanted to fine-tune it
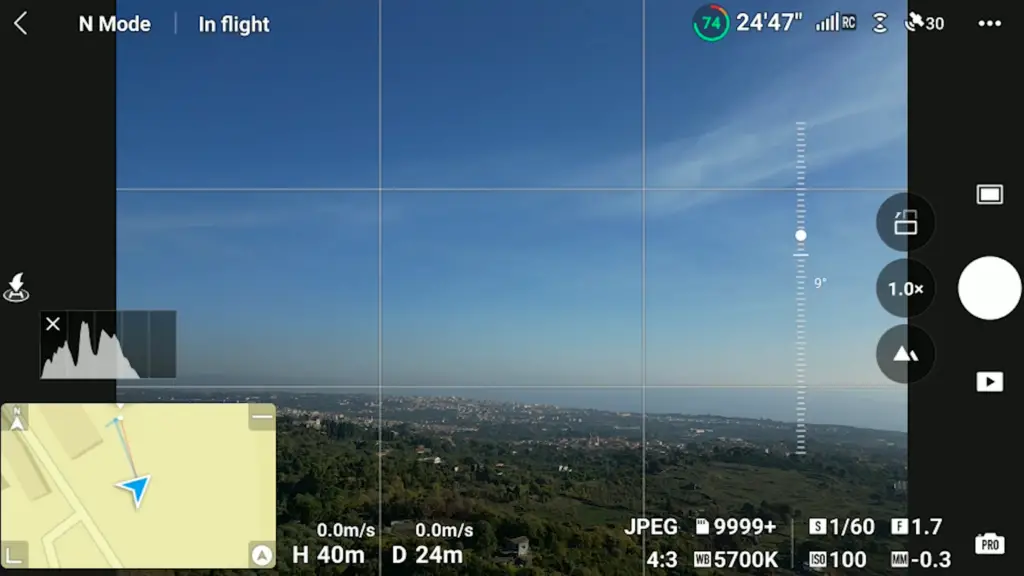
Exposure Settings
The exposure settings are in the lower part of the screen to the right
Auto Exposure
In auto mode the exposure is set by the software, we can only access the Exposure Value (EV) to adjust the overall luminosity
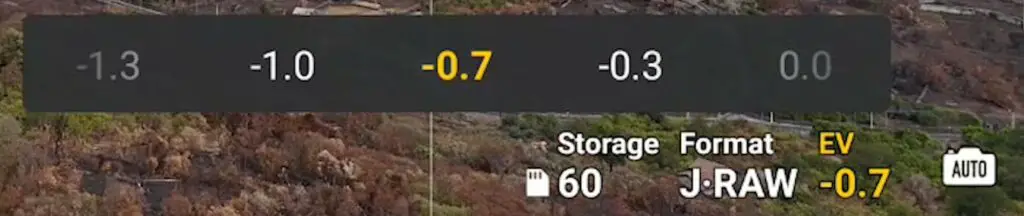
I find that the app has a slight tendency to overexpose, so I prefer to set the value at -0.3 or -0.7
When the camera moves and the light changes, the exposure values are modified to maintain a constant luminosity, but the individual values for ISO and SS are not shown
I suggest always using manual exposure, as we want to be able to control these values
Manual Exposure (Pro)
By tapping on the icon to the right, we access manual mode, labeled as Pro. Then tapping on the area of the values slightly to the left, we access the window for exposure
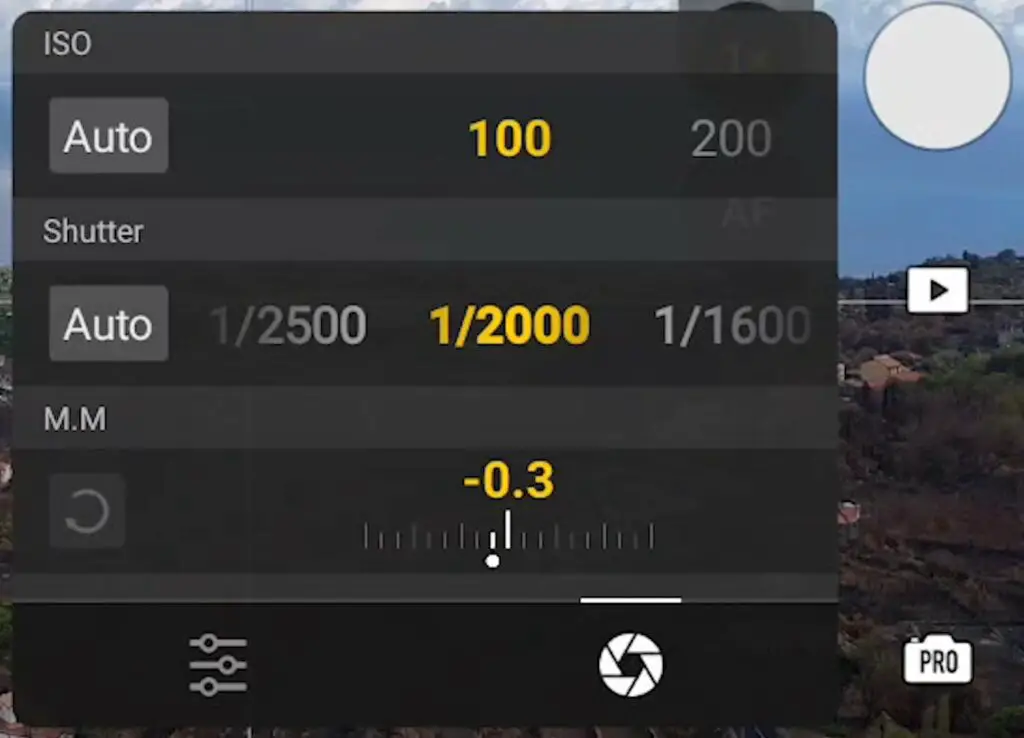
In photography, there are three parameters for exposure:
- ISO
- Aperture
- Shutter Speed
With the Air 3, like most other prosumer drones, the aperture is fixed, therefore we have only two values to deal with
We can set the values for ISO and Shutter Speed independently
The MM value at the bottom cannot be modified, it displays the luminosity resulting from the values chosen above compared to the optimal exposure computed by the software
I prefer to see a slightly negative value
Semi-Automatic Exposure
This window has two Auto buttons for ISO and Shutter Speed. We can set one of the two values, either ISO or Shutter Speed, as Auto
Auto Sutter Speed
If we want a fixed value for ISO, 100, to get the best possible quality, we set ISO to 100 and Shutter Speed to Auto
When the luminosity varies, only the value for Shutter Speed changes to maintain the correct luminosity, leaving the ISO at 100
Notice that the value MM has now turned into EV, for Exposure Value and it can be modified
Auto ISO
On other occasions, we might want a constant value for Shutter Speed
Let’s say we want a long exposure to shoot moving subjects with some motion blur
We select the desired value for SS and set the ISO to Auto and this time as the luminosity increases or decreases, only the ISO varies
We can choose to put both values to Auto
It is very much like using Auto exposure, but there are some advantages compared to using the traditional Auto mode
In Auto mode, we cannot see the individual values for ISO and SS, while this method shows both values
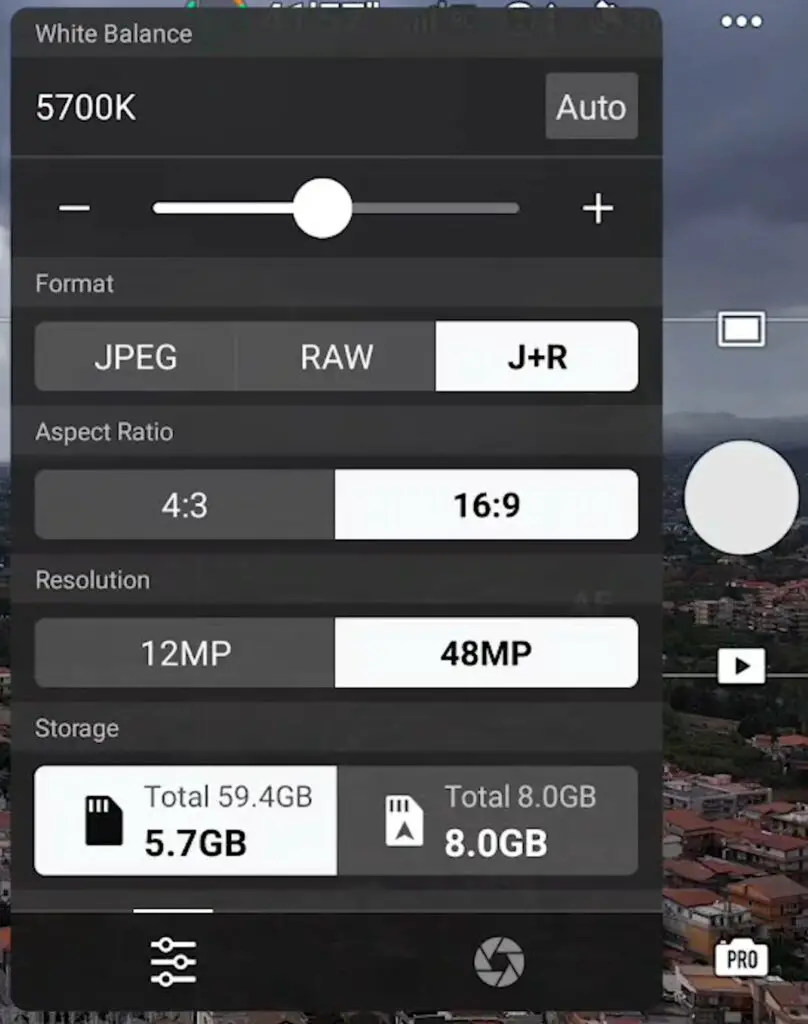
By tapping on the icon at the lower left, we access another window for the White Balance, the File Format, the Aspect Ratio, the Resolution, and the Storage location
We have already seen how these functionalities work, as they are also available in the Settings
Photo/Video Menu
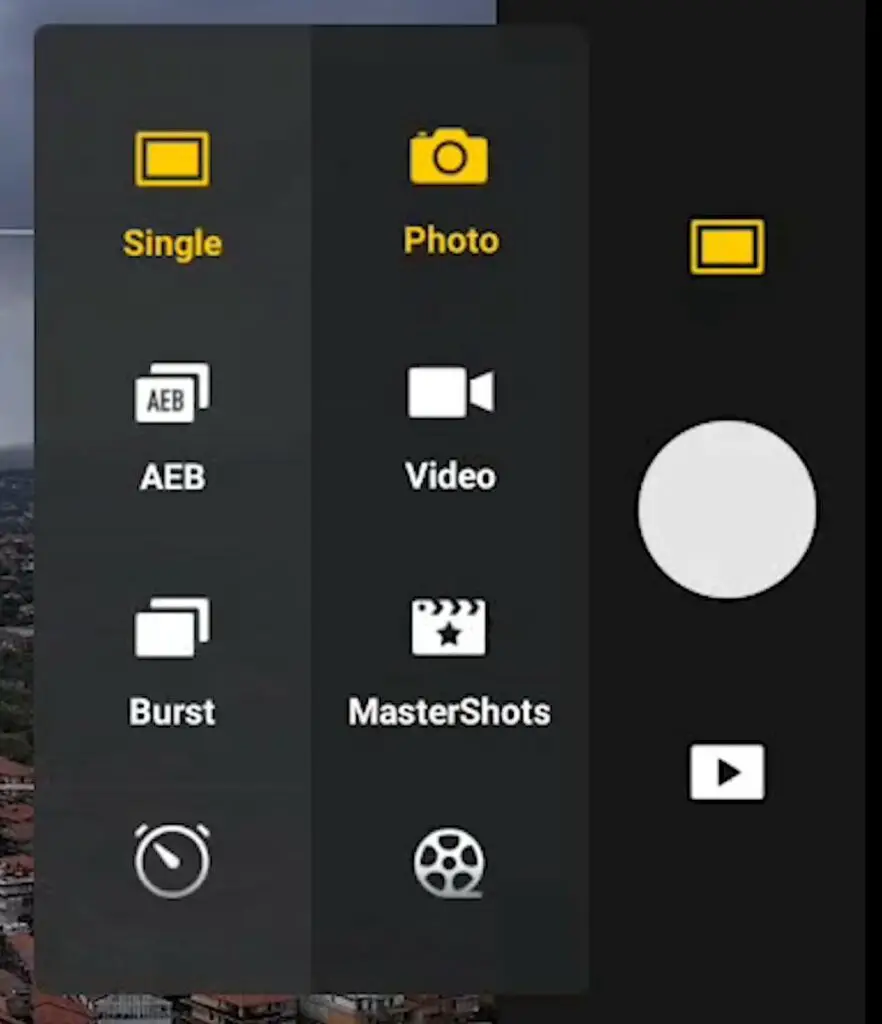
Let’s move to the Photo/Video menu above the shutter
Automatic Exposure Bracketing
After the Single shot, we can choose the Automatic Exposure Bracketing with a choice of 3 or 5 photos at an interval of 0.7 stops
When 48MP mode is selected, AEB mode will only take three photos
It is a feature that I use all the time, for two reasons:
- to be sure to have at least one image exposed perfectly
- To merge the five images to HDR using programs like Luminar Neo for better results compared to a single one in certain light conditions, especially in high dynamic range situations
To edit all the images and merge them to HDR I have used Luminar Neo.
Here you find my article about this excellent program
You will find info about Luminar Neo together with a coupon for a 10% discount by entering the code “vicvideopic” using the button below
Other Photo Modes
Then we have Burst, with a choice of 3, 5, or 7 photos in 12MP and 3 photos in 48 MP mode, useful when shooting action
Finally Timed Shot, to take several images at a specific interval in seconds
In the Mini 3 Pro, the 48 MP is found in this menu, but in the Air 3 has been moved to the Camera tab of Settings
Lens Selection
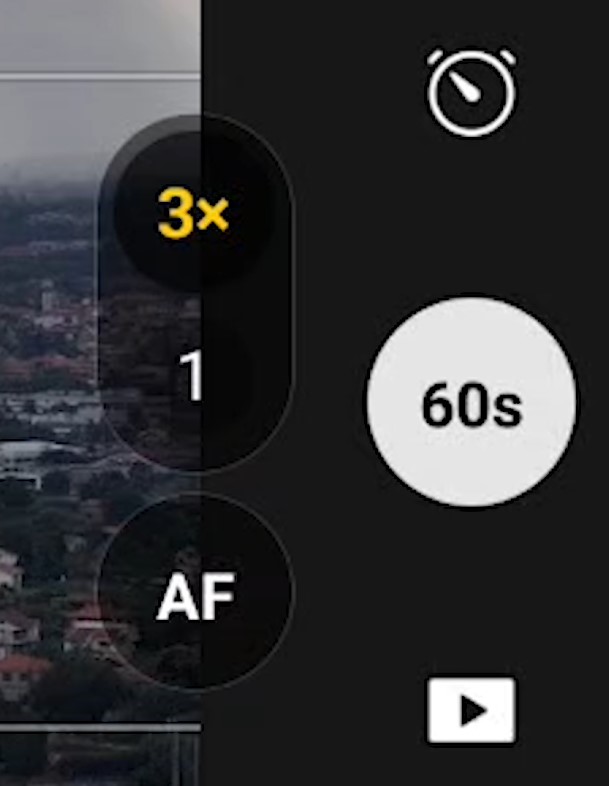
To the left of the shutter, there are 2 buttons to select one of the two lenses. 1x for the wide angle and 3x for the telephoto lens
There is no progressive zoom between the two focal lengths. This feature is only available for video
Further down there is a button to toggle between Auto and Manual focus. In manual mode, we focus by dragging the parameter bar up and down