
I will walk you through all the settings needed to capture cinematic footage and make the most of its outstanding video functionalities, like Omnidirectional Obstacle Avoidance, Cruise Control, Waypoints, Night Mode, extreme Slow Motion, and the two new 10-bit color profiles D-log M and HLG
The DJI Mini 4 Pro is equipped with many advanced features, most of them for filming
If you are mainly interested in photography, I have done a similar guide for still images
You can check the prices for the different configurations of the Mini 4 Pro through the button below (commission earned)
Other related articles about the Mini 4 Pro:
- Mini 4 Pro Video Quality
- Mini 4 Pro video color profiles
- Mini 4 Pro vs Mini 3 Pro video quality
- Exposure Settings for video and photos
- QuickShots with the Mini 4 Pro
- How to use MasterShots with the Mini 4 Pro
- Point of Interest with the Mini 4 Pro
- Spotlight with the Mini 4 Pro
- Active Track 360 new version
- Waypoints mode with the Mini 4 Pro
- Mini 4 Pro Obstacle Avoidance System
- Low-light footage and Night Mode
- RC 2 remote controller
- Mini 4 Pro Signal Transmission vs Mini 3 Pro
If you prefer to watch instead of reading, you will find my YouTube video at the end
Status Indicators
At the top of the main screen of DJI Fly app, some useful indicators show the status of the aircraft
From left to right we find:
- the current speed mode
- the remaining battery life
- the strength of the signal
- the status of the Obstacle Avoidance system (white when it is on and red when off)
- the number of satellites connected
At the bottom left, we find an icon to access the map of the area and next to it we can check the horizontal and vertical distance from the home point as well as the vertical and horizontal speed
Camera Settings for Footage
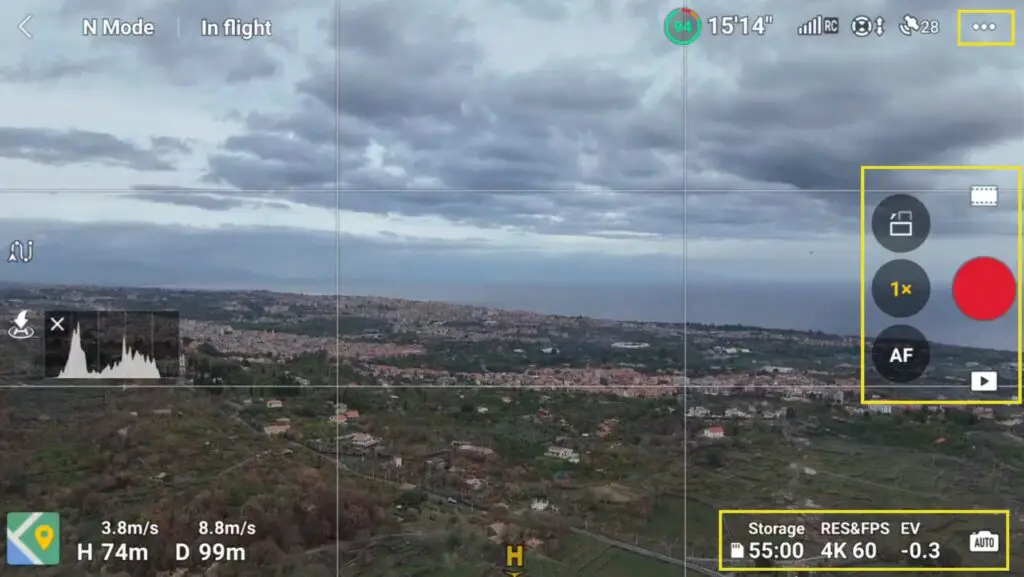
In the DJI Fly app, there are three main areas to set the different options for footage:
- in the Settings, through the three-dot icon at the top left of the screen
- in the Photo/Menu window above the shutter
- the exposure values at the bottom right of the screen
I will focus only on the important ones for filming
Safety Tab
A crucial new feature of the Mini 4 Pro compared to previous lightweight models of the DJI line is the omnidirectional obstacle avoidance system
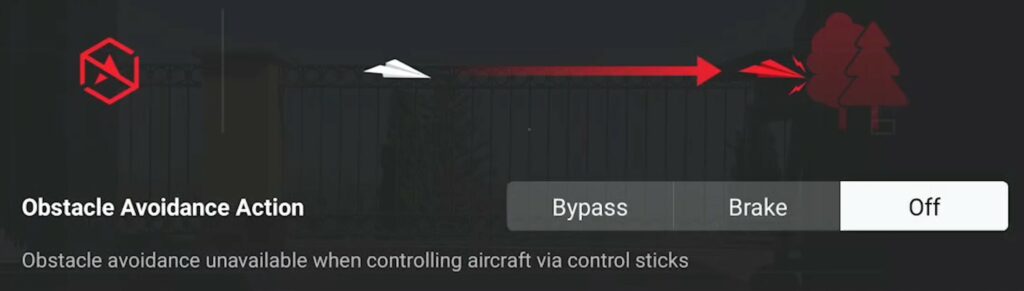
There are three options:
- in Bypass, the aircraft will avoid obstacles by finding its way around them
- in Brake, it will stop and hover
- when choosing Off, the system will be unavailable
This is a very important safety functionality and I suggest setting it always on Bypass to prevent crashes
In low light, the obstacle detection system is not available
Control Tab
The Control tab of Settings contains several important options to fine-tune the movement of the camera in the option Gain and Expo Tuning
In this window, we can set the values independently for each of the speed modes: Cine, Normal, and Sport
Max Horizontal, Ascend, and Descend Speed are self-explanatory
Max Angular Velocity is the speed of the rotation of the camera when panning using the left stick of the remote control, I suggest setting it to a low value for more control
Yaw Smoothness controls the behavior when releasing the stick after panning: with the minimum value the rotation will stop abruptly, I prefer a value just above the midpoint for a smoother move
Brake Sensitivity controls the distance traveled after releasing the right stick
Moving further down we can control the movement of the gimbal:
- Max Control Speed determines how fast the gimbal will tilt up or down. I like to set a low value for precise moves.
- Tilt Smoothness controls how quickly the gimbal will come to a halt after a move. I prefer a value slightly above the midpoint
Further down we can access the Button Customization window to assign specific actions to the two buttons on the back of the RC 2 controller, to the scroll wheel, or a combination of the wheel with each button
I like to set the C1 button to Recenter/Tilt Down Gimbal and the C2 to Cruise Control
Cruise Control is another important new feature of this model
When the aircraft is in motion, for instance, moving diagonally to the left, engaging Cruise Control ensures a constant speed and direction. It is then easier to add other moves like changes of elevation and gimbal tilting
The right dial is handy to smoothly control the digital zoom
Camera Tab
In the Camera tab of Settings, the menu is context-sensitive, in other words, it is different in video mode compared to photo mode
Since we have selected video in the video/photo menu, all the items in the Camera tab will relate to filming
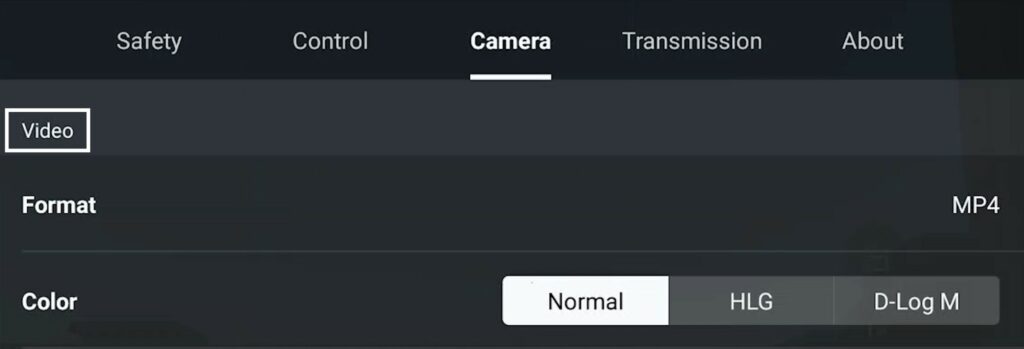
We notice another major upgrade of the Mini 4 Pro: the presence of two 10-bit color profiles, D-log M and HLG, besides the traditional 8-bit mode Normal. I have covered the color profiles of the Mini 4 Pro in a specific article
In Normal mode, there is a choice for the Coding Format between H 264 and H265. H265 is becoming the standard format and is the one I suggest using
When D-Log M profile is chosen the image on the screen will appear quite flat, but we can activate Color Display Assist to add contrast and saturation
The Histogram is the only tool I use for exposing, therefore I have it on all the time. I always leave some space between the last bar to the right and the right edge to prevent burning the highlights
Peaking Levels highlights in red the areas in focus. I only use it when focusing manually on a subject close to the camera. On all other occasions, I keep it off as I find it distracting
Overexposure Warning when selected shows zebra lines on overexposed areas. I find it extremely distracting and never use it
Then we can overlay Gridlines. I find it useful to add the one in the middle to apply the rule of thirds
When filming with drones, we often have the horizon line in the frame. Rather than having it in the middle, it is more interesting to divide the scene into thirds and have it either on the higher or on the lower third
In other occasions, especially for top-down shots, we might want a symmetric framing, in which case the same overlay helps position the subject
Further down there is a function Style with two sliders to adjust Sharpness and Noise
This is an example of footage taken at different Sharpness values, zoomed in at 200% to better appreciate the difference
I find that the Mini 4 Pro has already a good amount of detail and sharpness, but this function can be useful on certain occasions
Regarding noise, I use the excellent denoiser Neat Video when needed, you can read my article about Neat Video here
Area Around the Shutter
In the right part of the screen, above the big red shutter, we find the Photo/Video Menu
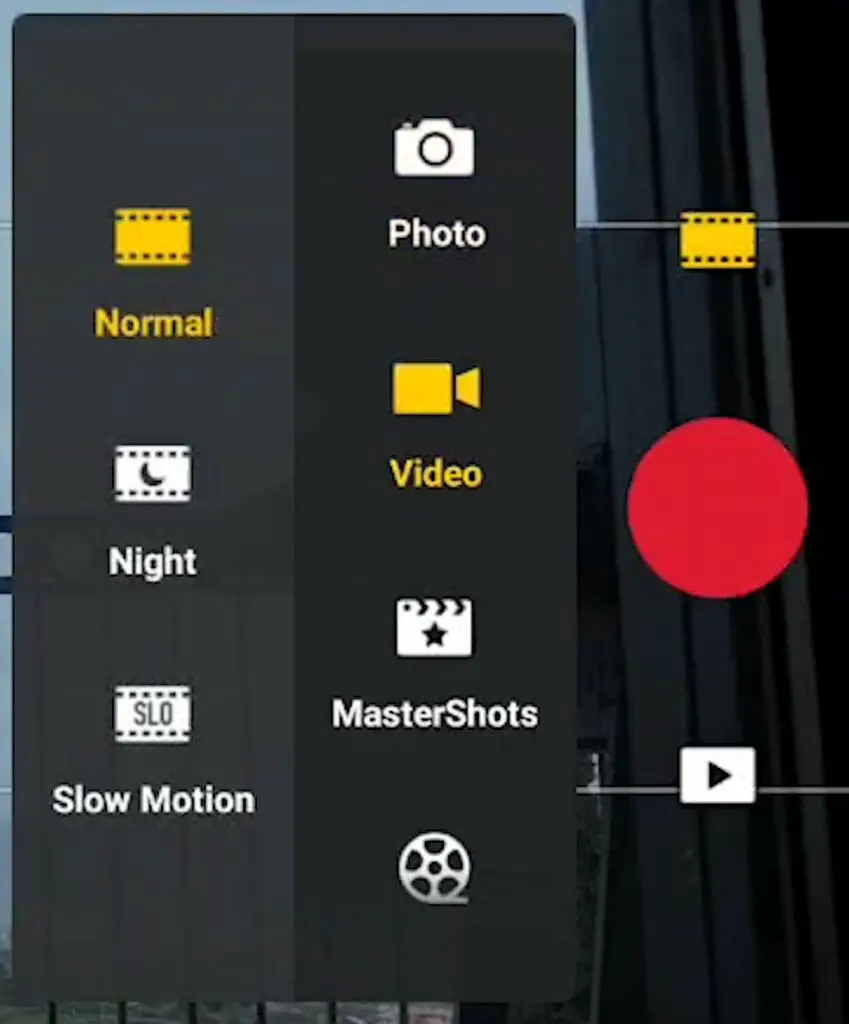
We can select Photo, Video, Masteshots, Quickshots, Hyperlapse and Panorama
Video mode has three options. Normal is the one we use on most occasions
Night Mode is another new feature compared to the Mini 3. It was introduced in the Mavic 3 and then added to the Air 3
It applies automatic values to exposure, noise reduction, and sharpening to optimize low-light footage
The Slow Motion mode is another major improvement of the Mini 4 Pro vs the 3 Pro, as it is now possible to shoot at 100 fps in 4k and 200 fps at 1080 for extreme effects
To the left of the shutter, there is an icon to toggle between the horizontal and vertical orientation of the camera to take footage in portrait mode
Further down we find the Zoom icon: by tapping on it we toggle from normal to 2x zoom, then 3x and back to normal. By holding and dragging it is possible to apply a progressive zoom, although smoother results are obtained by using the scroll wheel in the remote control
The icon at the bottom is for toggling between Auto and manual focus. The vast majority of the time we use autofocus, the only time where manual focus is needed is for targets very close to the camera, which is rare with drones. In this case, hold and drag to set the focus
Exposure Window
The window for exposure is on the lower area to the right
The icon to the right toggles between Auto and Manual, labeled as Pro
Like in all other lightweight models, the aperture is fixed, therefore we have only two values to set when exposing: ISO and Shutter Speed
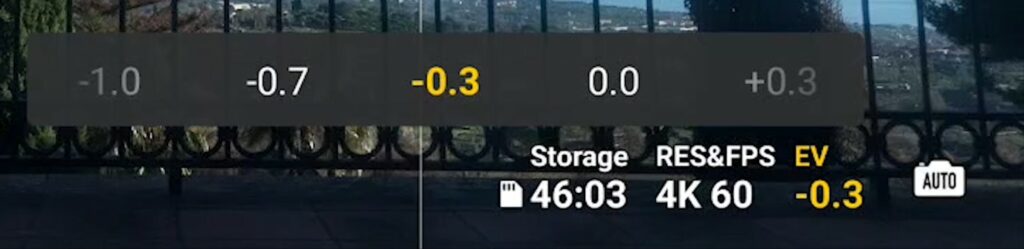
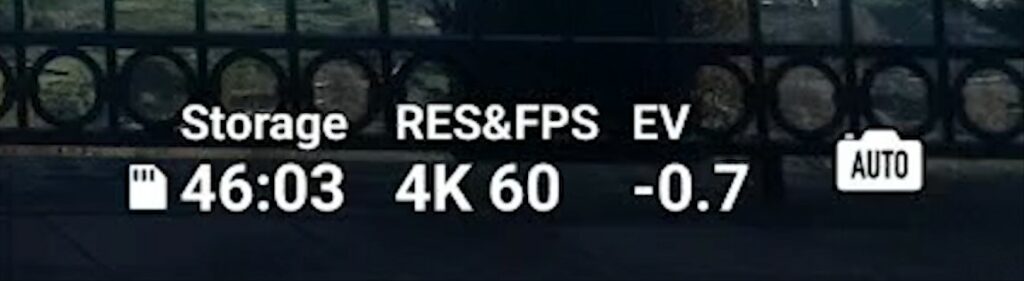
In Auto mode, the only control on exposure is through the overall Exposure Value (EV), the first icon to the right. I find that this model tends to slightly overexpose, so I prefer to lower the EV value by about 0.3 or 0.7
It is in most cases possible to recover the darkest areas in a slightly underexposed clip, while there is nothing we can do to fix overexposure
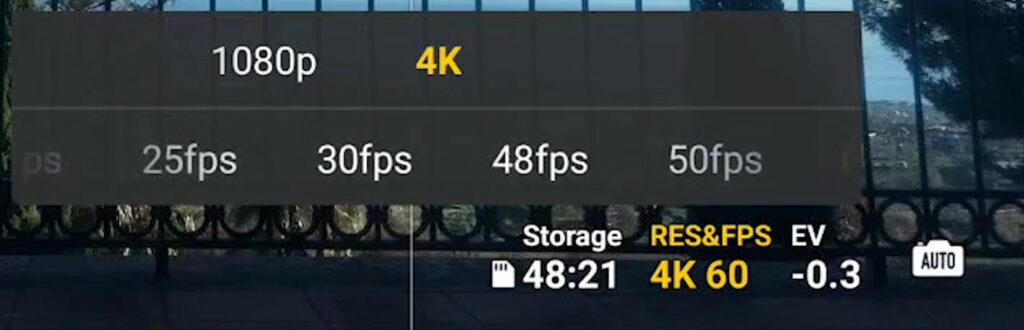
The next icon is for resolution and frame rate. We have two choices for resolution: 4k and 1080p. 4k is now the standard for video resolution and is the one I suggest using, although 1080p can still be used for social media if file size is an issue
Below the resolution, there are options for different frame rates. The most widely used are 24 and 30 fps. The higher frame rates are for slow-motion
Please refer to my article on how to use frame rates for slow motion for further details.
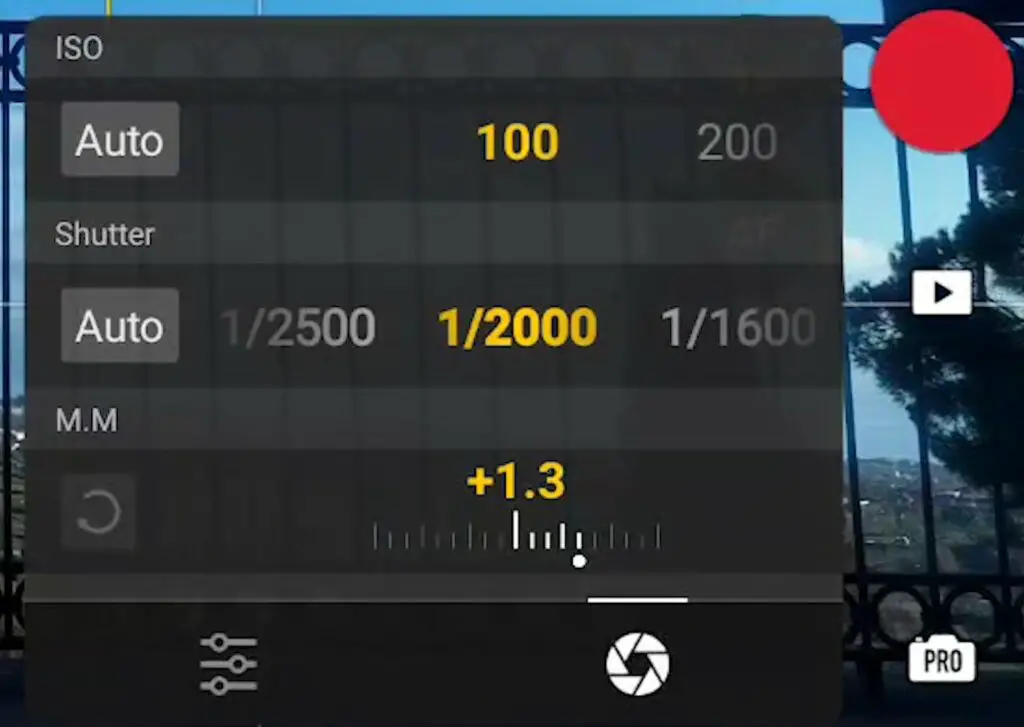
In manual exposure mode, we can set independently the ISO value and Shutter speed for more control
The MM value at the bottom cannot be modified, it displays the luminosity resulting from the values chosen above compared to the optimal exposure computed by the software
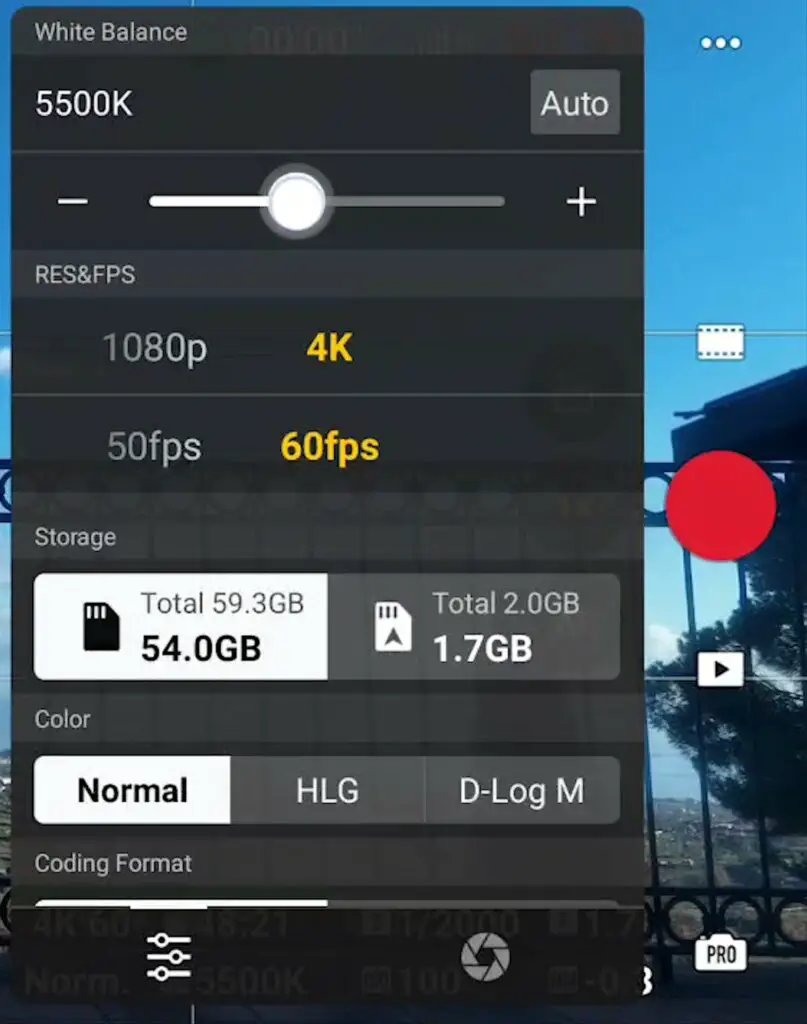
In the same window, we can click on the icon on the bottom left to access other video settings. At the top, we select the White Balance value, expressed in Kelvins
There is the possibility to use Auto WB by tapping on the icon on the left, but I suggest avoiding it, as it might lead to unwanted shifts of colors when the luminosity changes. The value I normally use in sunny conditions is 5500k
On the left part of the screen, there is an icon to access Waypoints, a very sought-after feature that was previously reserved for the flagship model of the DJI prosumer line. I will soon do a specific video on how to use Waypoint missions, so, stay tuned!