
Waypoints in the DJI Mini 4 Pro creates missions made by several points. For each point, the position, the altitude, and the camera orientation are stored in memory. The software handles the transition between points. A mission can be saved to be repeated at different times of the day or different seasons
DJI has added all sorts of intelligent features to the Mini 4 Pro. The most powerful one is Waypoints, a very sought-after mode previously reserved for the flagship model
You can check the prices for the different configurations of the Mini 4 Pro through the button below (commission earned)
Other related articles about the Mini 4 Pro you may find interesting:
- How to use Point of Interest
- How to use Spotlight mode
- Active Track 360 new version
- Mini 4 Pro vs Mini 3 Pro video quality
- Mini 4 Pro Obstacle Avoidance System
- Mastershots
- Quickshots
- Video qualit
- Camera settings for cinematic video
- Color profiles for video: Normal, D-Log M and HLG
- Low-light footage and Night Mode
If you prefer to watch this as a video, you will find my YouTube version at the end
Two Methods to Create Waypoint Missions
There are two ways to create a waypoint mission:
- On location by flying over the desired route to enter the different points
- Remotely, by entering the point on the map
I always use the first method, as I can see any surrounding obstacles, it is much faster and more precise
I will not describe here the second method, the one consisting in setting the points on a map, as I don’t find it effective and it can be dangerous as it is not possible to spot obstacles
Settings
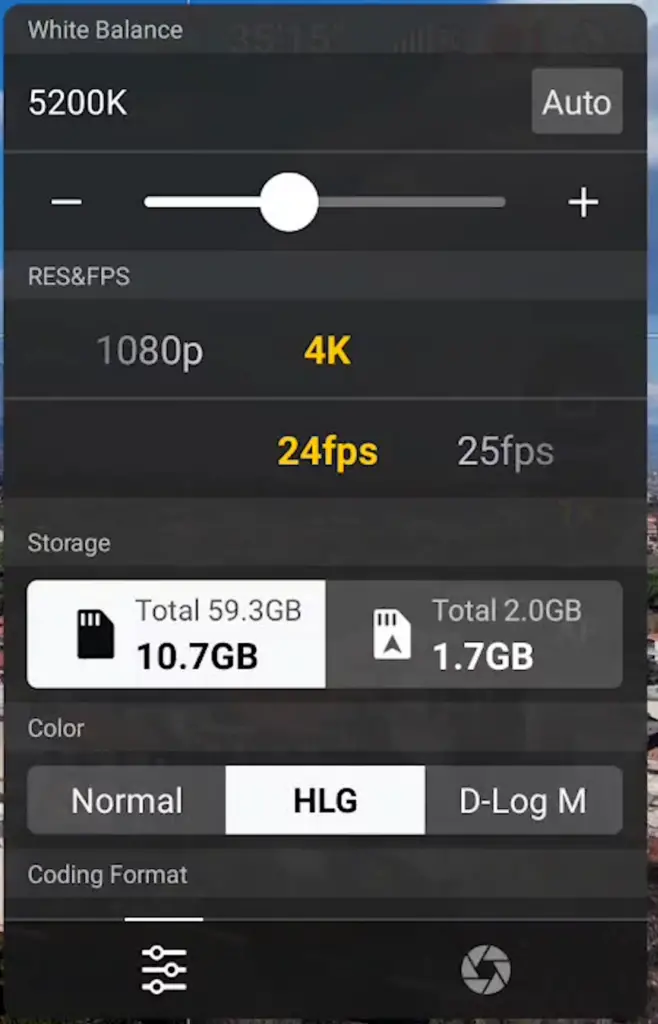
All the usual settings for video can be used with Waypoint mode, including
- Exposure
- White Balance
- Resolution
- Frame Rates
- Choice of the color profile between Normal, D-Log M, and HLG
This can be useful to adapt the footage to the color scheme of a specific project
We access Waypoint mode by tapping on the icon on the left part of the screen just above the one for taking off
How to Create a Waypoint Mission
A mission is created by flying to each point and recording it; the location, the altitude, and the orientation of the camera will be stored in memory for each point
The software will handle the smooth transition between each point
I want to show this village on the foothills of Mount Etna in Sicily with a top-down view and then progressively descend and move the left, while the camera pans to the right to frame Mount Etna
So I fly to the right of the village at medium altitude framing the central square
Setting the Points
A window in the lower part of the screen suggests hitting the C1 button of the RC 2 controller to set the first point. Users with the RC N2 controller should use the fn button. The first point is set
I then fly to the left to have the center of the village in the middle of the frame, rise to the maximum altitude, and get closer for a top-down view

If I open the small window on the screen, I can visualize existing points or add a new one by tapping on the plus sign on the first available one, in this case, point number 2
Then I fly backward and to the left while lowering the altitude and move the camera slightly to the right towards the mountain. I can set the third point here
Finally, I move to the left and lower the altitude
Deleting a Point
In this case, I accidentally hit the C1 button creating a waypoint that I don’t need

So I open the small window and tap on point number 4. A window will open with all the data relative to this point and I can delete it by tapping on the dustbin icon on the top left of the window
If we leave the window open while entering the points we can check the expected duration of the flight, the distance to be traveled, and the number of points forming the mission, all useful info
Now I can rotate and tilt the camera to frame Mount Etna and set the fourth and last point
Saving a Mission
Once all the points have been entered it is possible to save the mission to use it on other occasions
This is the major strong point of Waypoints, as we can repeat the same mission to optimize it with small changes, to get the perfect exposure, or to capture the same scene at different times of the day or in different seasons

To save a mission, tap on the icon at the top left of the small window. It is also possible to name the mission by tapping on the pencil icon
Using the Map
By watching the clip I noticed a major improvement: the transition between each point is now very smooth for a much more pleasing effect
In previous models, the same transitions cause abrupt changes in direction
If we open the map by hitting the icon on the bottom left of the screen and start a Waypoint mission, we get an excellent overview of the itinerary with the different points
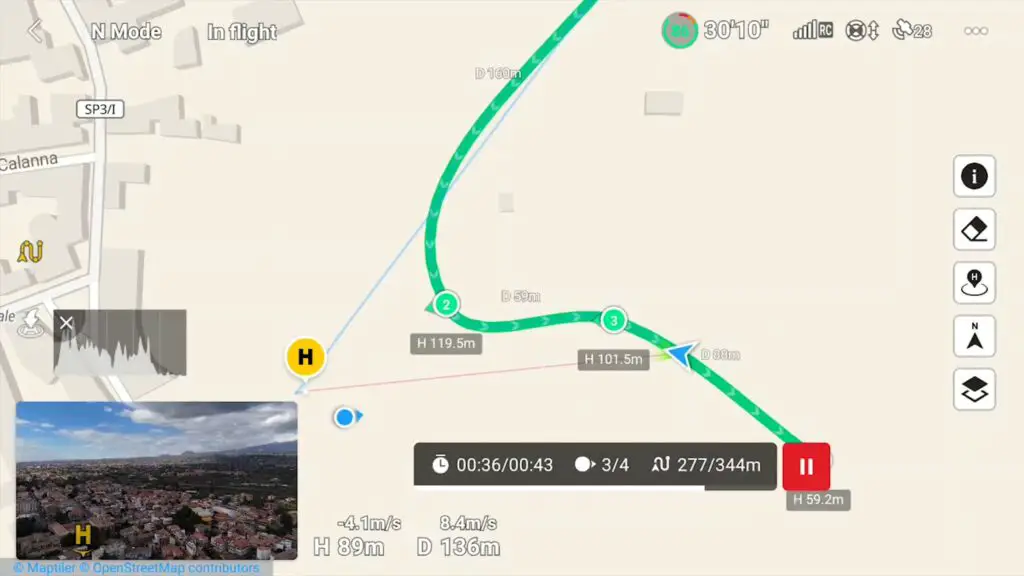
Notice how the segments between points are turned into gentle curves for a much smoother flow
Each point shows the altitude and the orientation of the camera. The distance between the two points forming a segment is also shown
Global Adjustments
In this clip the speed is way too slow
So I put the Mini 4 Pro back in the Air, I choose Waypoint mode by tapping on the icon on the left and I retrieve the saved mission
By tapping on the three dots on the right part of the window I access a window for the settings to be applied to the whole mission

Here I can specify the Global Speed. I want to increase it dramatically, at about 9 meters per second
At the top of the window, the resulting length of the clip is shown. At this speed, the clip will be 30 seconds long, which should suit our purpose
In the same window, we can choose the action to be taken at the End of the Flight and in case of Signal Loss, I leave them both to Return To Home
It is also possible to start the mission from other points, but I prefer to leave it on point 1
The movement is now much faster, exactly what I was looking for
We are not accelerating the clip, but simply increasing the speed of the aircraft. Moving elements like cars or people walking remain at their natural speed
The light conditions are horrible. We are in the middle of a sunny day, the worst possible time to shoot footage. Also, the sun is in front of the camera and the shadows are very harsh
The clip looks very bad, but this is not a major issue, since our mission is stored in memory and we can reshoot it in better light conditions
Local Adjustments
I put the drone back in the air after sunset with some artificial lights and the last twilight
I summon the same mission for another clip and now the light is much more pleasant with nice softer shadows
During the winter, there are often some very interesting cloud formations above Mount Etna, so it would be a good idea to tilt the camera up slightly at the end of the clip
I select the last point of the mission and the window shows the settings of that point. I go to Gimbal Tilt and turn the value up
There are several other settings for each point. It is possible to specify a Camera Action for the point with the following options:
- None
- Take Photo
- Start Recording
- Stop Recording
For videography, it is in general a good idea to set the first point to Start Recording and the last one to Stop Recording

It is also possible to modify other values for the same point:
- The altitude
- The speed
- The camera orientation
- Add some digital zoom
- Have the drone hovering for a specified amount of time
This is handy for fine-tuning a mission when needed
Now at the end of the clip, we can see a bigger portion of the sky above Mount Etna
The next morning I try again. This time the sun is behind the camera and the result is quite good, although it would be even better a couple of hours earlier or with the sun covered by clouds
But the beauty of a Waypoint mission is that it can be repeated until we obtain the desired result
How Many Points Are Needed?
In most cases, for videography, we only need a limited amount of points, at most four. An exception is when we want to follow a path, like a river or a twisting road
Other examples of applications where a larger amount of points are needed are when following the progress of a building site or site inspections for agriculture