
The DJI Mini 4 Pro camera has a wide aperture of f1.7, capable of gathering plenty of light. For users who post-process their footage, D-Log M is the color profile that gives the best results in low-light conditions. Normal is a good alternative when editing is not an option. Night Mode is a recent addition and requires further refinement
In this article, I will show how to get the best results in different low-light situations
I will compare the automated Night Mode to the color profiles Normal and D-Log M
You can check the prices for the different configurations of the Mini 4 Pro through the button below (commission earned)
Other related articles about the Mini 4 Pro you may find interesting:
- Video quality
- Camera settings for video
- Mini 4 Pro vs Mini 3 Pro video quality
- Exposure settings for video and photos
- Active Track 360, new version named Active Shots
- Waypoint mode
- Point of Interest
- Spotlight mode
- Mastershots
- Quickshots
If you prefer to watch this as a video, you will find my YouTube version at the end of this article
Safety Tips for Night Footage
In low light the Obstacle Avoidance System of the Mini 4 Pro will not be active, therefore a lot of care is needed
I suggest carefully inspecting the scene and flying at a higher altitude than any surrounding obstacles
The Mini 4 Pro has two LED lights at the bottom of the two back legs to help spot the aircraft when bringing it back home. They are turned off when recording video, so make sure to stop recording when bringing the drone back home
The two LEDs are positioned behind the aircraft and are not always clearly visible, but the Mini 4 Pro has a feature to make it much easier to visualize it

In the Safety tab of Settings, it is possible to turn on a very powerful Auxiliary LED placed at the bottom of the aircraft
This is very effective for tracking the aircraft when returning home
Light Conditions
To test the low light capabilities of a drone or a ground-based camera, it is important to choose the correct light conditions
Urban Scenes at Night
I often see low-light tests made in a big city with powerful artificial lights as the only light source
Some of these scenes can be quite spectacular, but they don’t say much about the capabilities of the camera
These are extreme dynamic range situations with very bright lights and extremely dark shadows
The aim is to avoid overexposing the highlights, while the shadows will be black, like a silhouette, regardless of the camera’s low-light capability
After Sunset Before the Blue Hour
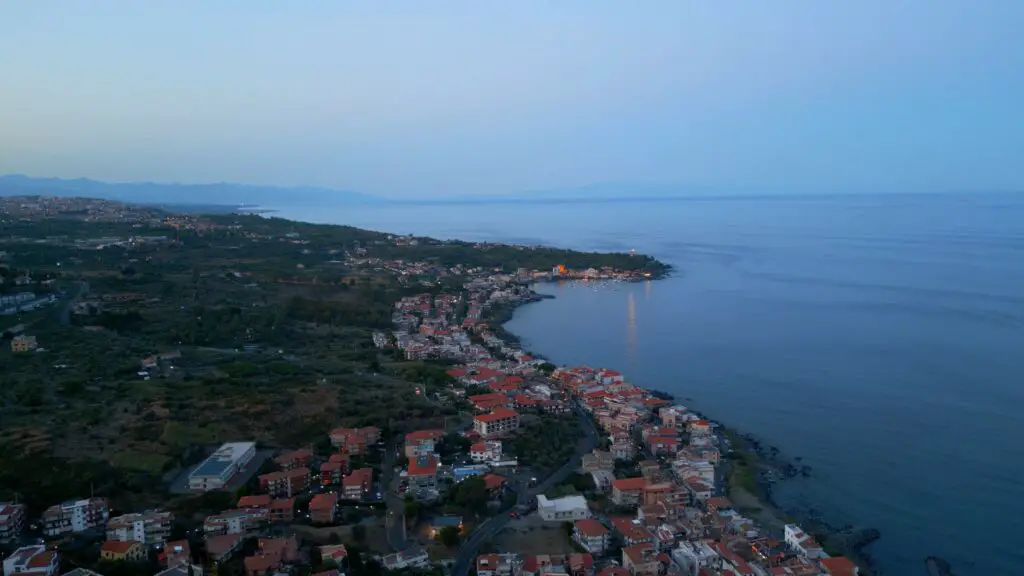
Much better results are obtained by shooting after sunset or before sunrise, with a bit of twilight acting as a fade light, and a few artificial lights as the main light source
It is important to have several natural areas with vegetation, the sea, or the sky to check the ability of the camera to maintain information in the shadows
Different Color Profiles
Let’s see how the Mini 4 Pro behaves under these conditions. I will compare the two color profiles Normal and D-Log-M to the Night Video mode
Normal
It is the most widely used as it requires minimal editing if any
For exposing I set the Shutter Speed at 1/50 of a second, the correct one for the frame rate I am using, 24 fps. I choose a low ISO value, 200, to avoid any loss of quality
By checking the Histogram, I can see that the clip will be underexposed by at least one stop, so I increase the exposure and lift the shadows while editing
The result is excellent: the colors are rich and very pleasing, there is plenty of detail in the shadows and the scene looks very organic
Some may think that these are not low-light conditions, but believe me, it was very dark. The f1.7 lens of the Mini 4 Pro can gather plenty of light
D-Log M
D-Log M is a flat profile, it requires a good dose of editing, and an LUT is needed
I have used the one made by DJI for the Mini 4 Pro, you can download it from DJI website
I use the same approach for exposure as before. The results in these light conditions are even better than the ones obtained in Normal mode
But, most importantly, the files respond very well to color grading, so it is easy to lift the shadow, modify the colors, or use a different LUT to adapt the footage to any color scheme
There is hardly any noise, but I am not overly concerned about noise. I use the excellent denoiser Neat Video to gently reduce luminance, chromatic noise, or flickering without introducing any artifacts
Here you find my article about Neat Video. You will find more info including the price through the button below
HLG
The Mini 4 Pro has another 10-bit color profile, HLG, but I will not analyze it here
It is a profile that can give good results, but it is more complex to use, as it is based on a different color space
You can find out more about HLG color profile in my article about the video color profiles of the Mini 4 Pro
Night Mode

In the Video/Photo menu, there is a Night Mode that automatically applies some noise reduction and sharpening to the footage
The ISO can reach a maximum value of 12800, versus 6400 for regular video mode
It is not as flexible as the regular video mode, as the maximum frame rate is 30fps, so it is impossible to apply slow motion
It works only with the 8-bit mode Normal. The 10-bit ones, D-Log M, and HLG are not supported
It is possible to expose using Auto or Manual mode
Night mode was introduced in the Mavic 3, and I found it disappointing, the denoising and sharpening are very aggressive and everything looks fake and plasticky
As often is the case, DJI seems to have improved this feature and the Gotham City effect is now less pronounced
In these twilight conditions, Night Mode cannot compete with D-Log M or Normal Mode. The colors are not as rich and there is little detail in the shadows and the buildings, probably due to the excessive denoising and sharpening
Let’s move to the other scenario I was describing earlier on. An urban scene where the only source is artificial light
Here again, Night Mode disappoints. The ISO value has been increased and the dose of denoising and sharpening is too aggressive
The shadows are crushed and the buildings don’t look organic. The colors are washed out
This mode has improved in the Mini 4 Pro compared to the first version in the Mavic 3, but it is still a work in progress
In these conditions, much better results are obtained using Normal mode with manual exposure. The colors are much richer, there is a nice contrast and some detail in the shadow and the buildings in the village look like real buildings
If You Prefer to Watch it as a Video
.