
When using Point of Interest with the Mini 3 Pro, the drone orbits around a target maintained in the same position in the frame. The sticks of the controller can be used to get closer or farther away and for elevation changes. POI has some tracking capabilities and can be used in the vertical orientation
One of the main upgrades of the Mini 3 Pro compared to the Mini 2 is the availability of the three intelligent flight modes grouped under the name Focus Track: Active Track, Spotlight, and Point of Interest
These modes are very powerful and by combining them all sorts of cinematic movements are possible
I have done several related articles you may find interesting:
- How to use Spotlight mode with the Mini 3 Pro
- How to use Active Track with the Mini 3 Pro
- Follow me and tracking with the Mini 3 Pro
- Obstacle avoidance system of the Mini 3 Pro
- Mastershots with the Mini 3 Pro
- Quickshots with the Mini 3 Pro
- Mini 3 Pro: settings for video
- Mini 3 and 3 Pro video quality
If you prefer to watch this as a video, you will find a link to my YouTube video at the end of this article
How to Use Point of Interest
Settings
To access Point of Interest with the Mini 3 Pro, we simply draw a box around our intended target
A small window will appear with the three modes of Focus Track
When choosing Point of Interest a yellow flag appears to choose the direction of flight and set the speed
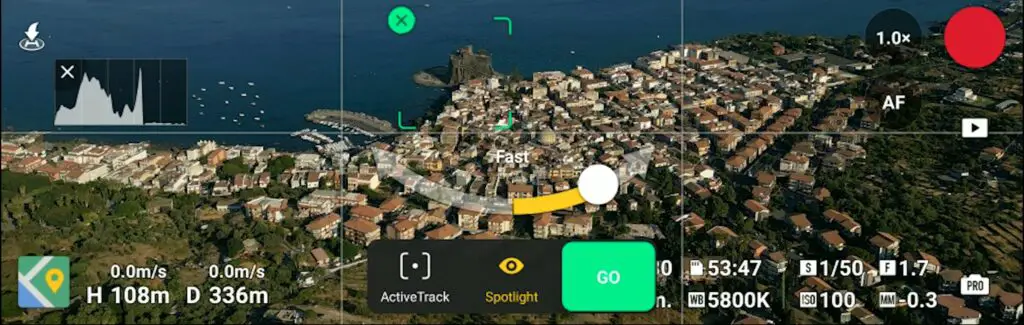
After tapping on Go the aircraft will start rotating around the target in the chosen direction. For a few seconds, the software will be evaluating the target and the scene
Then the box around the target will turn into a much smaller one. At this point, we can use the two sticks of the remote controller to ascend or descend and to get closer or further away from the target, which adds a lot of power to this mode
Speed of the Movement
The orbiting movement is much slower than in any other DJI model, even when set at maximum speed and this is a bit disappointing
It is possible to speed things up in post-processing, but if the scene contains elements in motion, like people, cars, or waves, it will not look natural
Obstacle Detection
When using Point Of Interest a lot of care is needed as the Mini 3 Pro doesn’t have lateral obstacle sensors
I decided to test how it behaves in case of a lateral obstacle while rotating
In the video above you can see the result of the test. I suggest staying away from lateral obstacles when using Point Of Interest
Tips and Tricks
Basic Move
Circling a landmark is a useful way to reveal a scene. It is particularly interesting when there are several elements in different planes, thus creating a sort of parallax effect where the different layers move slower or faster according to their distance
Combining Several Moves
By combining several moves with Point of Interest things get more exciting
A basic way to show this village on the East coast of Sicily on the Mediterranean Sea is to advance towards it at regular speed. But this way we don’t know much about the context and the surroundings
We can change the angle of view and advance towards it, this time showing two other villages further away with two very nice bays and some tiny volcanic islands, better!
Now we use Point of Interest by simply rotating counterclockwise with the castle as the target to gradually reveal the whole scene. Things get more interesting, as we add an element of surprise
Then I add some other movements with the two sticks of the remote controller to reveal the width of the bay pushing the right stick to the right to get further away from the target and widen the view during the rotation. I also very slowly descend to better position the other villages on the frame
Using the Zoom Functionality
With the Mini 3, it is possible to use the left wheel of the remote controller to apply a smooth zoom of up to 200% while using Point of Interest
I start with a 200% zoom over the Norman castle, and then use Point Of Interest with the same movement of the sticks as before, but this time slowly zooming out back to 100%
Then I do the opposite: I start at 100% and then gradually zoom into the villages in the distance up to 200%. The parallax effect is even more interesting, as by zooming in we are compressing the distance between the villages that now seem much closer to each other
The zoom of the Mini 3 is digital, so there will be a severe loss of resolution. This is not a concern when the footage will be filmed in 4k and encoded in 1080p
The same effect can be performed in a more flexible way by adding the zoom while post-processing, but the use of the wheel is useful for users who do not rely on computer editing
More cinematic examples of the use of Point of Interest are in my article 9 drone moves for stunning cinematic video
Point of Interest vs Spotlight
When combining the stick of the remote controller with POI in certain cases we can pull out some moves that can be done in a similar way with Spotlight
This is a scene with excellent parallax with a monastery in the foreground, several villages, some slopes, and the sea at different distances
Using Spotlight, after setting the top of the monastery as a target, I move diagonally to maintain the camera on the target while lowering the altitude, thus revealing the different layers on the background
Using Point of Interest the result is similar, but with a different flavor. You might prefer one or the other according to the situation
Using Point of Interest to Mimic Waypoints
The Mavic 3, the Air 3, and the Mini 4 Pro have a mode called Waypoints. It allows setting two or more points to perform complex cinematic moves
By using Point of Interest or Spotlight in combination with the two sticks of the remote controller we can produce a similar move
In the following example using Point of Interest while pointing the camera down, with the drone almost on top of the target, I lower the elevation with the left stick of the remote controller to combine two famous Hollywood moves: the screwdriver and the crane
You can check my specific article about Waypoints with the Mavic 3
Tracking
Point of Interest has some basic tracking capabilities. But in the vast majority of situations, the best tools for tracking are Spotlight and Active Track
It can be interesting for circling at close range around someone walking at a slow pace, maybe for a music clip, or an interview
POI can now be used at very close range and at only a couple of feet of elevation, which is perfect for these occasions
Vertical Format
The vertical video format can be used with Point of Interest and this is great news for users who are involved in social media platforms
All that is needed is to turn the camera into the vertical format before selecting the target