
Users often ask me how to control light conditions, whether to use manual or auto exposure, how to avoid overexposing or under-exposing. Mastering the correct exposure is crucial for drone footage quality
To control exposure in drone video I suggest planning the moves in advance and maintain the orientation of the camera away from the sun. Choosing the best lighting conditions is crucial, avoiding the central hours of a sunny day. The use of keyframes while editing helps in scenes with noticeable shifts of luminosity
Here you can check the prices of the different configurations of the current DJI line (affiliate links):
Other related articles you might find interesting:
- Mini 4 Pro Video quality
- Mini 4 Pro Exposure settings
- Mini 4 Pro Camera settings for video
- Air 3 Video quality review
- 9 drone moves for cinematic footage
- How to use ND filters
If you prefer to watch this as a video, you will find my YouTube version at the end of this article
Tools for exposing
The Exposure Triangle
In videography there are three parameters to set for exposure:
- Aperture
- ISO
- Shutter speed
They form the so-called Exposure Triangle
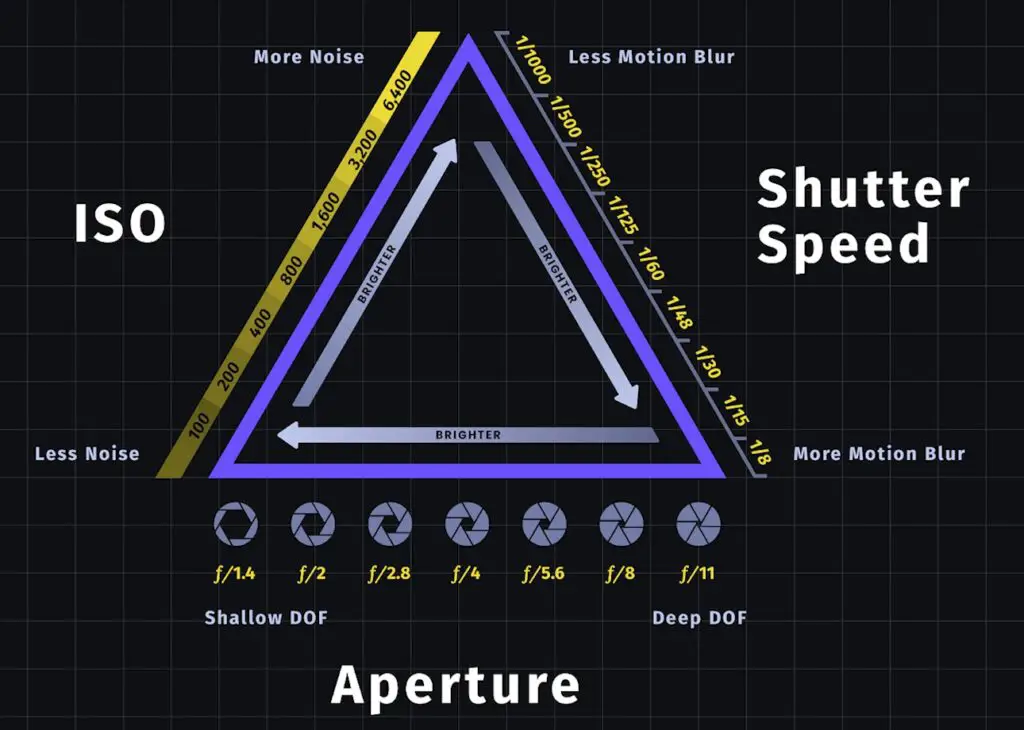
Most prosumer drones like the Mini 4 Pro and the Air 3 have a fixed aperture, so there are only two values to take care of. The only model of the current DJI line offering variable aperture is the Mavic 3
Being able to control the aperture gives some extra flexibility, but it is still possible to get good results with a model with fixed aperture
The Histogram
In the Camera tab of the Settings there are some tools to help exposing. The only one I use is the Histogram
It is a graph that represents the luminosity of the pixels in the scene with the darkest ones on the left and the brightest ones on the right
By simply looking at the histogram we learn interesting things about the scene:
- If the bars are bunched up against the left edge, the image is underexposed
- If they touch the right edge, the image is overexposed, and this is something to avoid
- If the bars touch both the left and right edge, it is the case of a high dynamic range scene, the most challenging situation
- If the bars are mostly in the middle and there is some space to the left and to the right, it is a low-contrast scene, which corresponds to friendly conditions for exposure
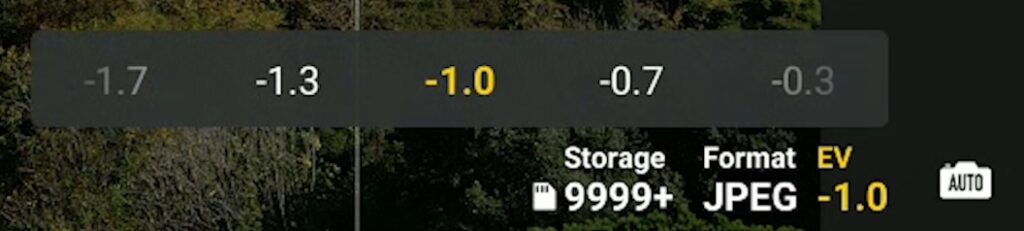
When using Auto Exposure it is possible to use the EV value to modify the overall luminosity in the scene. I prefer to set it to a slightly negative value between -.3 to -1 for two reasons:
- Most models tend to slightly overexpose
- It is easy to adjust a slightly underexposed image while editing, while nothing can be done to correct an overexposed one
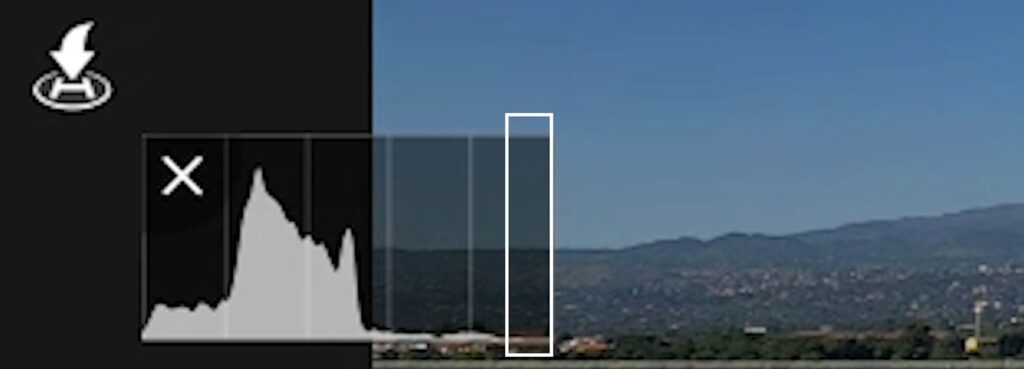
This is why when exposing I suggest to leave a gap between the last bar to the right and the right edge of the histogram
Position of the sun
Camera Orientation
When filming it is important to plan the moves in advance to reduce the differences in luminosity within a clip. In daylight it is strongly suggested to maintain the sun behind the aircraft
After setting the exposure values it is better to avoid orbiting or rotating movements toward the direction of the sun, as the dynamic range (which is the difference between the brightest and the darkest areas) will be too strong and some parts of the clip will be overexposed and others underexposed
I wanted to show the width of this red fjord in Iceland with a sliding rotating move, so I waited several hours to have the sun behind me before filming
On social media we often see clips like these, with the sky burnt beyond repair, while trying to get some light on the elements on the ground
The result is in my opinion unwatchable, we never see this in movies or in works by professional videographers
I suggest avoiding shooting footage in the direction of the sun in daylight, unless when the sun is heavily covered by clouds
These conditions are very challenging even for professionals and require the use of flat color profiles and heavy computer post processing
Changes in Luminosity
Another situation that requires planning is when starting a move with the camera facing down toward the ground and then progressively turning the gimbal upward
These moves are often interesting revealing shots, but the difference in luminosity will be very high once the sky enters the frame
It is crucial to always always have the sun behind the camera when performing these moves
Best light conditions
It is often said that the middle hours of the day is when videographers and photographers sleep
The results obtained in the central hours a sunny day are always disappointing as the shadows are very harsh and the difference between brightest and darkest areas too strong, in other words there will be too much contrast
The best results are obtained around sunset and sunrise, the time known as golden hour and blue hour. These are very favorable low-contrast conditions, as it easy to increase the contrast while editing
If we must shoot footage in the central hours of the day, it is preferable to wait for the sun to be hidden behind clouds that act like a big soft box reducing the contrast and softening the shadows
Manual vs Auto
Beginners generally start by using Auto exposure for video
Good results can be obtained in several situations if following the suggestions given in this article, but there are two main reasons why it is preferable to use manual exposure
The first one is to control the individual exposure values, ISO and Shutter Speed. To dig deeper on this topic, I suggest reading my articles about Exposure Settings with the Mini 4 Pro and How to use ND filters
When using auto exposure, in case of changes of light intensity in the scene, the software reacts by adjusting the exposure values. This translates in an abrupt delayed shift of luminosity that is a clear indication of amateurish footage
When using manual exposure the exposure values remain constant during the clip, it will then be possible to adjust the change of luminosity in a smoother way while editing, as we will see later
Post processing
When editing footage two main adjustments are performed most of the time
Adding Contrast and Saturation
It is used with most clips taken in favorable light conditions to spice up footage that looks just a bit flat.
I am using Premiere Pro, but the process is very similar with other editors
First of all we adjust the overall luminosity if needed
Then we push the contrast slider to the right. If the scene needs even more contrast we can lower the shadows and increase the highlights
Finally we adjust the white balance and add some saturation if needed
Using Keyframes
A more dynamic adjustment is performed when there is a difference of luminosity within a clip taken in manual exposure. The use of keyframes is required
A good example is a revealing shot starting with the camera pointing to the ground and progressively tilting the gimbal upwards. The luminosity increases as the sky enters the frame and the brightest point will be toward the end of the clip
We expose for the brightest part. The first part with the camera facing down will be too dark, with the luminosity progressively increasing as the gimbal is tilted up
In the video editor we scroll to the point where the overall luminosity reaches the maximum value, at the end of the tilt of the gimbal
We tap on the stopwatch icon for Exposure to set a keyframe. The value is stored in memory for that point. It is 0 as we have made no changes
We move the cursor back to the end of the darkest part of the clip, just before the sky enters the scene. We increase the Exposure value for that point as needed. Since we have already created a keyframe for Exposure, another one will be automatically added when we modify the value. The value entered is +0.5
The beginning of the clip until the first keyframe will have a value of +0.5. From the first keyframe to the second one the Exposure adjustment will progressively decrease from +0.5 to 0. After the second keyframe the value will remain at 0 until the end of the clip
In the resulting clip the difference in luminosity between the ground and the sky will be reduced in a smooth way without abrupt or delayed adjustment. The whole sequence appear to be well exposed