
Like most recent DJI models, the Mini 4 Pro has a hyperlapse functionality with four modes. But one of them is much more powerful and flexible than the others, Waypoint mode. It works by creating missions with several points for precise movements. Each mission is stored in memory and can be used in different conditions
I have already made an article about hyperlapses with the Mini 4 Pro, however, Waypoint mode deserves a detailed one
Other related articles you may find interesting:
- Mini 4 Pro Photography review
- Mini 4 Pro Camera settings for photography
- Mini 4 Pro Waypoint video mode
- Motion blur in time lapses and hyperlapses
If you prefer watching this as a video, you will find my YouTube version at the end of this video
Settings
Adding points
Waypoint mode operates differently compared to the other hyperlapse modes. It works by creating a mission based on two or more points
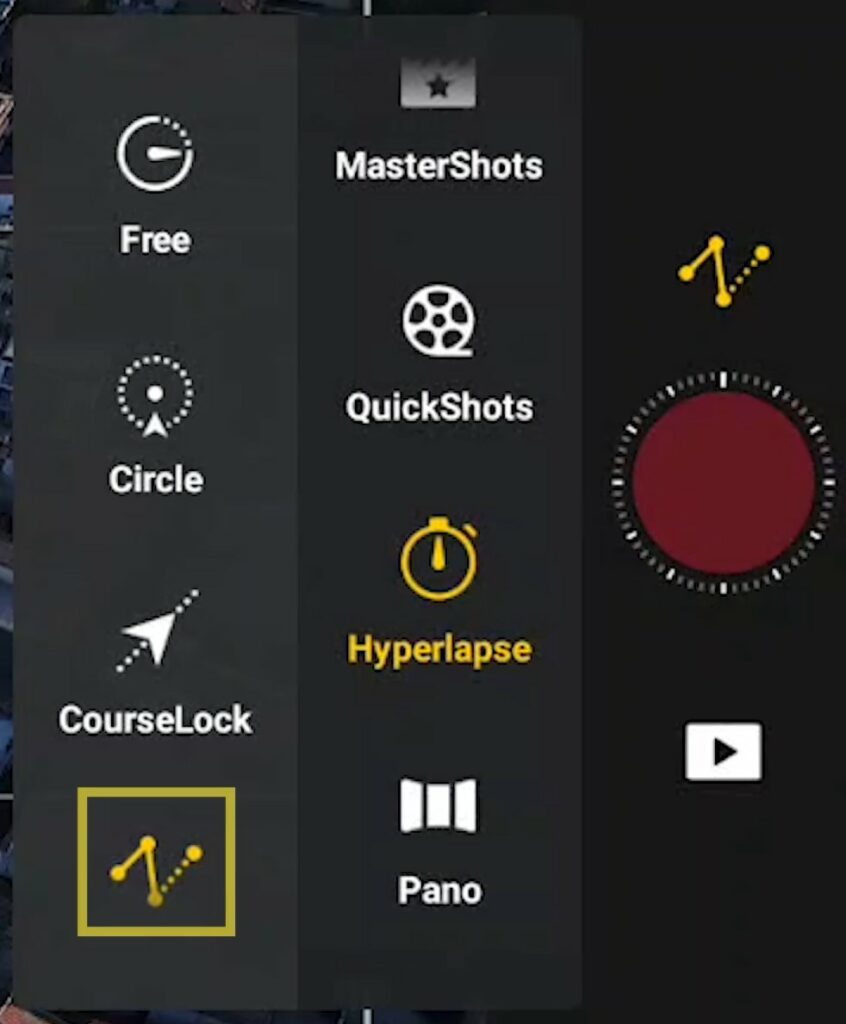
After choosing Hyperlapse in the Photo/Video menu, another menu appears to the left with the four hyperlapse modes:
- Free
- Circle
- Course Lock
- Waypoint
We choose the one at the bottom, Waypoint. A small window prompts us to Set Waypoint

We can add as many points as desired. For videography, in most cases, we only need a few points, in some cases, two points will be enough unless we want to follow the path of a river or a road, in which cases more points will be needed
Later in this article, I will show the same scene taken with two, three, and four points
To set the first point I fly to the desired location and orient the camera to frame the target, open the window by tapping on the small arrow to the right, and tap on the first icon to the left
The first point is set, the position of the aircraft, its elevation, and the camera orientation are stored in memory
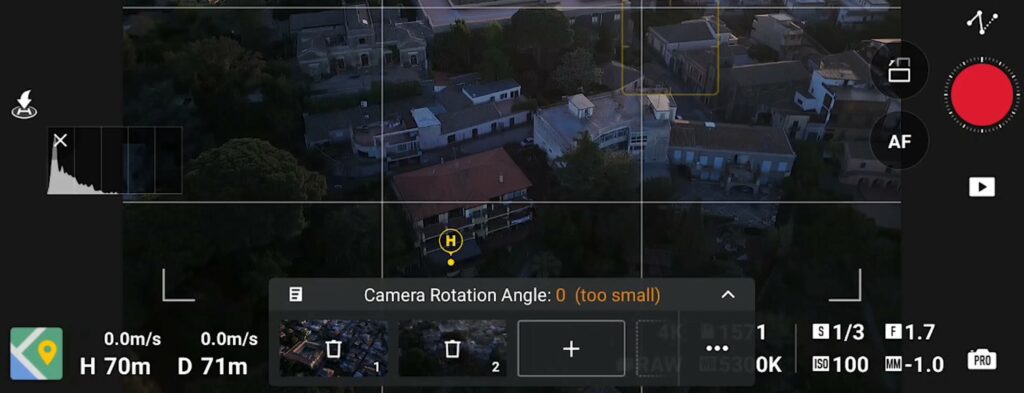
We can move to the position for the second point, orient the camera, tap on the next icon to set the second point, and so on
Here I will mainly analyze the settings specific to Waypoint mode, I suggest reading my article about hyperlapses with the Mini 4 Pro for more details about other useful settings that apply to all four hyperlapse modes
Sequence
After entering all the points needed, we tap on the three dots at the right of the window to access the other settings

The first one to the left is Sequence with two options:
- In Normal the photo shoot will start from the first point
- Tapping on it will turn into Reverse, where the shooting will start from the last point. This can save battery time in certain situations
I suggest always choosing the option that ends the move closer to the home point, as we will often be short of battery at the end of the shooting and need to land as soon as possible
Interval and Length
The option Interval sets the time in seconds between each photo. Assuming that we want a short movie of about 12 seconds, with the Mini 4 Pro we can choose 2, 3, or 4 seconds
The interval affects the speed of the moving elements within the scene. As you can see from these examples, the longer the interval, the faster the cars move
It also affects the time needed to take a certain amount of photos. With drones in general I aim for 300 photos for a hyperlapse of about 12.5 seconds
| Interval | N of photos | Movie length | Shutter speed |
| 2″ | 450 | 19″ | 1/4″ |
| 3″ | 300 | 12.5″ | 1″ |
| 4″ | 225 | 9.2″ | 1″ |
| 5″ | 180 | 7.5″ | 1″ |
With an interval of 3 seconds, it will take 15 minutes to take 300 shots. This is compatible with the battery life of the Mini 4 Pro, which is about 25 minutes, assuming that we don’t waste too much time setting up and returning home
With an interval of 2 seconds, we can take 450 photos in 15 minutes, for a longer movie of almost 19 seconds. This is often useful, but there is a caveat: at this interval, the shortest value available for shutter speed is ¼”, as the camera needs some time to buffer each shot
As we will see later the ideal shutter speed value is 1”. At ¼” the movement is not perfectly smooth, but still acceptable, so there is a bit of a trade-off
An interval of 2 or 3 seconds works well when the moving elements in a scene are people walking, cars, or other vehicle
When the movement is mostly on the clouds, an interval of 4 seconds is preferable. However at this interval in 15 minutes we can only take 225 photos, therefore we must compromise on the length of the hyperlapse, which will be a bit more than 9 seconds
We can even choose a 5-second interval for a more dramatic cloud movement, but the movie will be shorter at about 7.5”
You might have noticed that, unlike the other modes, Waypoint has no setting for speed. In this mode, the pace of the flight is automatically based on the distance traveled and the length of the short movie. The longer the distance, the faster the aircraft will fly
Shutter speed
The most important variable to master for epic hyperlapses is the shutter speed value, to achieve the correct amount of motion blur
I have described in depth the importance of motion blur in many articles, if you are serious about time lapses and hyperlapses, I suggest watching my specific article
I will quickly show you some clips made at different shutter speed values to show how important motion blur is
This one was taken without ND filters at a fast shutter speed of 1/3600“. This is a mistake that many users make when they start, the movement of the cars is extremely jumpy, nowhere near what one would see in real life, and simply painful to watch, a disaster!
In the next one, I put an ND filter, however, it is not strong enough for the light conditions: the shutter speed value is 1/20”. The result is marginally better but still unusable, the movement is still way too jumpy
For this one, I chose an interval of 2” for a longer short movie. I have the correct ND filter, but with this interval, the slowest shutter speed available is ¼”. In the resulting clip, we start to see some motion blur
The effect is not exactly what I aim for, but it is acceptable. We are trading off some motion blur for extra length
In this one I set an interval of 3” and I put on an ND filter of the correct value to use a shutter speed of 1”. To simplify we can consider 1” as the most suitable shutter speed value for drone hyperlapses. As you can see the movement is now very smooth and the hyperlapse looks much better
ND filters
A set of ND filters of the correct strength is crucial to applying a specific shutter speed value in different light conditions
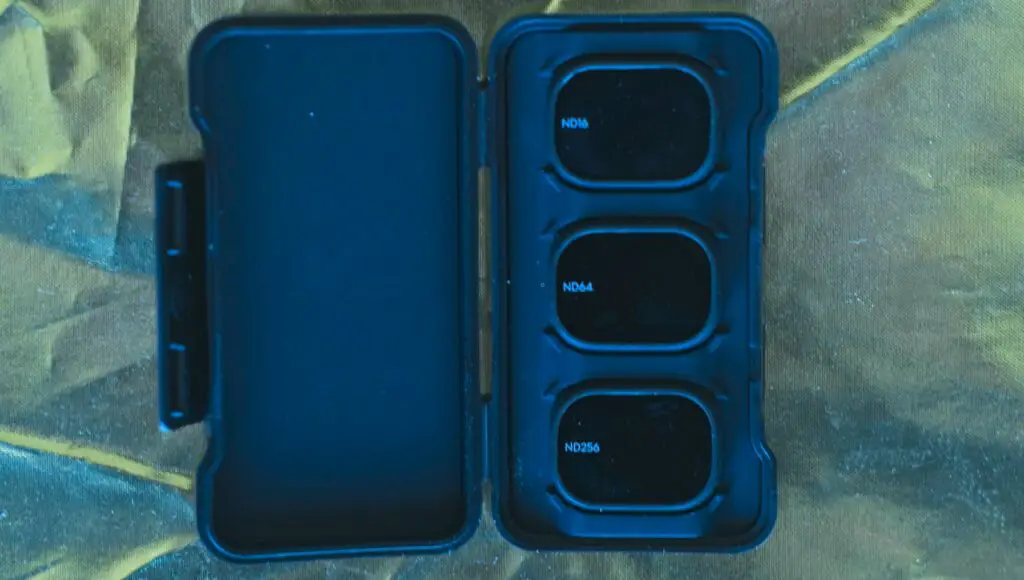
I have a set of three filters made by DJI with ND values of ND 16, 64, and 256 (affiliate link). The quality is excellent and they perform very well for video, but the maximum value is not strong enough, so hyperlapses can only be taken in the last hour before sunset or later
If you are serious about this technique, I suggest adding a stronger filter for brighter light conditions (affiliate link)
Examples
Let’s see a couple of examples of hyperlapses made on the same scene but with different numbers of points
For the first one, I will only use two points. I want to start to the right of the main square of this small village looking down from a maximum altitude
For the second point, I move backward, to the left, and lower the altitude while slightly lifting the gimbal to maintain the camera on the same square
After setting the two points, I choose 3 seconds for the Interval and 12 seconds for the movie length. At this interval, I can set the shutter speed to 1” for optimal motion blur
This is the result. We are just a few minutes before sunset facing the sun. I kept the camera toward the ground to avoid overexposure
The aircraft movement is perfectly smooth, as always when using just two points. The motion blur in the cars is, in my opinion, excellent
The second one was taken a few minutes later. I start from the same point, then move to the left until the camera is parallel to the main road, I insert the second point
I move backward slightly descending and insert the third point. Then I move backward and to the left while descending and set the fourth and final point. The camera constantly aims at the square of the little village
When using more than two points there is a risk of abrupt direction changes, but in this case, it works quite well
The quality of the auto-generated short movie has improved enormously compared to previous DJI models. The clip doesn’t need any stabilization
It is possible to assemble the individual RAW photos using a photo editor for better results, but I am happy with the auto-generated hyperlapse
Saving Missions
A powerful functionality of Waypoint mode is the ability to store each mission in memory
By tapping on the small icon at the top left of the small window we access the Task Library containing all the hyperlapses recently made with the most recent on top
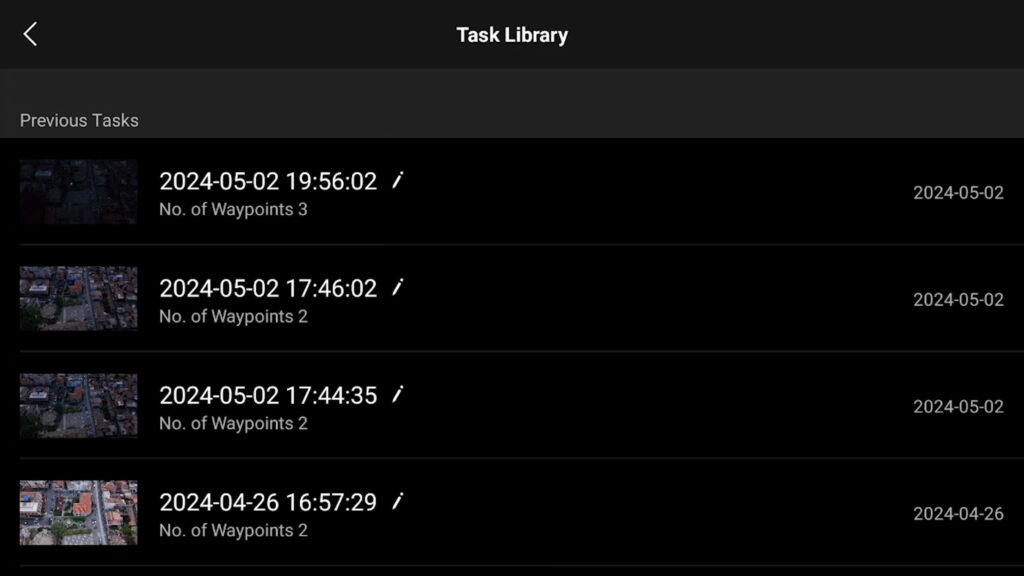
It is then possible to retrieve any of them to make the same hyperlapse in different light conditions or other seasons. It is also useful to experiment with different settings