
The hyperlapse function has been introduced by DJI in the Mavic 2 series, the 2 Pro and the 2 Zoom. It has been revamped in the Mavic Air 2 but some improvements were still needed. Since the Air 2S seems to do everything very well, let’s see how this function works with this model
What’s the difference between a Timelapse and a Hyperlapse?
Timelapses and hyperlapses employ the exact same technique. The only difference is that with time lapses the point of view is static, while in the case of hyperlapses the point of view moves. In the case of the Air 2S the point of view is the camera of the drone
To know more about this technique, I suggest watching my in-depth article Timelapse vs Hyperlapse tutorial which applies not only to drones but also to ground-based cameras and contains some very interesting examples
I have done a Step by step tutorial for beginners on how to shoot a drone time lapse, and another Step by step guide on drone hyperlapses, I suggest them as a starting point for beginners
DJI Air 2S Hyperlapse settings
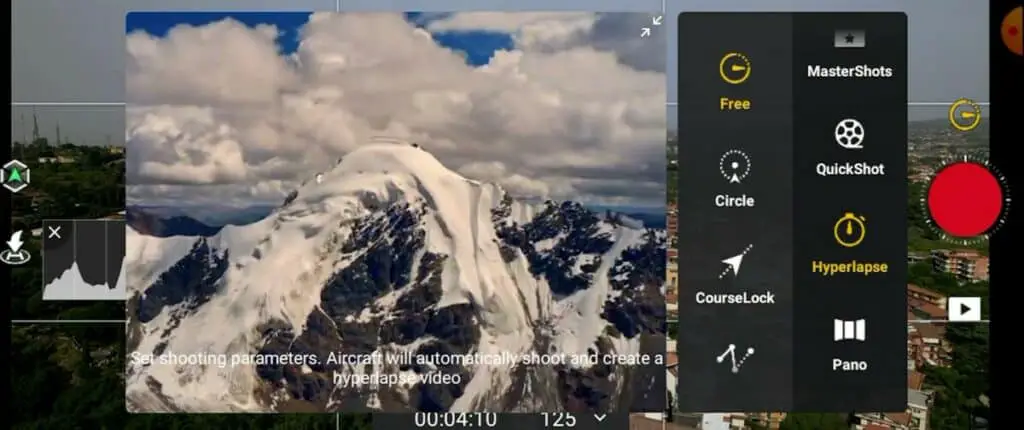
With the Air 2S, the button above the shutter opens the main Photo/Video menu. After choosing Hyperlapse on the menu on the right, the usual four modes are available: Free, Circle, Course Lock, and Waypoints. After completion, an hyperlapse is automatically generated
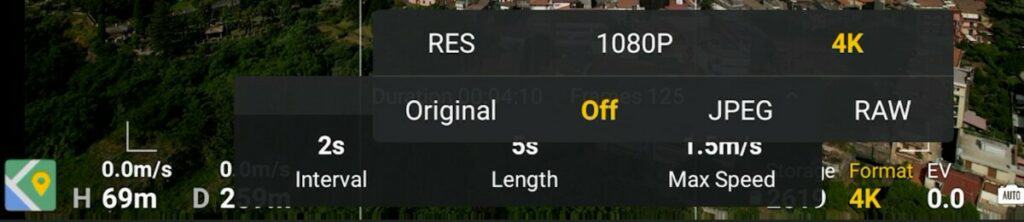
By tapping on the icon format at the bottom of the screen, we have a choice for the resolution of the automatic movie, between 1080p and 4k. In the line below we can choose to save the original photos either in JPEG or in RAW format. I suggest saving them in RAW to be able to create the hyperlapse after post-processing the images for a more professional result
The new layout is quite handy once we get used to it, as we can quickly access it, while in previous versions we had to go back to the settings pages
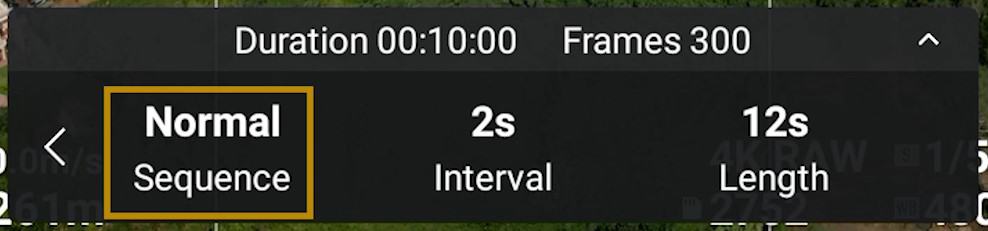
We will set the interval between each photo and the length of the short movie in the specific settings of each individual mode
For editing and color grading all the images I have used the excellent Luminar Neo, the tool I use for editing and managing all my photos. Click on the link for an in-depth analysis of this program
DJI Air 2S Hyperlapse modes
The following modes are available in the vertical hyperlapse menu of the Air 2S
- Free
- Circle
- Course Lock
- Waypoints
Free Mode
Free mode is considered the poor relative and often dismissed as the least spectacular. In previous models, it was the only one allowing changes in altitude and direction at low speed but with the Air 2S the much-improved Waypoints mode can handle these situations much better
I only use this mode for static time lapses where the point of view (the drone) doesn’t move
Course Lock
Course Lock is a very useful and versatile mode. In the window on the lower part of the screen, the direction of flight is set by pointing the camera and then pressing on the first icon to the left, Unlocked DIrection, which will turn yellow and will read Locked Direction
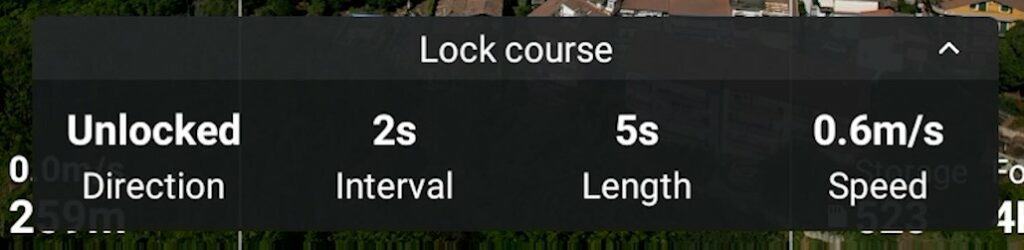
It is possible to choose a target by drawing a box around it. The camera will remain locked to that target while moving toward the chosen direction. In other words, the camera will move independently from the direction of flight. If no target is selected, the aircraft will simply advance toward the chosen direction
We can now choose the interval, length, and speed of our move. The minimum interval is now one photo every 2 seconds, even with RAW files, which is excellent, but the interval of 2 seconds is not available with the slow values of shutter speed needed, therefore in most cases the interval will be 3 o 4 seconds
The maximum length for a hyperlapses with the Air 2S is about 12 seconds, which requires 300 photos for a shooting time of 15 minutes at an interval of a shot every 3 seconds and a frequency of 24 frames per second
The slowest speed available is now 0.1 meters per second, a big improvement compared to the Mavic 2 line. Hyperlapses with a subtle movement of the point of view are often very interesting, especially when the scene already contains a good amount of movement
In Course Lock and in Circle mode it is now possible to use the two sticks of the controller to modify the elevation or to get closer or further away from the target. These moves are to be made at very low speed, as any fast move will result in very abrupt results
Circle mode
Orbiting around a target is an interesting way to discover a scene, especially when there are elements in different plains, creating interesting parallax effects
In Circle mode, the settings are similar to those of Course Lock. After choosing the target, the interval, and the speed, there are two options for the direction, clockwise or counterclockwise
As in the Course Lock mode, the sticks of the remote controller are available to add extra movement
Waypoint Mode
The first iteration of waypoint hyperlapse in the DJI prosumer line appeared with the Mavic 2 Pro and Zoom. The impression was that this mode could be the only one needed for perfect hyper lapses. But, as is often the case for a first version, it needed several improvements
For more details refer to my specific article Waypoint Hyperlapse
The aircraft had to travel at least three meters between each shot, which is too much. To get 10 seconds hyperlapses a distance of 750 meters was needed. The resulting movement was extremely fast, which is fine once on a few occasions, but not what is needed in most cases
With the Mavic Air 2 things improved, but the distance needed between each shot was still way too long
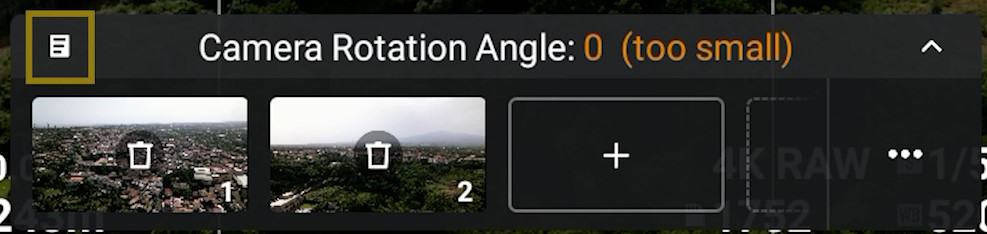
With the Air 2S, after choosing Waypoints in the Hyperlapse menu, we fly to the starting point of the hyper-lapse and frame the scene. By tapping the first icons on the left, the position of the drone, the altitude, and the orientation of the camera will be stored, we can then move to the next point and do the same
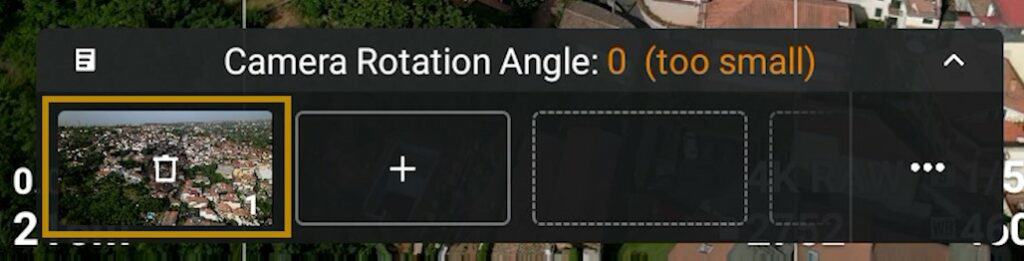
If needed we can add several points, although in most cases I use just two points, occasionally three for very precise and smooth results
After having selected the points, the next window proposes several choices. The first icon toggles between Normal and Reversed. When Normal is selected the drone will start the hyperlapse from the first point. if Reversed is selected, it will start from the last point thus saving battery life. During the whole process, Waypoint will handle the smooth transition between each point
How to Control the Speed in Waypoint Mode
The next choices are for Interval and Length, as usual. One thing to notice is that there is no choice for Speed
In Waypoint mode with the Air 2S the speed of the aircraft is based on the distance traveled. The drone has to travel at least 1.5 meters between each photo, so for a hyperlapse of 10 seconds, if the distance traveled is 150 meters, the aircraft will move at the minimum speed. 300 photos will be taken
If the distance is lower, the resulting hyperlapse will be shorter. As an example, if the distance traveled is 75 meters, only 150 photos will be taken for a final hyperlapse of 5 seconds
If the distance traveled is higher, the resulting hyperlapse will still last for 10 seconds, but the aircraft will advance to a higher speed. With a distance of 300 meters, the movement of the drone will be twice as fast compared to the first example
How to Save a Mission In Waypoint Mode
With the Air 2 in Waypoint mode, it is possible to save and name each mission by tapping on the tiny icon at the top right of the control window. It is then possible to perform the same hyperlapse at different times of the day, in different light conditions, or in different seasons, a bit like Monet’s cathedrals
Interval between photos for Hyperlapses with the Air 2S
When shooting hyperlapses with the AIR 2S the minimum interval available in the settings is 2 seconds. But some time is needed to buffer each shot. When using our preferred shutter speed, one second, the interval of 2 seconds is not available
In most cases, with the Air 2S the interval used is either 3 or 4 seconds, which is excellent when the main movement comes from people walking, cars, or boats. When the movement is mostly in the clouds, or with sunsets or sunrises, a longer interval would be desirable. But we are limited by battery time
How many photos do you need for a hyperlapse?
The amount of photos needed for a hyperlapse is linked to the interval between each photo and is limited by the battery life. In general, it is better to get a final movie as long as possible
In average conditions, the battery life of the DJI Air 2S is about 27-28 minutes. We must consider the time needed to set up the shot and to bring the drone safely home, therefore the maximum amount of time for the shooting process is about 15 minutes
For a hyperlapse with an interval of 3 seconds between each shot, 300 photos can be taken in 15 minutes. This generates a short movie of around 12 seconds. When using an interval of 4 seconds, 225 photos can be taken in 15 minutes, for a hyperlapse of 9.3 seconds, if using a timeline of 24 fps
How to make a Smoother Hyperlapse
The secret to smooth hyperlapses is the correct amount of motion blur. In most cases, the interval will be 3 or 4 seconds. With a drone in motion, the slower shutter speed we can use without introducing artifacts is one second. This value generates a good amount of motion blur
More details about Motion blur, the crucial element of time lapses, in my dedicated article
Are ND Filters Needed for Hyperlapses with the Air 2S?
ND filters are needed for hyperlapses with the Air 2S, as using such a slow shutter speed during the day, the image would be heavily overexposed. An ND of the correct strength value reduces the amount of light entering the shutter so that the desired speed can be used
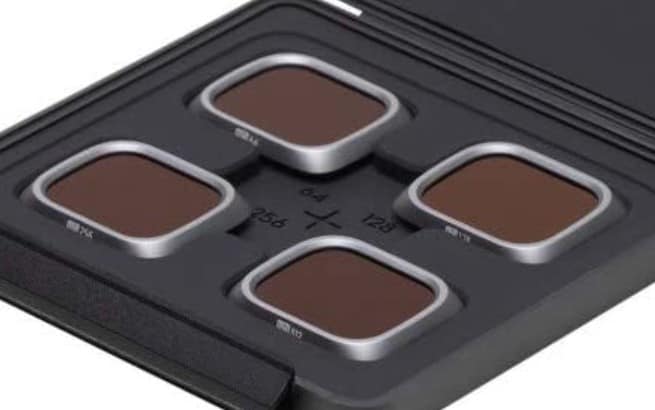
The Air 2S combo comes with a set of ND filters perfectly suited for hyperlapses, with values ranging from ND64 to ND512. They can also be purchased separately. Other models are available from third parties, but make sure to choose a set of similar strength values
THis article explains in-depth Why ND filters are needed for hyperlapses
Does DJI Air 2S have 8K Hyperlapse?
The so-called 8k hyperlapse mode is not available in the Air 2S. This feature was introduced with the Mavic Air 2. It will not be missed, as it was not a very convincing experiment
Related Articles
More Info and Examples about Hyperlapses with the Air 2S
The following video contains plenty of extra examples and explanations about hyperlapses shot with the DJI Air 2S