
An hyperlapse is a time lapse with a moving point of view, in other words the camera is in motion during the shooting process
Drones are the perfect tool for hyperlapses, as they can move in all directions, including elevation changes. They offer unique points of view free from obstacles from high above. I will show how to make a drone hyperlapse in the easiest possible way, suitable for beginners
You can check the prices for all the different configurations of the Mini 4 Pro, for the Air 3 and for the Mavic 3 (affiliate link)
To post-process the individual RAW files I have used Luminar Neo, my favorite program for photo editing and photo and video organization, here you find info about the pricing options together with a discount coupon (code “Vicvideopic”)
If you prefer to watch this as a video, you will find my YouTube version at the end of this article
Hyperlapse modes
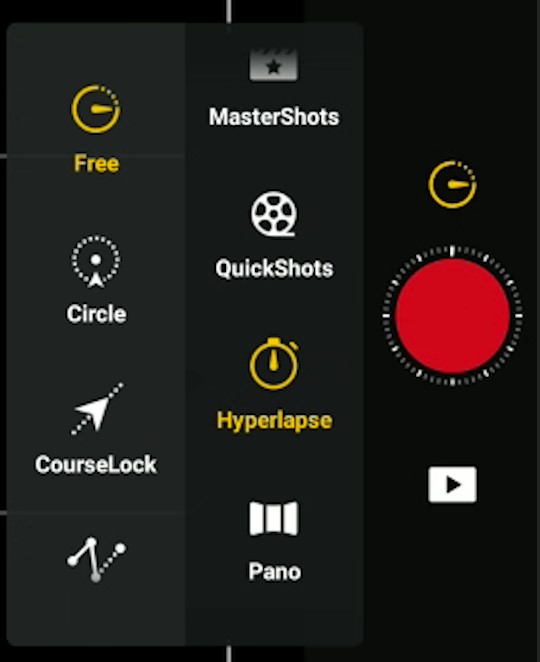
We access hyperlapse mode in the photo/video menu near the shutter. We are presented with four different modes: Free, CIrcle, Course Lock, and Waypoint
- The mode Free is the one to use for static time lapses. I have made a step-by-step guide on how to make drone time lapses
- For hyperlapses, the only other mode I occasionally use is Circle, as it is not easy to replicate a perfect circular move using Waypoint
- I practically never use the mode Course Lock, as it produces moves that can be performed in a much more accurate and flexible way using Waypoint
- Most of the time I use Waypoint mode, which is by far the most powerful and flexible one
Choice of the scene
Time lapses and hyperlapses need movement in the scene, otherwise a simple photo is more interesting. The movement may come from people walking, cars, boats, or other vehicles, it can also come from natural events, like clouds, or transitions from day to night
The same concept of motion blur also applies to Long-exposure photography with a drone or with a regular camera, you can watch my dedicated article for more details and for creative photography ideas
In the case of hyperlapses the motion of the point of view, which is the camera on the drone, is an extra way to add movement to the scene
This is the scene for our hyperlapse: a quiet village on the foothills of Mount Etna in Sicily, with several other villages on the slopes of the volcano. It is better to choose the busiest parts of the day to get some action from cars and people walking, we can also catch some cloud movement around the mountain and even some activity from the volcano if we are lucky
It is also crucial to choose the time of the day for the best light conditions. I always avoid shooting photos, videos and hyperlapses in the central hours of a sunny day. The shadows are way too harsh and the results are always very disappointing
It is suggested to choose the first couple of hours after sunrise or before sunset, or to shoot with the sun covered by clouds, acting like a big softbox. Another excellent time is after sunset when the street lights are turned on and there is still a bit of natural light, although some advanced post-processing is needed due to the shift in luminosity
I have done specific articles about drone hyperlapses with the different models of the current DJI prosumner line
Settings
Hyperlapses open the door to plenty of creativity, it is possible to obtain slightly different results by modifying some parameters
I often shoot the same hyperlapse several times, in different light conditions or applying different values to certain parameters, until I get the ideal result. This process of trial and error is part of the fun
Length of a Drone Hyperlapse
There are two parameters that are common to all the different hyperlapse modes: the length of the resulting short movie and the interval between photos
A hyperlapse must be at least 10 seconds long to be fully appreciated. In general, I set the length at 13 seconds. In certain situations, I prefer longer ones, especially in the case of transitions from day to night, but with drones, we are limited by the battery life
Interval Between Photos
The interval in seconds between each photo modifies the speed of the movement within the scene, as shown in these examples
With drones, we cannot use intervals shorter than 3 seconds due to the time needed for buffering each photo and because of the long shutter speed needed. Due to the limited battery life, in most cases, the longest interval available is 4 seconds
I generally choose a length of 13 seconds and an interval of 3 or 4 seconds. The shooting time needed with an interval of 3 seconds is approximately 16 minutes. With an interval of 4 seconds is about 22 minutes, which is still feasible, although a bit tight for the battery life
3 seconds is a good choice when the movement comes mainly from people, cars, or other vehicles, 4 seconds is preferable in the case of cloud movement
Speed of the Drone
Another parameter to select is the speed of the movement of the drone. It is set in different ways according to the hyperlapse mode we are in, as we will see later
In general, I prefer to have a relatively slow and subtle movement, but here again, different speed values can give a different feel to the same hyperlapse
Exposure Settings
In most DJI models the aperture is fixed, with the exception of the Mavic 3, so there are only two values to set for exposure: ISO and Shutter Speed
For ISO it is preferable to keep the lowest value, which is 100, but if needed we can go up to 800 without a noticeable loss of quality, this gives us some room to play with
The value for shutter speed is crucial as it affects the amount of motion blur, the single most important factor in hyperlapses. The ideal value for shutter speed with a drone is 1” in easy wind conditions
Due to the light conditions, it is not always possible to dial in this value. In this case it is possible to select faster values up to 1/5 “, but the flow of the elements in motion will not be as smooth
Motion blur is the most important topic for time-lapses and hyperlapses, but it would take too long to analyze it in depth here. To anyone seriously interested in hyperlapses I suggest watching my specific article about motion blur in time lapses and hyperlapses
To select specific exposure values in different light conditions ND filters are needed. Please refer to my article Why ND filters are needed
These are the ND filters I suggest for the different DJI models:
- Mini 4 Pro: set of ND filters for video. For hyperlapses I suggest adding a stronger ND 1000 filter
- Air 3
Other Settings
By clicking the small icon at the bottom left of the exposure window we access some other options
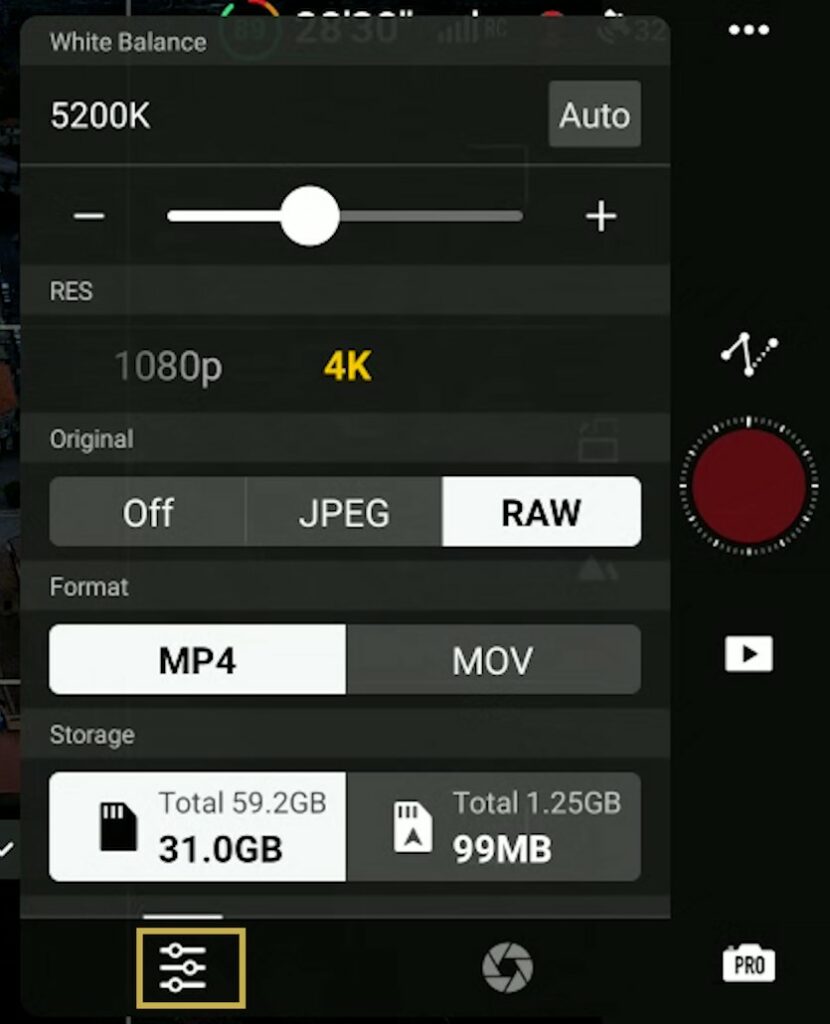
At the top the White Balance: I suggest always using manual mode. With most models, I set it at around 5500 Kelvin, but I find that the Mini 3 and 3 Pro have a tendency towards a yellowish tone, so with these models, I set it at around 5000 Kelvin
Then the resolution of the auto-generated short movie, the options are 4k and 1080p, I always use 4k
Further down it is possible to choose to save each individual photo in RAW or JPEG format in order to post-process them for much better results
I always use the individual RAW files, but beginners can start by simply using the auto-generated shot movie which has improved a lot in the current generation of DJI drones
More details and examples about all the settings needed in my article about Hyperlapses and time lapses
Circle Hyperlapse
Let’s start with a simple orbiting one. I set the drone at the maximum height allowed by the rules, a bit more than 100 meters so that I can frame the center of the village with a top-down view, keeping the sky out of the equation. This reduces the dynamic range and makes it easier to find the correct exposure
The sun is covered by clouds and this is excellent for this kind of shot, as the shadows will be very soft reducing difference in luminosity within the image. The village has narrow roads and with the full sun, the shadows would be too dark
We are in the middle of a Sunday afternoon and I hope to find some action in the village. I put on my strongest ND filter, a ND 1000, and bring the drone to the desired starting position. In the DJI Fly menu, I enter Hyperlapse mode and choose Circle, the second icon from the top
I start by setting the exposure: I keep the ISO at the minimum value, 100, and try to set the shutter speed to 1” for the correct amount of motion blur
The light is a bit too strong with this ND filter, so I have to settle for a faster shutter speed of about ½”, the flow of the cars should be acceptable, although not ideal
Then I select a target by drawing a box around it. It will be the center of the orbiting move. I fine-tune the exact starting position and then I enter the length of the hyperlapse at 13 seconds and the interval at 3 seconds
The next selection is the speed of the movement of the aircraft during the shooting process. In most cases I like a slow, subtle move when the scene already has a good amount of motion, so I choose a low value of 0.2 meters per second, feel free to experiment with different values
Finally, we need to select the direction of the move between clockwise and counterclockwise. We can then hit the red shutter and the aircraft will start shooting 325 photos while rotating
This is the result: the flow of the cars is quite good, although not perfect as I could not use the desired 1” shutter speed
The shadows are nice and soft, as the sun is covered by clouds, although, in the second part, there is an increase in luminosity due to the sun breaking out of the clouds. I am quite pleased with the result
Waypoint Hyperlapse
Waypoint is the most powerful and flexible hyperlapse mode. The aircraft flies to each individual point forming a mission. The position of the aircraft, the elevation, and the direction of the camera will be stored in memory. The software will handle the smooth transition between points
It is easier to follow with a simple example. I take off the same day, later on in the afternoon, the sun is still covered by clouds reducing the luminosity, which is good for our purposes
I select Waypoint mode and I still have the ND 1000 filter on. I will start from the center of the village with the camera pointing down, like in the previous Circle hyperlapse, but this time I will end up framing Mount Etna, thus including the sky in the image
The luminosity will change during the hyperlapse so I need to enter exposure values suitable for both conditions. When framing the center of the village I can see that I can use the ideal shutter speed of 1”, the scene is dark, so it would help to raise the ISO value to 400
Moving to the last point, where the camera faces the top of Mount Etna, I notice that I can keep the shutter speed at 1” and raise the ISO value to 200, excellent!
I make sure that in the Safety tab of the Settings the Obstacle Avoidance Action is set to Bypass for safety reasons
Now it is time to set the points forming the mission. In general, I prefer two use just 2 or 3 points to avoid too many changes of direction, although it is possible to enter many more
I fly to the first point at the maximum elevation close to the center of the village with the camera pointing down. After framing, I open the small window Set Waypoint and tap on the icon to the left to enter the first point of the small window
I then fly about 30 meters backward and lower the altitude while maintaining the center of the village in the middle of the frame and enter the second point
Finally, I turn the camera to the right to frame Mount Etna while moving diagonally backward and to the left before entering the third and last point
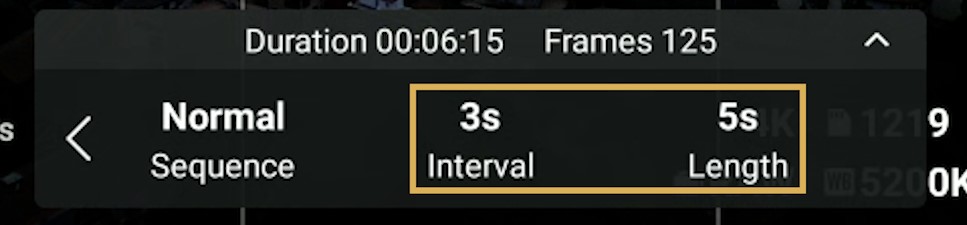
I then set as usual the length of the short movie to 13 seconds and the interval between photos to 3 seconds
In the left part of the small window it is possible to choose Normal Sequence, in which case the shooting process will start from the first point, tapping on it will reverse the sequence and start from the last point, which can be useful to save battery time
This is the result: The camera follows the cars in the center of the village while slightly descending and moving backward, before sliding toward Mount Etna
The flow of the cars is very smooth with the shutter speed at 1” and the shadows are very soft. Sadly we cannot see the tip of Mount Etna, as it is covered by clouds
Notice that there is no option to set the speed of the move. In Waypoint hyperlapses the speed is a function of the distance traveled during the process: the longer the distance the faster the speed. For more detail please refer to my article about Waypoint Hyperlapses
In Waypoint mode it is possible to save each individual mission. This is extremely useful to quickly make the same hyperlapse with different settings, at different times of the day, or in different seasons