
It has been a very long wait, but It has finally arrived, just when everyone had given up hope
Waypoint was everyone’s favorite feature for video in the Mavic 2 and Phantom 4 series. This feature was in the past limited to the flagship models of DJI prosumer line, but surprisingly it was not so far included in any of the current models, even though for hyperlapse, several models have a Waypoints mode. Here is my in-depth analysis of Waypoints mode for hyperlapses
DJI Fly app 1.9.0 now includes the very powerful Waypoints 3.0, for the moment only available with the Mavic 3 and 3 Classic. A sensational tool is back. Many users will ask if it will be soon available on other models. My impression is that DJI will only offer it in the flagship model for marketing reasons
If You Prefer To Watch This As a Video
What is Waypoints 3.0?
Waypoints 3.0 is an intelligent flight mode that works by creating missions based on a path made by several points. For each point, the position of the aircraft, the elevation, the orientation of the camera, and the speed are stored in memory. When a mission is launched, Waypoints handles the smooth transition between points
It is the ideal tool for repetitive tasks like surveys, agriculture, building sites, and so on. But it is also the most powerful tool to achieve all sorts of cinematic moves in videography
There are two different ways to create a Waypoint mission. The first one is much simpler, faster, and more precise, the one to use for videography. The second one uses maps and can be useful for repetitive tasks, I will analyze it later on in this video
How to Use Waypoints 3.0 with the Mavic 3 or 3 Classic
With the first method, after hitting the new Waypoints icon above the RTH button, a window appears in the lower part of the screen with two options, Waypoint and POI
Let’s start with Waypoint. I fly to where I want my mission to start, to the right of this village, framing this old house as the focal point. I intend to store the mission to be used at different times of the day. At sunset, the sun will be right behind the village, so I prefer to start from a high altitude of just above 100 meters to position the gimbal slightly down and keep the sky out of the frame to avoid overexposure
After framing I set the first point by simply hitting the C1 button on the back of the remote controller. To help frame and check the altitude I prefer to close the window
For the second point, I move closer to the village at the same altitude and maintain the same focal point facing the old house and the center of the village, to set the point I press again the C1 button. For the third point, I move to the left, lower the altitude to just above 50 meters, and tilt the camera slightly upwards and to the right to frame majestic mount Etna
Before framing I increase the zoom level to 2x. Since I will be shooting at 5.1k the digital zoom should not lose too much resolution when encoding in 4k. Once again I press C1 and now the three points forming the mission have been set
There are several parameters that can be adjusted. By tapping on the three dots at the right of the small window we access the global ones that apply to all points: I increase GlobalSpeed slightly to about 4 m/s
It is possible to select the behavior at the end of the mission, with a choice of Hover, RTH, Land, and Back to Start. Some care is needed with the option Land as it can be dangerous: the drone might land in water or on someone’s property. The same options are available in Signal Loss. Start Point in most cases will remain on the first point
There are also several options relative to each individual point, we can move through the different points using the small arrows at the top of the window
The values for Altitude, Heading and Gimbal TIlt are the ones stored when hitting the button C1, but they can be individually adjusted here for each point if needed. In Camera Action, we can take a photo, start recording or stop recording
In global speed, it is possible to modify the speed for the whole mission or, by tapping on the small icon at the lower left, we can choose Custom to enter a specific speed for that point. In this case, I want the move to slow down at the end of the mission, therefore I enter a value of 1.3 m/s for point 3. The aircraft will move at the global speed of 2.5 m/s until point 2 and then slow down between points 2 and 3
It is also possible to modify the digital zoom level at each point. Notice that since at point 3 I set the zoom at 2x, the value has been stored automatically. Finally, it is possible to have the drone hover for a specified number of seconds at that point
How to Use Saved Waypoints Mission with the Mavic 3
The most powerful feature of Waypoint 3.0 is the ability to save a mission. By tapping on the small icon to the left of the window we access all the missions and we can name and save the new one. It is then possible to use the same mission at different times of the day or in different seasons
After hitting Go, the aircraft will fly to the first point to perform the mission. Waypoints works at all resolutions, including 5.1k, and with all three color modes
Here you can see it in action in HLG…
…and then in D Log
Since the mission is saved, it is extremely fast and easy to reshoot the same clip in different light conditions
And if the exposure is not perfect, it only takes a couple of minutes to modify the setting and reshoot it
Cinematic Moves Made with Waypoints 3.0 with the Mavic 3 or 3 Classic
There are countless applications for Waypoints to perfectly produce complex cinematic moves. Let’s try it with a typical movement for cinema and real estate, the Crane. It is a hard move to perform manually, but very simple using Waypoints
I start on top of this house at a relatively high altitude with the camera pointing straight down in a bird’s eye view and set the first point, then I move backward descending until a position in front of the house revealing the background and set the second point. This is the result
By adding a third point we can make the movement more interesting by combining the crane with another Hollywood movement, the screwdriver
I set the first point again in a top-down position but this time after rotating the camera by 90°. I then add a second point by moving away from the target, rotating the camera to the right by 45°, and lowering the altitude, the third and final point remains the same as in the first example
This is the result. The movement is not perfectly smooth, as the second point should be a bit lower. But since the mission is stored in memory, all I have to do is simply select the second point and modify the altitude. I love Waypoints!
Some creative examples of the use of Waypoints are in my article 9 drone moves for stunning cinematic video
How to Set Waypoints on a Map with the Mavic 3 or 3 Classic
The second method for Waypoints works by setting the points directly on the map. It is more time-consuming and not as precise, since the points are computed based on the GPS, so some slight positioning errors are possible. For safety, It is preferable to know the surroundings and eventual hazards, although the omnidirectional obstacle sensors of the Mavic 3 are very reliable
The advantage of setting Waypoints on a map is that missions can be created from home or from the office when it is not possible to be on the field. It may be useful for complex repetitive missions, but for videography the first method is suggested, setting the point on the field by flying to their location

Tap on the map at the bottom left corner to have a full-screen view and zoom in to the desired location. There are two options, Waypoints and POI. Waypoints are set by simply tapping on the screen. Each point is represented on the map and on the lower part of the window
The settings for the entire mission and for each individual point are the same as for the previous method. The big difference is that when using the map the values must be entered manually, and this is time-consuming
Selecting the camera orientation and the gimbal tilt is hard without a real view of the scene. This is where points of interest come into play
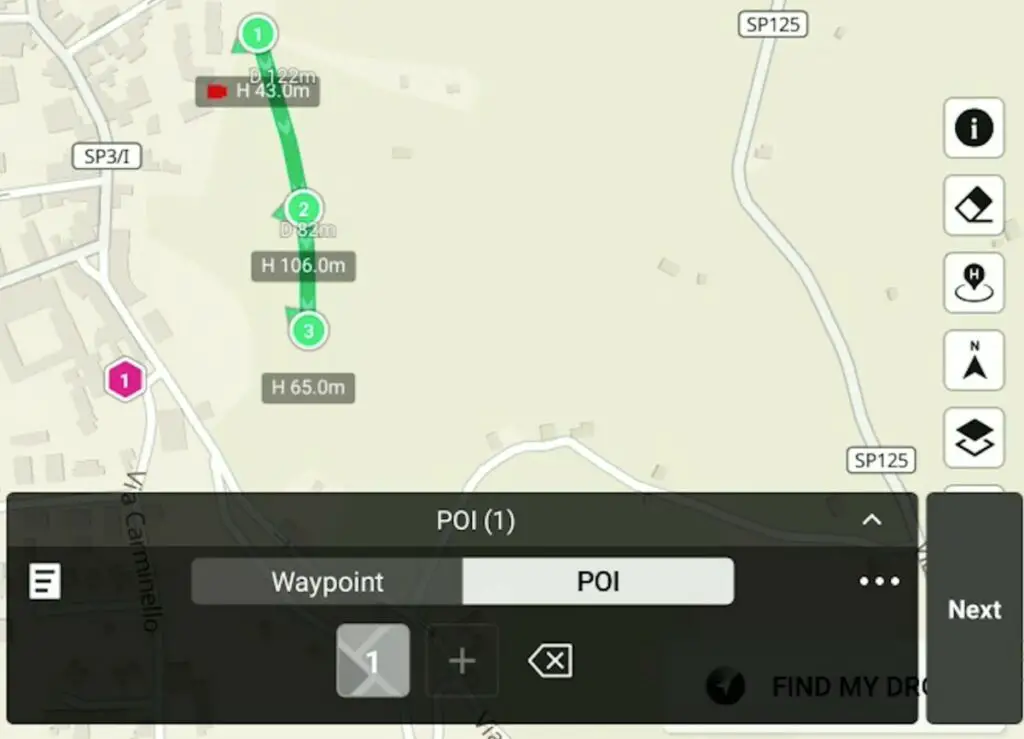
Points of Interest are set in the same way, by simply tapping on their position on the map. It is then possible to have some waypoints (or all of them) facing a POI. in this case the altitude, camera orientation, and gimbal tilt will be automatically entered making the process much easier