Up next in 10

Luminar Neo November 2025 Update - Light Depth
Show More Show Less View Video Transcript
0:00
The pre-release marketing campaign
0:02
announced the tool name volume, but the
0:04
name must now be changed to the more apt
0:07
light depth.
0:09
This is not simply a new
0:11
functionalities, but a revolutionary way
0:13
to control the depth of the light in
0:15
image containing elements on different
0:18
layers.
0:21
Previous version contain a tool named
0:23
relight to adjust the area on the
0:26
background and foreground of an image.
0:28
The idea is interesting, but something
0:31
was missing. This functionality has been
0:34
massively improved with the death map
0:36
capabilities of light depth. A true game
0:39
changer.
0:41
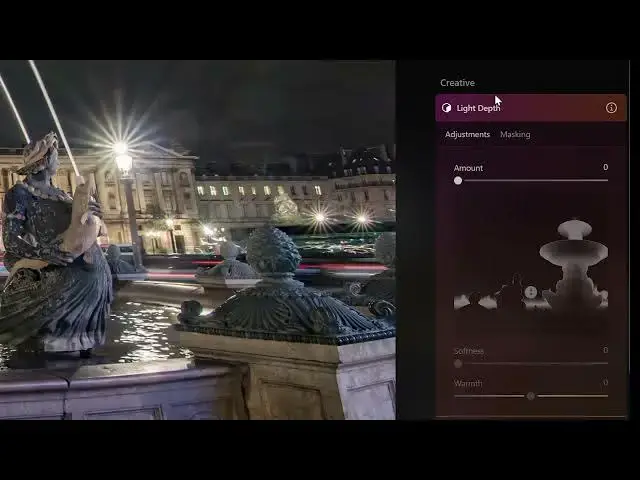
Let's move to Paris to show you how it
0:43
works. In this image of Plaston Cord, we
0:46
have four layers. the front of the
0:49
fountain,
0:51
the center of the fountain with a
0:53
statues,
0:55
the buildings with columns behind,
0:59
and the sky behind the building, which I
1:02
prefer to have blacked out as it was a
1:04
very foggy night with a few raindrops on
1:06
the lens. As we can see, if I add light
1:09
to the background,
1:11
the image looks already quite nice as it
1:14
is, but it is an excellent one to show
1:16
you how light dep works to add light to
1:19
specific elements based on their
1:21
distance from the camera. When we open
1:24
the tool, we notice that the software
1:26
has created a mask with a shape similar
1:28
to the central part of the fountain,
1:30
which has been detected as the main
1:32
element of the image.
1:36
Like in a luminosity mask, the white
1:38
part reveals and the black one conceals.
1:41
So if I add light using the amount
1:44
slider, only that specific part of the
1:46
image is affected.
1:50
Notice how the light remain constant in
1:52
the buildings behind even though they
1:54
are on the same horizontal plane. This
1:57
indicates that this is not a simple
1:59
linear mask,
2:02
but rather works by mapping the distance
2:04
of the elements compared to the camera.
2:08
The mask can be modified by holding and
2:10
dragging the white icon vertically.
2:14
Only the elements on the same layer are
2:16
affected by the extra light.
2:20
We can also modify the height of the
2:22
mask using the two cursors above and
2:24
below the white icon.
2:34
Notice how we draw attention to the
2:36
central part of the fountain by dragging
2:38
the amount slider to the right.
2:44
Further down, we have other sliders.
2:46
Softness expands the edge of the mask.
2:49
The effect is very subtle and it is
2:52
generally better to increase its value.
2:58
warmed shift the color scheme towards
3:00
blue or yellow.
3:05
In the panel advanced settings, we can
3:07
independently adjust luminosity and the
3:09
white balance for the elements in the
3:11
foreground and background.
3:17
For more complex images, other tools can
3:19
be used before or after light depth.
3:22
This image is quite complex as it was
3:25
taken at sunset against the sun
3:27
partially covered by clouds. We can
3:30
start by opening the lens tool and using
3:32
the accent and sky enhance sliders to
3:35
adjust the overall luminosity.
3:39
With the structure tool, we can very
3:41
gently increase the amount and fine-tune
3:44
the boost slider.
3:48
When we open light depth, we notice that
3:50
the monastery has been recognized as the
3:52
focal point of the image and the map has
3:55
been created accordingly.
4:01
After adjusting the different sliders,
4:03
we can move to the super contrast tool
4:07
to fine-tune the contrast in the midtone
4:09
and the shadows.
4:15
We can then check the result before and
4:17
after the different tools have been
4:18
applied.