Up next in 10

DJI Mini 4 Pro: Exposure Settings for photography
Show More Show Less View Video Transcript
0:00
Let's move to the exposure settings located in the lower part of the screen to the right
0:06
In Auto mode the exposure is set by the software. We can only access the EV for exposure value to adjust the overall luminosity
0:17
I find that the app tends to slightly overexpose. Therefore I prefer to set the value at minus point three or minus point seven
0:27
When the camera moves the exposure values are modified to maintain a constant luminosity
0:32
but the individual values for ISO and shutter speed are not shown
0:37
This is one of the reasons why I always suggest using manual exposure as often we want to
0:43
be able to control these values. By tapping on the icon to the right we access manual mode, labeled as Pro
0:52
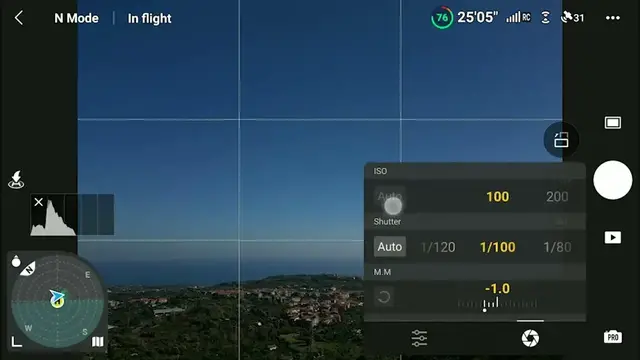
Then tapping on the area of the values slightly to the left, we access the window for exposure
0:59
In photography there are three parameters for exposure, ISO, aperture and shutter speed
1:06
But with a Mini 4, like with many other Presumers drones, the aperture is fixed
1:11
Therefore we have only two values to deal with. We can set the values for ISO and shutter speed independently
1:19
The MM value at the bottom cannot be modified as it displays the luminosity resulting from
1:25
the value chosen above compared to the optimal exposure computed by the software
1:32
In this window there is a feature that was added in the Mini 3 Pro
1:36
There are two auto buttons for ISO and shutter speed. We can now set one of the two values, either ISO or shutter speed, as auto
1:46
Let's say we want a fixed value for ISO, 100, to get the best possible image quality
1:53
So we set ISO to 100 and shutter speed to auto When luminosity varies only the value for shutter speed changes to maintain the correct luminosity leaving the ISO at 100 Notice that the value
2:07
MM has now turned into EV and it can be modified. On other occasions we might want a constant
2:16
value for shutter speed. So we select this value and set the ISO to auto. And this time
2:23
as the luminosity increases or decreases only the ISO varies. We can also choose to put both values to auto
2:32
It is very much like using auto exposure but there are some advantages
2:37
As in auto mode the individual values for ISO and shutter speed are not shown while
2:43
using this method we can see both of them. By tapping on the icon at the lower left, we access another window with other options
2:53
The watt balance can be set to auto, in which case the value will adjust automatically as
2:59
the luminosity changes. I prefer to keep it on manual, and I generally set it to about 5500K, which is the average
3:08
value for sunny condition. I like the GIFLY app interface with most of the settings available from a few windows
3:18
But there is something that I find very annoying. The exposure settings are sticky for each photo or video mode
3:26
Let's say that I'm shooting single photos. I set the exposure and take the shot
3:31
Then I decide to take five bracketed photos of the same scene
3:36
The exposure values will be the one used the last time a bracketed image was taken, so
3:41
I need to expose again. The same applies to 48MP mode or if I switch to Auto mode
3:49
It would make much more sense to memorize the latest exposure value for all modes to
3:54
match the current light conditions