Master Shots, What is it?
Master shots is a feature introduced with the Air 2S. I must admit that at first, I dismissed them expecting just a compilation of quick shots. But once I discovered it I can see several interesting ways to use them
Master Shots is a series of automated moves performed by the DJI Air 2S. After selecting a target, with a single click, the drone will perform a series of automated moves around it for about 3 minutes in order to generate a 20 seconds short movie of the surroundings with music. The footage can also be stored in the memory disk and used as individual clips that can be edited and used in other projects
At first glance, it looks like a simple tool to quickly produce a movie of your vacation to be posted on social media. But we also have access to the original footage and some of the moves are quite interesting, cinematic, and not very easy to achieve manually
So, it can be an interesting tool to generate quickly and without effort, some very interesting footage, and to quickly scout an unknown location. After watching the footage back home on the computer, we might desire to go back to the location for some extra moves
Which DJI drones have Mastershots
Mastershots is a feature that has been introduced with the DJI Air 2S. It has also been included in the flagship model of the DJI prosumer line, the Mavic 3, in the Mini 3 Pro, and in the Mavic 3 Classic
Master Shots Settings
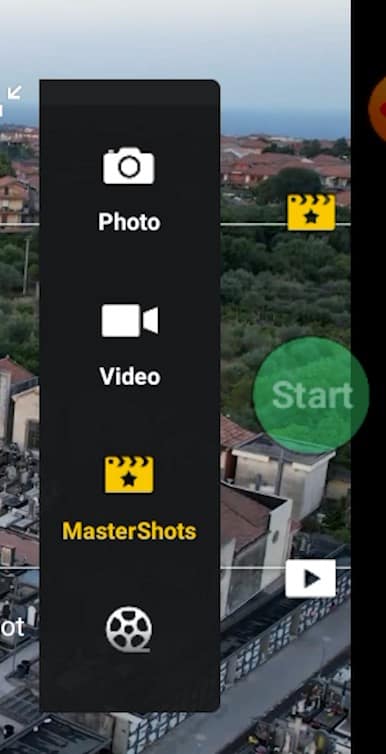
To enter the Master shot mode, tap on the video photo icon above the shutter. The icon for Mastershot is right under the one for video

After selecting Mastershots in the photo video menu, a target must be chosen by drawing a box around it. At the bottom of the screen, a rectangle shows the estimated flight time and a selection for three parameters: Width, Length, and Height, each of them can be set to Small, Medium or Large. In the bottom right part of the screen, the resolution of the video files can be chosen between 1080, 2.7k, and 4k

Best Practices for shooting Master Shots with the Air 2S
The Air 2S lacks lateral sensors, so for Master Shots, choose a wide-open location without obstacles, as it is hard to predict the movement of the aircraft. It is suggested to check that the Obstacle Avoidance Action on the Safety tab is set either to Bypass or Brake, for obvious reasons we don’t want it to be on Off

Master Shot with the Air 2S and Warning Zones
The first time I tried to shoot a master shot, this message appeared on the screen: “Flight route will reach maximum flight altitude. Lower aircraft altitude or adjust settings”. So I tried to modify all sorts of settings, the height of the drone, and the maximum flight in DJI Fly app, but I still kept receiving the same message

Master Shots with the Air 2S are not available when flying in a Warning zone. Warning zones don’t have to be confused with authorization or restricted zones. It is perfectly legal to fly within a warning zone and in fact, the flight of the aircraft is allowed by the geofencing system, while in restricted or authorization areas, the drone would not take off
This is probably a mistake in DJI Fly app that will probably be fixed by upcoming software upgrades
How to Expose Master Shot with the Air 2S
It is generally suggested to always shoot in manual mode, but in the case of Master shots, there will be plenty of moves with the camera alternating between pointing down and up, therefore with big changes in luminosity. So in this case auto exposure can be beneficial
Since the auto setting often tends to overexpose, it is preferable to lower the EV settings to protect the highlights and then eventually lift the shadows while editing

How to Do Master Shots with the Air 2S
After setting up the parameters, we can hit the shutter and get going. For a few seconds, the aircraft will orbit around the target in both directions making some calculations
Then it will perform a dronie by flying away while raising in altitude. Then a Circle move, followed by a Pitch Up plus fly forward, another Circle move but this time at a closer distance, and another one at a medium distance
Then a Rocket move, raising in altitude while maintaining the camera pointing at the target, followed by a forward motion with the camera pointing down until the target is right below the aircraft
Then it circles around the target still with a top-down view, then the camera point straight up while the drone descends, before pointing the camera straight down again, circling while descending for a famous screwdriver move
Just before the end of the Mastershot it performs a very interesting crane move, descending and keeping the camera on the target while going back to the starting position
How to Avoid Propellers in Master Shots with the Air 2S
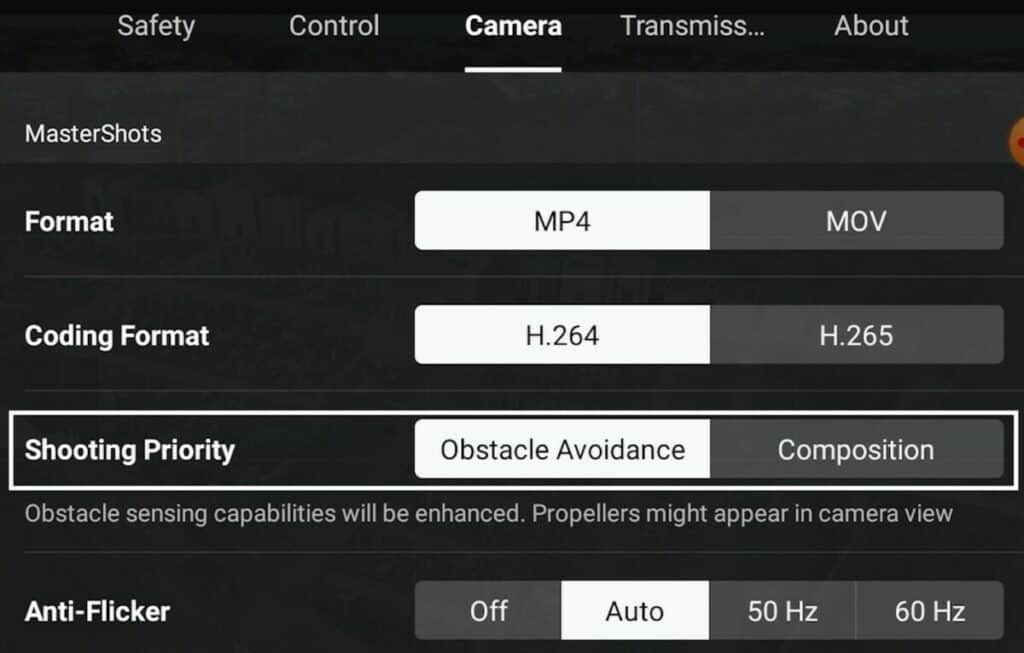
The Camera tab of the Settings is contest-sensitive, it contains options that apply only to Master Shots
There is a choice Shooting Priority, which by default is set to Obstacle Avoidance. The aircraft will prioritize safety: when circling, the gimbal will rotate the camera to the side as much as possible to avoid a sideways movement of the drone, so that the obstacle sensors work better. The trade-off is that this might bring the props into the shot

When choosing Composition during Master Shots with the Air 2S, the gimbal will behave normally and the propellers will not interfere with the lens. It is suggested to use this option only when there are no dangerous obstacles in the surroundings
Auto-Generated Mastershots with the Air 2S
The footage for MasterShots is stored on the drone, available in the Aircraft tag on DJI Fly app album. It is about 2 minutes long. By clicking on the star icon it can be downloaded and edited using pre-made templates. Several music tracks are available. The resulting short movie will be about 20 seconds long in 1080p resolution
Make sure you have enough free storage on your mobile device
